Quantcast
Channel: Profile Builder Archives - Cozmoslabs
Viewing all 116 articles
Browse latest View live

The Complete Guide to WooCommerce User Roles (2021)

$
0
0

Interested in how you can use WordPress and WooCommerce user roles to enhance your eCommerce store?

At a basic level, WooCommerce roles let you control what store admins and shoppers can do while on your WordPress site. For example, roles, and their companion capabilities, are what let store admins manage and edit products, but not your actual shoppers (who can’t even access the WordPress dashboard).

However, you can also use WooCommerce roles in more advanced ways to segment your shoppers into groups and even restrict certain users from buying/viewing your products or offer special discounts to certain classes of users.

In this post, we’re going to cover everything that you need to know about WordPress and WooCommerce user roles and capabilities:

What Are WordPress User Roles and Capabilities?

In order to help you understand WooCommerce user roles and capabilities, we’re first going to start by discussing roles and capabilities in a general WordPress sense.

In a nutshell, WordPress roles and capabilities let you control what registered users can do on your site. The two concepts are closely linked:

  • Capability – this is a single, specific action that a user can take. Examples of individual capabilities include “Publish blog posts”, “Install plugins”, “Disable plugins”, “Edit other users’ blog posts”.
  • Role – this is a collection of capabilities that you can assign to users.

For example, if you wanted to register an account for a blog writer on your site, you could assign their account the Author role. The author role would grant that user the individual capabilities to perform actions such as creating new posts, editing their own posts, uploading media files, publishing their own posts, etc.

By default, WordPress sites come with five roles:

  • Administrator – gives you every single capability. This is your default role if you’re the person who set up WordPress.
  • Editor – can publish/edit all the content on your site, even from other users.
  • Author – can publish/edit their own content, but not content from others.
  • Contributor – can add their own content, but cannot publish it to the live site.
  • Subscriber – has no special capabilities other than their user account.

For WordPress multisite networks, WordPress adds a sixth default role – Super Administrator. This is the administrator for the entire network, whereas the regular Administrator role can only control individual sites.

You can view a detailed comparison in the official WordPress roles vs. capabilities table.

What Are the Default WooCommerce Roles and Capabilities?

WooCommerce roles and capabilities follow the exact same concept, but are specific to WooCommerce stores.

These new capabilities include individual actions such as “View WooCommerce reports”, “Manage WooCommerce settings”, “Manage WooCommerce products”, “Add coupons”, etc.

To help you control these capabilities and organize your customers, WooCommerce also adds two more default roles to your site:

  • Customer – this is the default role for shoppers. Users are assigned this role when they register at checkout or via your store’s signup process. This role is roughly equivalent to the default Subscriber role, but it also gives shoppers the option to view their past/present orders.
  • Shop Manager – this is a useful role to give authorized users access to important backend WooCommerce processes without making them a full Administrator. They’ll be able to manage WooCommerce settings and products and view reports, but they won’t get the ability to install plugins and access other key Administrator tasks.

How to Create New Roles With a WooCommerce User Roles Plugin

Now, let’s move away from the theory and get into some actionable ways that you can use WooCommerce user roles on your store.

We’ll start at the beginning with how to create new custom WooCommerce user roles, complete with their own sets of custom capabilities if needed.

For example, let’s say your store has two types of customers:

  1. Retail customers
  2. Wholesale customers

To better organize these customers and also optimize the experiences for each type of customer, you might want to split them into two different user roles. So instead of just using the default “Customer” user role that WooCommerce uses, you could have separate “Retail Customer” and “Wholesale Customer” roles. In the next section, we’ll show you how you could automatically assign the proper role to each type of customer.

To create custom WooCommerce roles (or edit the existing ones), you can use the free Profile Builder plugin. In addition to letting you work with WordPress roles, it will also let you create custom user registration forms, which will come in handy in the next section.

To get started, install and activate the free Profile Builder plugin from WordPress.org. Then, here’s how to use it…

1. Activate Roles Editor Module

To enable the role editor, go to Profile Builder → Settings. Then, find the “Roles Editor” Activated drop-down and set it equal to Yes:

How to enable roles editor

2. Create, Clone, or Edit Roles

Once you’ve activated the roles editor module, you can go to Users → Roles Editor to edit your site’s existing roles or create new WooCommerce roles.

You should see the five default WordPress roles as well as the two roles that WooCommerce adds. You’ll also see a list of the number of capabilities that each role has.

You can either:

  1. Hover over an existing role to edit it.
  2. Hover over an existing role to clone it. This creates a new role that starts with all the same capabilities as the role you cloned.
  3. Click the Add New Role button to create a new role from scratch.

No matter which option you choose, you’ll end up in the same interface to manage capabilities.

For this example, let’s say you want to create a new Wholesale Customer role. The simplest way to get started would be to clone the existing Customer role:

The Profile Builder roles editor

3. Edit Role Capabilities

Now, you’ll be able to manage the individual capabilities for the role that you’re creating/editing.

The default “Customer” role has a single capability – “read”. By cloning that role, your new “Wholesale Customer” role will start off with that same capability:

Editing capabilities

If you wanted to add more capabilities, you could do that by searching for them in the box. For example, here you can see some of the many WooCommerce-related capabilities that you can add:

Adding new WooCommerce capabilities

For this example, you probably wouldn’t want to add any new capabilities to a “Wholesale Customer” role. However, you might have situations where it does make sense to grant new capabilities.

For example, you might want to create a more limited store manager role that can only edit products and not access other store settings.

Once you’re happy with how things look, click the Publish button to make your new role live.

Now, let’s talk about some of the ways that you can start assigning your new role to your store’s users.

How to Register Users for Your Custom WooCommerce User Roles

Once you’ve created your custom WooCommerce user roles, you can manually assign them to users by editing their profiles. With the Profile Builder plugin active, you’ll even be able to assign multiple roles to a single user (normally WordPress only lets you choose a single role):
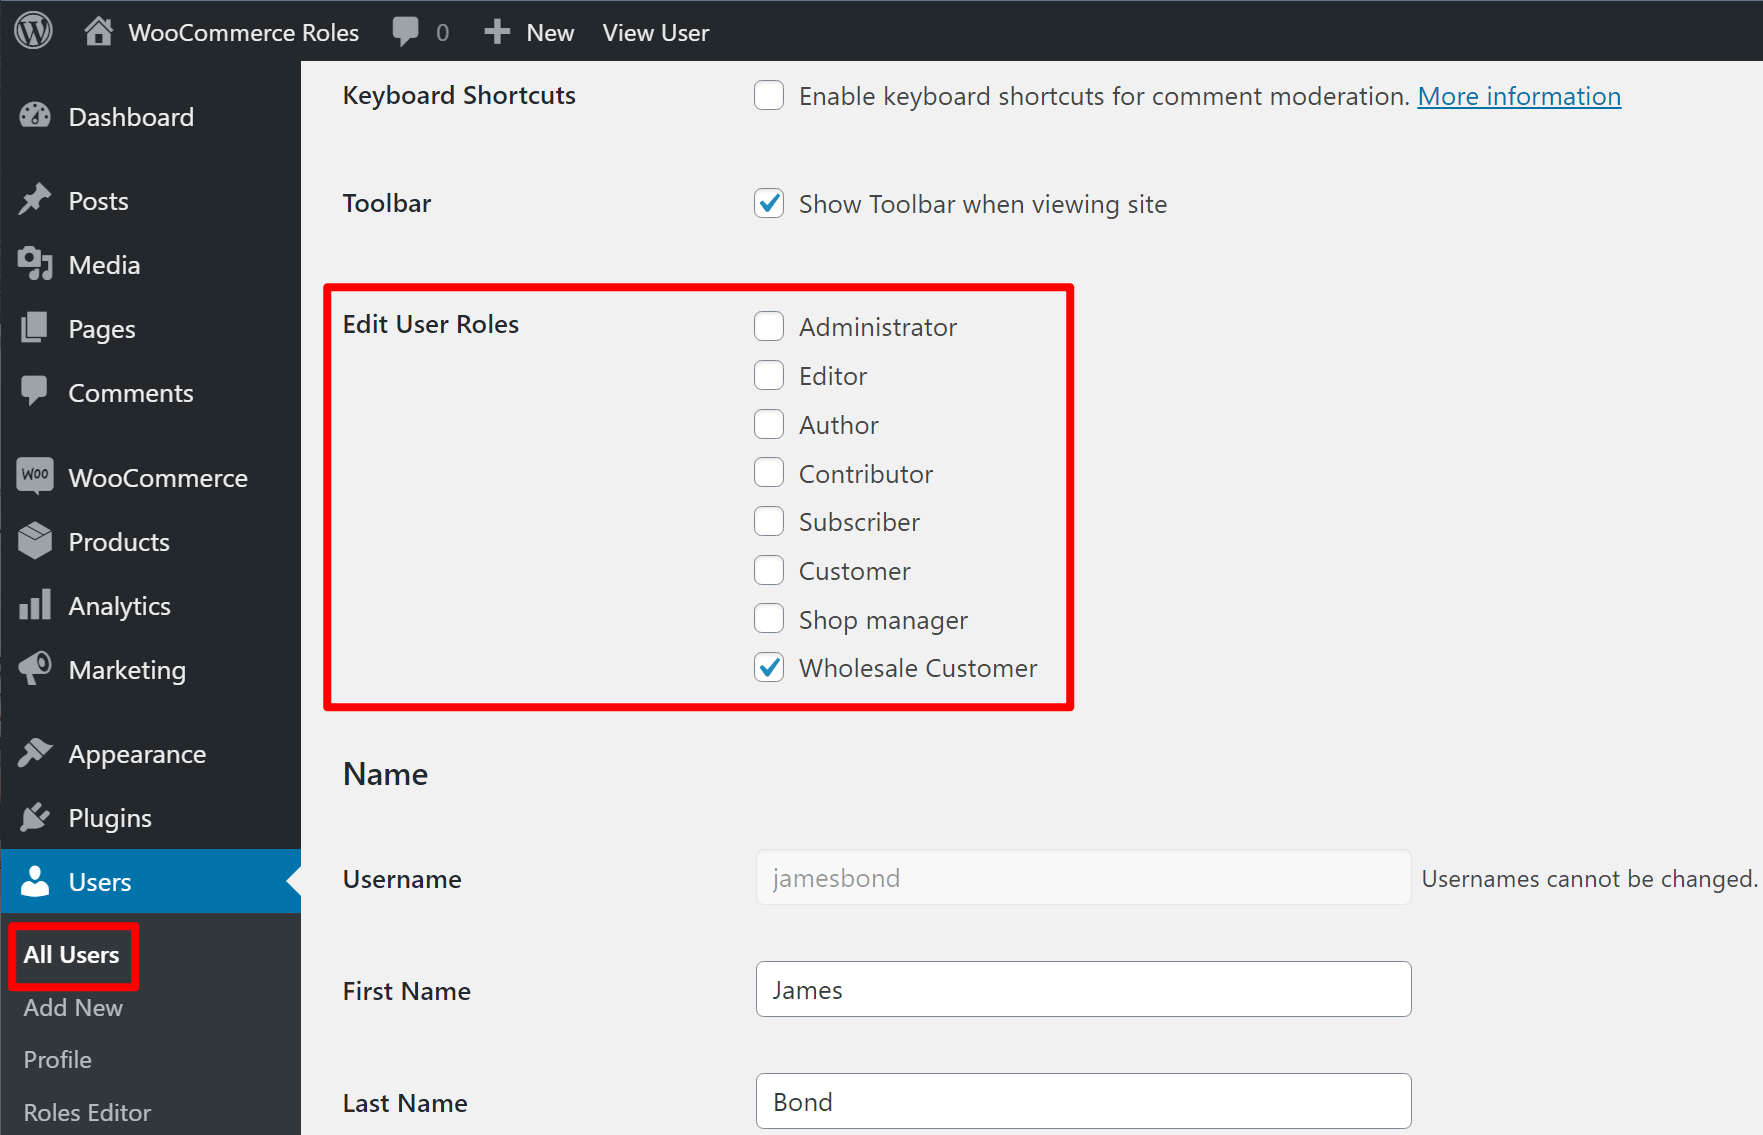
Editing WooCommerce roles

However, you’ll likely want a more automated solution than manually editing roles for each user.

Here, the Profile Builder plugin can help by letting you create custom user registration forms. You can then assign users to different roles based on the registration form they use or even how they answer a single registration form.

We’ll start by showing you a simple implementation that you can set up with the free version of Profile Builder. Then, we’ll showcase a more flexible use case that you can achieve with the premium version of Profile Builder.

Profile Builder Pro

The best WooCommerce user roles plugin to create/edit roles, create registration forms, and restrict access to products.

Get the plugin

Method 1: How to Create a Registration Form That Assigns Users to Role

With the free version of Profile Builder, you can create a single custom registration form.

Then, when you’re adding the shortcode for your Profile Builder registration form, add the “role” parameter to control the user role for people who use that form. For example, to add all people who submit a form to the Wholesale Customer role, you would use this shortcode:

[wppb-register role="wholesale_customer"]

To control the fields that display in your form, you can go to Profile Builder → Form Fields:

Custom registration form

Method 2: How to Let Users Choose Role and Require Admin Approval

With the premium version of Profile Builder, you can create a much more user-friendly form and also enhance your backend processes.

With this method, you can create a single unified registration form. On that form, users can choose whether they’re a retail customer or a wholesale customer. Then, if they choose the wholesale customer option, you can require manual admin approval for their account. You could also use conditional logic to show extra fields for wholesale customers.

Or, the premium version also lets you create multiple registration forms, which lets you create completely separate forms for each user role, each with different registration fields.

1. Create Form

To get started, go to Profile Builder → Form Fields.

First, you can edit the basic fields on your registration form. Then, to let users choose their WooCommerce role, you can add a Select (User Role) field:

Adding role select field

If you wanted to go further, you could optionally use conditional logic to add extra fields that only display if a user selects “Wholesale Customer”. For example, you could collect additional information about their business to verify their wholesale status:

Conditional logic

Now, when you add your custom registration form, users will have an option to choose their role:

Choosing WooCommerce roles on front-end

If they select “Wholesale Customer”, they’ll be prompted to enter additional information:

Extra fields

When users submit the form, they’ll be automatically added to the role that they selected.

2. Require Admin Approval (Optional)

You might have situations where you don’t want just anyone to be able to access a certain user role. For example, in our “Wholesale Customer” use case, you wouldn’t want to let just any user sign up as a wholesale customer without verification.

To adjust for this, the premium version of Profile Builder lets you require manual admin approval for certain roles. Users can still register for any role that you selected. However, if they choose a role that requires admin approval, their account won’t be active until you confirm it yourself.

To enable this feature, go to Profile Builder → Settings. Turn the admin approval feature on. Then, use the checkboxes to mark the specific roles for which you want to require admin approval:

Require admin approval for WooCommerce roles

How to Customize Your Store Using WooCommerce Roles

Once you’ve registered shoppers for your custom WooCommerce roles, let’s talk about some of the ways that you can customize and enhance your WooCommerce store based on those roles.

We’ll cover a few different scenarios:

  1. Restrict viewing WooCommerce products based on role to create a members-only store for some/all of your products
  2. Restrict purchasing WooCommerce products based on role
  3. Give special discounts to users based on role

1. Restrict Viewing Products Based on Role

In addition to helping you create custom WooCommerce roles and registration forms, Profile Builder can also help you restrict access to any content on your site by user role, including your WooCommerce products.

If you use this feature, only customers with specific WooCommerce roles will be able to see the products that you restrict.

To get started, go to Profile Builder → Settings → Content Restriction and enable the content restriction feature. In this settings area, you can also configure the message that users see if they don’t have permission to view a restricted product:

Configure restriction message

Next, edit the product that you want to restrict. Below the Product data box, you’ll find a new Profile Builder Content Restriction box.

Use the Display For setting to check Logged In Users. Then, choose which user role(s) should be able to see this product. If a shopper doesn’t have one of these roles, they’ll see the restriction message instead:

Restrict content based on WooCommerce roles

2. Restrict Purchasing Products Based on Role

With just the Profile Builder plugin, you can restrict access to who can view your WooCommerce products.

If you want even more control, though, you can add the Paid Member Subscriptions plugin, which integrates perfectly with all of the Profile Builder features that we’ve discussed so far.

With this plugin, you can restrict both viewing and/or purchasing. For example, you could make certain products visible to all users, but only purchasable by users with certain roles.

To set this up, you’ll need the $69 Hobbyist license for Paid Member Subscriptions to access its WooCommerce integration.

Create Subscription Plan for WooCommerce Role

To get started, you go to Paid Member Subscriptions → Subscription Plans → Add New to create a membership level. You can either make the plan free or charge for access. For example, you could charge a $50 setup fee for wholesale members.

Make sure to set the User role box equal to the custom user role you created above.

Create new level

Restrict Access to Products

Once you’ve created your subscription plan, edit a product that you want to restrict. You can use the Content Restriction metabox to control who can both view and/or purchase the product:

Restrict purchasing

3. Offer Special Discounts Based on Role

With the Paid Member Subscriptions plugin, you can also offer special discounts to certain WooCommerce user roles. For example, you could automatically give wholesale customers a 25% discount off the retail prices.

To get started, make sure that you’ve created a subscription plan per the instructions in the previous section.

Then, edit the subscription plan and use the Product Discounts box to add a discount for either individual products or entire categories of products:

Offer special discount for WooCommerce roles

You can also go to Paid Member Subscriptions → Settings → WooCommerce Integration to control important settings such as whether or not a user can stack role-specific discounts with general discounts (such as a coupon code) and whether the member discount is valid for sale products:

WooCommerce integration

Get Started With WooCommerce User Roles Today

WooCommerce roles are a useful tool to organize your users/shoppers and also control which actions they can perform.

One common use case would be to divide your customers into different groups – e.g. “Retail Customers” and “Wholesale Customers”. However, WooCommerce roles are quite flexible, so you can come up with your own use cases as well.

To create and customize your own roles, you can use the free Profile Builder plugin. Then, Profile Builder can also help you create custom registration forms that automatically add users to certain roles.

With the premium version of Profile Builder, you can let users select their own role (from a list that you choose), require admin approval for certain roles, use conditional logic, and more.

Once you’ve set up your role-based system, you can use your WooCommerce roles to customize your store, such as restricting access to certain products based on role, offering special discounts to certain roles, and more.

To get started with the best WooCommerce user roles plugin for everything from creating roles to registration forms and content restriction, purchase Profile Builder today.

Profile Builder Pro

The best WooCommerce user roles plugin to create/edit roles, create registration forms, and restrict access to products.

Get the plugin

The post The Complete Guide to WooCommerce User Roles (2021) appeared first on Cozmoslabs.


How to Setup WordPress Email Verification

$
0
0

There are numerous reasons why you might want to allow users to register for your website. However, the default login and registration forms that come with WordPress look outdated.

In addition to that, they aren’t easy to customize which means you can’t add or remove fields from the registration form unless you want to get your hands dirty with code.

Another problem with the standard WordPress registration is that it doesn’t do much to prevent spam and bot registrations out-of-the-box.

One of the ways to combat spam registration is to enable WordPress email verification. That’s precisely where the Profile Build Pro plugin comes in. The plugin has a free version that can be downloaded from the official repository. The free version has all the functionality you need to set up WordPress email verification.

There’s also a premium version of the plugin that comes with more advanced features such as custom redirects and email customization; to name a few.

In this tutorial, we’ll show you how to set up WordPress email verification to ensure your visitors entered a genuine email as well as to prevent spam registrations.

How to Build A Front-End Registration Form

The first step is to build a front-end registration form that will allow visitors to register for your website. This is the place where they will also be asked to insert an email address. Let’s go through this process, step-by-step.

Create Necessary Pages

Once you’ve purchase the Profile Builder Pro plugin, you can download the plugin files from your account area and save them on your computer in an easily accessible location.

Next, go to your WordPress website and log in to your dashboard. Install the Profile Builder Pro plugin by going to Plugins > Add new > Upload. Press the Choose file button and locate the zipped folder with the plugin’s contents on your computer. Press the Install button and once it’s installed, click on Activate.

You’ll be taken to the plugin’s dashboard where you create the login, registration, and edit profile pages with a single click. To do so, click on the Create Form Pages.

Creating form pages

The plugin will then create the necessary pages and take you to the Pages section where you can edit them as well as see how they look on the front-end of your website.

Customize the Registration Form with Fields

You can customize the registration form by removing or adding new fields to it. To do so, go to Profile Builder > Form Fields. You can then delete any of the form fields you don’t need as well as add those that are better suited for your website.

Adding extra fields to the registration form

For example, maybe you want to allow visitors to upload their own profile photo. In that case, you can add the Avatar field which will allow them to upload a photo they want to display on their profile.

Or maybe, you want to add GDPR consent boxes. Profile Builder makes it easy to do so and you can even add custom fields.

In any case, the one field you’ll want to add here is the Email Confirmation field. Customize it with your own text and ensure the visitors know they have to re-enter their email address to make sure they didn’t make a mistake in their email address.

Adding email verification field to the registration form

Redirect Default WordPress Registration and Login Pages

The last step is to redirect the default back-end WordPress registration and login to the front-end pages created with Profile Builder. This makes sure everyone trying to register or login for our website won’t go through the basic and not user friendly WordPress registration process and will be redirected to our custom front-end forms instead.

After this we can proceed to set up WordPress email verification and confirmation.

For this, you’ll need to redirect the default WordPress registration form to the registration form built with Profile Builder with the help of the Custom Redirects module. This is a premium module that’s available in the Pro version of the Profile Builder plugin.

Go to Profile Builder > Add-Ons and activate the Custom Redirects Module. Then, go to Profile Builder > Custom Redirects and scroll down to the section that allows you to redirect default WordPress posts and pages.

Enabling Custom Redirects

From the drop-down menu, select the default WordPress registration page and enter the URL for the registration page you’ve created with the Profile Builder Plugin. Click Add Entry. Then, repeat this process for the Login page.

Redirecting login and registration pages

Now that your form is customized and the default pages have been redirected, let’s set up email verification on the backend.

Setting Up WordPress Email Verification

The first thing you’ll want to do is go to Profile Builder > Settings and make sure that the Email Verification Activated is set to Yes. Save your changes. This will send a confirmation email to every user who registers on your website.

Enabling email activation

You’ll also want to set up an email confirmation landing page. This is where users will end up after they click the email confirmation link in the email.

You have a few options here. For example, you can set up a custom page with a simple confirmation message along with a link to login into their account.

Another option is to redirect them immediately to the login page so they can log in to their account and start editing their profile.

Keep in mind that if you don’t choose a page here, they will see the Profile Builder’s default email confirmation page. While this is not necessarily bad, it leaves your visitors hanging and unsure of what to do next.

As such, we recommend you set this to a custom confirmation page that welcomes them to your site. Use this page to tell them what the next steps are now that they have registered and confirmed their account.

Another thing to keep in mind is that you can change this page at any point in time. This is useful if you’re still working on your site and want to redirect your users to a temporary page.

When you’re done, click save changes. You can now test your registration form and ensure everything is working as it should.

Additional Registration Form Settings For WordPress Email Verification

There are a few extra registration form settings worth looking into that will help make your forms more secure.

Extra Form Settings

For starters, you can allow users to log in with their username, their email address or both. You can find this setting under Profile Builder > Settings > General.

Another setting you can change is to set the minimum password length. You can enter the minimum characters that the password should have. If you leave it empty, the password can be any length.

The last setting you can change to make your forms more secure is to set password strength. This will prevent users from entering weak passwords that are easy to guess and make it harder to hack their account.

Dealing With Unconfirmed Email Addresses

So now you know how to build a custom registration form, set up registration and login pages, and make sure WordPress email verification is in place to prevent spam registrations.

However, in some cases, your users might not immediately verify their email address. They might even email you to ask how they can access their profile and access the content they’ve registered for.

There are a few ways to go about this.

Manually Confirm Unverified Email Addresses

Option #1 is to manually confirm emails that were not verified. You can do this by going to Users > All Users. Then, click on the tab that says Users with Unconfirmed Email Address.

Confirming email manually

Hover over the user’s username and you’ll see the option to manually confirm their email address. You can also choose this option from the drop-down menu under Bulk Actions.

Once you click the option to Confirm email, you’ll see a popup asking you if you’re sure you want to confirm the email yourself. Click OK and the user’s email address will be confirmed instantly.

Manually confirming user emails is probably the easiest and quickest way to give registered users access to the website.

However, it can be time-consuming for you, especially if you get dozens or hundreds of new registrations each day. That’s where the second option comes in handy.

Resend Activation Emails

Another option is to resend activation emails. You can do this from the Users page by hovering over the username and clicking on the Resend Activation Email link.

Resending activation email

You’ll see a popup prompting you to confirm you really want to do this so press the OK button and the activation email will be automatically resent to their email address.

Alternatively, select the option to resend activation email from the drop-down menu under Bulk Actions. Press Apply and you’ll see a popup that will notify you the activation emails have been resent.

User Admin Approval

Before we wrap this tutorial up, there’s another option to consider. And that’s admin approval for who can be the user on your website. This step adds another layer of security and ensures that only legitimate users have registered for your site.

Admin approval

You can activate this under Profile Builder > Settings. Find the setting called “Admin Approval” Activated and ensure it’s set to Yes. Then, save your changes.

Once you’ve enabled this feature, you’ll be able to choose which user roles require admin approval upon registration and which user roles can register automatically.

The fastest way to approve users is to activate the Email Customizer module under Profile Builder > Add-Ons.

Once you’ve activated this module, go to Profile Builder > Settings > Email Customizer and click on the Administrator Emails tab.

Scroll down to the Registration With Admin Approval section and you’ll be able to customize the administrator emails to include the approval link. All you have to do is add the {{{approve_link}}} tag to the email.

Adding this will add an approval link you can click to directly approve the user registration. After you click the link, the user will be notified and be able to login to the website.

Set Up WordPress Email Verification On Your Site Today

Verifying users’ email addresses will help you prevent spam registrations as well as ensure that the users are registering with a genuine email address. Setting up WordPress email verification is easy with the Profile Builder plugin and it gives you more control over the registration forms.

In addition to that, it helps you maintain brand consistency and create modern-looking registration and login forms that match the rest of your website.

If you’ve been thinking about enabling user registrations on your website, give the Profile Builder plugin a try. If all you need is a simple way to setup WordPress verification emails and create branded registration and login pages, take advantage of the free version of Profile Builder plugin that’s available on the official repository.

But, if you want more advanced options, such as the ability to redirect users, customize the verification emails, add extra fields, and more; the Profile Builder Pro is the best choice. You can take it for a spin with a free demo, test the settings, and see the forms in action.

When you’re ready to purchase, choose your Profile Builder version and start customizing your registration and login pages. Good luck!

Profile Builder Pro

Create beautiful front-end registration and profile forms with custom fields. Setup member directories, custom redirects, cutomize user emails & more using the all in one user management plugin.

Get the plugin

The post How to Setup WordPress Email Verification appeared first on Cozmoslabs.

How To Create A WordPress Register Page & Boost Registrations

$
0
0

Before we get into the nitty-gritty of building a custom WordPress registration page, let’s quickly cover why make a WordPress register page.

There are a few reasons for putting your own stamp on the WordPress register page, probably the most obvious one, look and feel.

Standard WordPress Register Page

By default, the WordPress register page is well; it’s quite bland, no fault of WordPress, you understand, it’s perfectly serviceable and works, but it is limited to what it can do.

What if you wanted to collect more information from registrations? Maybe you’d like to get to know your users, ask them questions.

The other issue with the standard WordPress registration page, a lot of different websites will offer the same style. Which I’m sure you can agree doesn’t do much for managing your brand identity.

It could also be confusing to new users who decide to register. They came to sign up to billsawesomesite.com. Now they’re confronted with something completely different, to the uninitiated, this may put users off.

There’s no consistency, no flow, plus if a visitor is unsure, they could always click on the WordPress logo and be taken away from your website; what have you got?

A lost registration.

So What Can You Do to Boost Registrations for Your Website?

To boost registrations and, more importantly, reassure visitors, we’ll need to create a custom WordPress registration page. Matching the look and feel of your website.

Relax, grab a coffee/tea; we’re going to show you how to do just that, with an in-depth guide. Oh, and we promise, there’s no code needed for this.

What Information Do You Need to Capture From Your WordPress Registration Page?

Before you build your custom WordPress register page, ask yourself what information do you need to capture? Nobody wants to sit there and feel like they’re filling in a government form.

Tips for an effective WordPress Register Page:

  • Keep it simple, ask only for the information that will help you serve your new registrants.
  • Making the process easy for users is crucial; a lengthy registration page will see visitors bounce.
  • Redirect users from the default WordPress registration to your front-end custom register page. Remember, it’s a trust thing; a registration page should match your brand/website identity. It instills confidence and another way you can boost registrations.

In this example, we’re going to show you how to make a school’s custom registration page. Why? We need to have an example to show you the logic behind the process.

Installing and Setting up the Profile Builder Pro Plugin

For this tutorial we’ll be using the Profile Builder Pro plugin, which is an all in one user registration and profile plugin. It lets you setup beautiful front-end registration forms, populate them with a variety of fields and keep users from accessing the default WordPress registration by setting up proper redirects.

Profile Builder Pro

Create beautiful front-end registration and profile forms with custom fields. Setup member directories, custom redirects, cutomize user emails & more using the all in one user management plugin.

Get the plugin

First things first, let’s install Profile Builder Pro plugin to build our front-end registration form(s) for our students/teachers.

If you’d like to take the Profile Builder plugin for a spin, don’t forget we have a free version, so you can familiarize yourself before leaping into the premium version.

Installing Profile Builder Pro

Once you’ve purchased Profile Builder Pro, you can install it by navigating to Plugins > Add New, then click Upload Plugin. Drag and drop the plugin into the choose file box or click to search for it on your device.

Installation Complete What’s Next?

Once installed, you’ll see a new addition to your WordPress back end; see below:

Profile Builder Settings

You have two options here, automatically create the form’s pages, or if you’d prefer, you can use the following shortcodes:

  • [ wppb-login ] – for your login page.
  • [ wppb-register ] – houses your registration form.
  • [ wppb-edit-profile ] – allow users to edit their user profile.

We’ll concentrate on the registration side of things for this tutorial, so let’s build our first form. This form will be for students to register on the site.

We’re going to hold fire on creating the pages, for the time being, there are a few things we need to take care of first.

Creating A User Role For Students

Out of the box, WordPress comes with a selection of user roles. To create our form, first, we’ll need to create a custom user role for students.

Since Profile Builder allows us to assign users with a certain role at registration, it might make sense to set one up. This way we can also give different user roles different permissions on our website.

Heading over to settings in Profile Builder, and enable the “Roles Editor” option as below:

Creating A User Role For Students

Once activated, click the link shown above-called Users > Role Editor.

Adding a new user role is straightforward; all we want our students to do is read content, things like class timetables, updates from the school, and sudden changes to the curriculum.

To do this, head on over to the role editor and click Add New Role as shown below:

Add New Role for your custom WordPress registration page

Next, we’ll need to set up the role for student; see the screenshot below for how this works; role capability wise, we’ve gone with the basics, Read, which is the same as the subscriber role:

Student role created for our WordPress register page

Creating A User Role For Teachers

Using the same process outlined above, we can create a role for teachers; teachers may need more privileges such as posting articles and so forth; using the Role Editor, you can do this easily:

Teacher Role Created for our WordPress register page

Hide the Admin Bar for Students, Show For Teachers

Once you’ve created the user role, head over to Settings in Profile Builder Pro, click on the Admin Bar, and hide/show as below:

Hide admin bar from students show for teachers

Hiding the admin bar based on the student role keeps things simple for them, they don’t need to see it, and we don’t want to confuse them by showing it.

For teachers, showing the admin bar makes sense; they may need to add content to the site or perform administrative tasks.

Setting up Multiple WordPress Registration Forms

As Profile Builder Pro is modular by design, you can activate only the features you require for your site. In this instance, we’ll use an add-on called, Multiple Registration Forms.

To access add-ons for Profile Builder Pro, click Add-ons in the Profile Builder menu, and activate.

Multiple registration fields add-on for our WordPress register page

This Pro add-on will allow you to set up multiple registration forms with fields for specific user roles. Precisely what we need for our student and teacher WordPress register page(s).

We’ll create two different registration forms, populate them with different fields, one for each role: student & teacher.

Creating Custom Registration Fields for Students

Profile Builder Pro has 13 default fields upon installation, designed to get you started up quickly. To access the fields in the Profile Builder Menu, click on Form Fields.

Form fields for our WordPress register page

Three of the fields cannot be deleted (as highlighted) as WordPress requires them to process new user registrations.

Registration Information for Students

Earlier, we discussed the need to keep the forms simple, as not to put users off. So thinking about this, here’s the information we need from our students:

  • Username? (Maybe not!)
  • First Name
  • Last Name
  • Email
  • Student ID number
  • Teachers (allow students to choose multiple)
  • Emergency Contact (text area)
  • Avatar (image upload)
  • Password
  • Reconfirm Password

Removing the Username Field

As this is a student form, it might be prudent not to allow them to choose something that could come back and haunt them later!

To achieve this, head to the General Settings Tab in Profile Builder and change the following option to Email:

Stop Username from showing in Profile Builder Pro

Doing this prevents the Username from being shown on the front-end, and it’s one less field to hinder our students:

Username begone for WordPress register page

Adding Fields for Students

The creation of form fields is located in the Profile Builder menu under Form Fields. It’s here you can add as many as you require—all with various settings available.

A quick click in the field selector box will display the available fields you can utilize, and there are 46 available options. You’ll find any form field type needed in this list:

Form Field types

In this particular case, we’re utilizing the following fields the field name is in brackets:

  • First Name – ( Default – First Name )
  • Last Name – ( Default – Last Name )
  • Email – ( Default – E-mail )
  • Student ID number – ( Number )
  • Teacher – ( Checkbox )
  • Emergency Contact – ( Textarea )
  • Avatar – ( Avatar )
  • Password – ( Default – Password )
  • Reconfirm Password – ( Default – Repeat Password )

Creating the Student Registration Form

As we have the Multiple Registration Forms add-on installed and activated, we need to create one for our students.

In the Profile Builder, select Registration Forms, and not unlike WordPress blog posts, we’ll need to give our form a title:

Adding a custom registration form

As you can see from the above image, we’ve named our form Student Registration. There are a few more options available here, such as:

  • Set Role, we’ve defined the user role for this as Student, thanks to the Role Editor add-on.
  • Automatically Log in, set to yes to eliminate the username issue for students entering silly names!
  • Redirect, an excellent feature and one our customers love. Using this option, you can redirect (once a user has logged in, to a page of your choosing!).
  • Display Messages, you can select how long you’d like a success message to display in seconds.
  • URL, in our example, we’re redirecting to a page dedicated for students.

Further down the Registration Form page, you can choose from the fields created in the Form Fields settings:

Choosing form fields

If you’re not happy with the order of your fields, you can change the order by simply dragging and dropping:

Change position of fields

Once you’ve published the form, don’t forget the Form Shortcode, located on the right-hand side of the page:

Form Shortcode

Copying the shortcode: [ wppb-register form_name=”student-registration” ] from the prompt, we now need to add it into a page.

How Does the WordPress Register Page Look on the Front End?

Pasting the shortcode into a page of your choice, this is how it looks:

Custom WordPress registration from on front end

You’ll notice we’ve added a description to the Student ID number and various other fields from the screenshot. This helps clear up any confusion as to what a specific field needs.

Also, fields marked with * are required, so the form will not process unless all the available fields are completed; this is as simple as clicking on a checkbox when creating a Form Field.
In terms of styling each form inherits the style of your theme and Profile Builder offers several ways for you to style your forms.

Redirect Default WP Registration to your Custom WordPress Register Page

It’s all very well creating a custom WordPress registration page, totally pointless if the standard register page is still accessible, so what can you do to correct this?

It’s an easy fix by using the Profile Builder add-on called Custom Redirects:

Activate Custom Redirects custom WordPress register page

Once the add-on is activated, you’ll see a new addition to the Profile Builder menu called Custom Redirects.

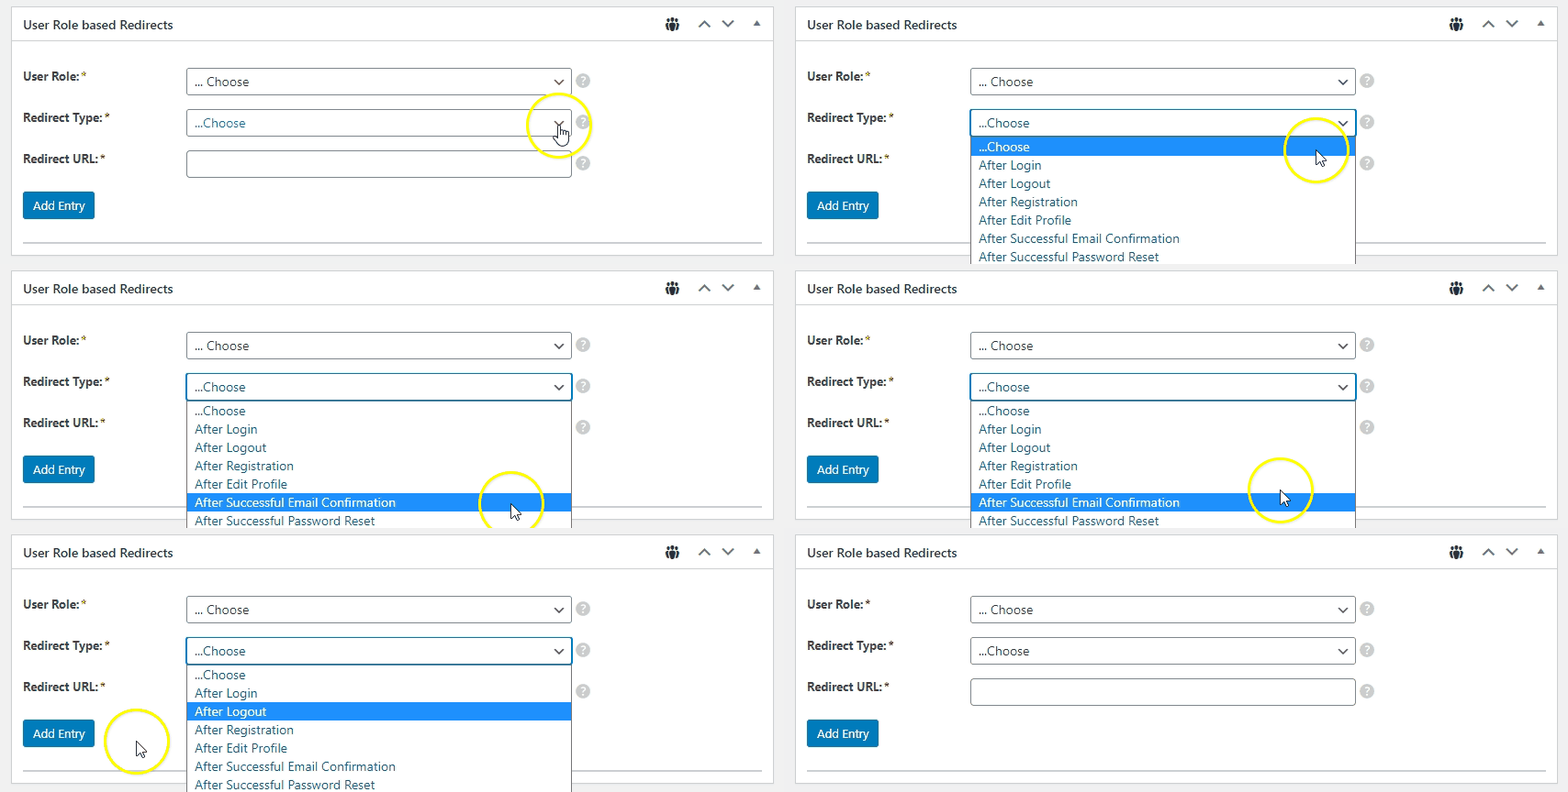
Accessing the Custom Redirects options, you’ll see four individual sections to add redirects:

Custom redirects for custom registration pages

Individual User Redirects, this option allows you to set a redirect at a personal level. Here you can set a User ID or Username that this custom redirect will point to.

User Role based Redirects, here we can redirect students to a specific registration page based on their user role and the same for teachers by clicking on Add Entry.

Global Redirects, if you’d like to set a site-wide redirect, you can add an entry here, and all login attempts will redirect to specific URL(s) of your choosing.

The previously mentioned redirect options all have the same Redirect Types:

Criteria

Using various methods, you can redirect students to URLs of your choosing based on multiple criteria, for example:

Student registers > redirect to mysite.com/welcome/
A student logs in > redirect to mysite.com/latest-news/

The possibilities are endless in terms of redirections.

For more information on Custom Redirects, along with how to use tags for dynamic URLs and more, please view our detailed guide covering everything you need to know.

Strengthening Passwords for Students

Back to the passwords for our students, as it stands, our password field could do with strengthening, to protect students, and of course, to prevent misuse.

To enforce strong passwords in Profile Builder, click Settings; in the General setting tab, scroll down till you see the following fields:

WordPress register page and setting strong passwords

Here you can set a Minimum Password Length (enter a numerical value) and the Minimum Password Strength; in our instance, we have it set to strong.

Let’s revisit the front-end and see what happens by setting these options.

Filling in the form details, we’ve deliberately entered a password of abc123456 and re-entered the same in the repeat password field, and this is what happens:

Password strength

Once the form is submitted, a message displays, requiring the user to use a stronger password for security.

Better for our students and security in general.

What About A WordPress Register Form For Teachers?

If you’ve come this far, then using the same methods as outlined previously, you can create a form for teachers and a registration form for them. Redirect them to a teachers hub and show them the WordPress admin bar for adding content.

And, of course, create a custom WordPress registration page, specifically for teachers.

Restricting Page/Post Content to Only Be Viewable to Students

The last thing we want to show you is restricting content. After all, all this is for nothing if everyone can see your content; we only wish for specific posts/pages to display to students. Nothing more.

Restricting content on pages/posts is straightforward; all you need to do is head on over to Settings then the Content Restriction tab:

Content Restriction

Enable Content Restriction, select yes from the drop-down menu; you have two options when it comes to the Type of Restriction:

  • Message, this option will display the Message for logged-out users; in the editor, you can define a message to show to students, along with a link to point to or whatever you need.
  • Redirect, choosing this option means you can specify a URL to redirect users to the post/page that restricts content.

Further down the settings page, we can define a few more options:

Restricting content for logged out users

  • Message for logged-in users, here you can create a Message for logged-in users using the editor.
  • Restricted Posts Preview, choose from none, or show the first (numerical value input) words of the post/page content. Or insert a read more tag in a post/page and only display the content above the tag.

Page/Post Restriction Settings

In this example, we’re using the block editor; Profile Builder Pro works in the classic editor too, so no need to worry.

Settings in page or post for restricting content

Here we can create a Class Timetable page and restrict it to only being viewable to students and teachers.

Via a couple of checkboxes, you can set access for designated roles.

If you’d like to override the custom message, you can Enable Custom Messages and fill in descriptions for logged out users and logged in users.

Wrapping Things Up

Hopefully, we’ve demonstrated the flexibility you have in creating a custom WordPress register page using Profile Builder Pro. While this example is for students/teachers, you could use the tools featured above to setup any type of registration form and collect the information you need from your users.

Creating beautiful front-end forms that integrate with your site and brand, while keeping users from accessing the default WP registration, will have a positive effect on boosting registrations.

Profile Builder Pro

Interested in finding out more about Profile Builder Pro? Make sure to checkout the full suite of features Profile Builder Pro provides offers below:

Get the plugin

The post How To Create A WordPress Register Page & Boost Registrations appeared first on Cozmoslabs.

How to Create an Elementor Register Form for Free (and Customize It)

$
0
0

Searching for the best way to create your own custom Elementor register form or page?

With its drag-and-drop design and array of style options, Elementor makes it super easy to create your own custom registration page to replace the drab default WordPress design.

But while Elementor nails the design part, you still need a solution to create the actual register form that adds users to WordPress and stores information about them.

Elementor Pro does include its own registration form widget, but we’re going to show you an even better method in this tutorial using the free version of the Profile Builder plugin.

Customizing the Elementor register form widget

Here’s why we think Profile Builder is the best Elementor register form plugin:

  1. It’s free, so you can create a custom Elementor register page even if you’re just using the free version of Elementor.
  2. Profile Builder adds its own dedicated Elementor widget, so you’ll be able to style your form using all of the regular Elementor settings and do all of the styling without leaving Elementor.
  3. It gives you more control over the form fields on your registration form, including advanced tactics like conditional logic and repeater fields that the Elementor Pro widget doesn’t offer. Basically, it’s a lot easier to collect additional information from your users.
  4. It allows for more customization of backend processes, such as adding users to different user roles based on how they answered the form and holding certain user roles for manual admin approval

So – whether you’re using the free version of Elementor or Elementor Pro, the plugin that we’ll use in this tutorial still has advantages for you.

Keep reading to learn how it works…

What You Need to Create an Elementor Register Form for Free

To follow this tutorial, all you need is the free version of the Profile Builder plugin.

Profile Builder is a full user registration and profile plugin, which means it can handle forms for:

  • Registration
  • Login
  • Edit profile

For your registration forms, you’ll be able to control which fields should appear (including adding custom fields with the premium version), link your registration forms to different user roles, and more.

To help you use these features in Elementor, Profile Builder includes dedicated Elementor widgets, rather than forcing you to use a shortcode like a lot of other plugins.

The benefit of this native Elementor approach is that you’ll be able to use all of Elementor’s style and layout rules to control how your registration form looks.

We’ll start by showing you how to use the free version of Profile Builder to create your own custom Elementor register page. Then, we’ll also share some of the more advanced features that you get access to if you upgrade to the premium version of Profile Builder.

Profile Builder Pro

The best plugin to create a custom Elementor register form.

Get the plugin

How to Create a Custom Register Form in Elementor With Profile Builder

Now, let’s get into the step-by-step tutorial. Here’s a high-level view of how it works, and then we’ll take you through every step below:

  • Set up the fields on your registration form from the Profile Builder interface.
  • Add the dedicated registration form widget in the Elementor interface.
  • Use Elementor’s style and layout rules to control how your registration form looks.

To begin, make sure to install and activate the free version of Profile Builder from WordPress.org. Then, here’s how to set it up…

1. Create Your Registration Form

You’ll be able to style your registration form in the Elementor interface. But before you get to that point, you first need to configure your form itself, such as which form fields to include on your registration form and any headings/instructions you want to include.

To set this up, go to Profile Builder → Form Fields.

Here, you can:

  • Add new fields to collect additional information about your users.
  • Rearrange the fields using drag-and-drop.
  • Remove fields (you must have at least the fields for username, email, and a single password field, but you can remove everything else if desired).

Edit form fields

You can add new fields by using the drop-down at the top.

The free version of Profile Builder supports all of the native WordPress user profile fields, including some extra fields for reCAPTCHA, selecting user role, GDPR, and more:

Add new fields

If you upgrade to the premium version, you’ll also be able to add your own custom fields using a ton of different field types including text, text area, checkmark, radio button, drop-down, etc. We’ll cover this in more depth later on.

When you add a new field, you’ll be able to further customize it, such as changing the field title and marking whether or not it’s required:

Edit a specific field

When you’re happy with the fields in your registration form, you’re ready to embed it in Elementor and style it using Elementor’s style options.

2. Add Registration Form to Elementor

Next, open the Elementor editor for the post or page where you want to add your custom registration form.

If you want to add any content beyond your registration form (e.g. headings, text, images, etc.) you can go ahead and do that now using Elementor’s widgets.

When you’re ready to add your registration form, scroll down to the Profile Builder Forms section in the Elementor widget list and drag over the Register form:

The Profile Builder Elementor register form widget

In the registration form widget’s settings, you’ll be able to make a few important choices:

  • Form – if you upgrade to the premium version of Profile Builder, you can create unlimited custom registration forms. The free version only supports one form, though, so you’ll just leave this as the default if you’re using the free version.
  • Assigned Role – choose which WordPress user role to assign to users who register through this form. If you’re not sure what roles are, you can check out our full post on WordPress user roles.
  • Automatic Login – choose whether you want to automatically log in users after they register via this form.
  • Redirects – you can automatically redirect users to a custom page after they register

Customizing the Elementor register form widget

3. Style Your Registration Form Using Elementor

Because Profile Builder adds its own custom registration widget, you’re able to style your registration form using all of Elementor’s native style options. You can access these settings from the Style tab, just like you’d style any other Elementor widget.

You’ll get a full set of style options for each element/field in your registration form, so you can customize every element in your form as needed:

Styling options

You’ll also be able to style the button and the checkboxes. For example, you can see that we’ve changed the button color and made it full-width:

Example of styling options

You can also go to the Advanced tab to access custom spacing, Elementor Motion Effects, and all of the other usual options that Elementor gives you.

And that’s it! You just created your very own custom Elementor register form. However, Profile Builder can do a lot more than just this use case, so let’s keep looking at some of the other things you can do with both the free version and premium versions of Profile Builder.

4. Create a Custom Elementor Login Form or Password Recovery Form (Optional)

Profile Builder isn’t just for registration forms! It also gives you Elementor widgets to add a login form and/or a password recovery form.

You can use these widgets just like the Register widget:

Custom elementor login form

5. Create a Custom Elementor Edit Profile Form (Optional)

As you saw in the screenshots above, Profile Builder also gives you a dedicated Edit Profile widget for Elementor. You can add this widget anywhere on your site to create a front-end profile area and give users the ability to edit all of the fields on your register form:

Elementor edit profile widget

If you upgrade to the premium version of Profile Builder, you’ll also be able to create unique edit profile forms that include different fields from your registration form.

6. Restrict Access to Elementor Widgets

In addition to the dedicated Profile Builder Elementor widgets, Profile Builder also includes another Elementor integration that lets you restrict access to Elementor sections, columns, or widgets based on a user’s logged-in status or user role.

You can find these options in the Advanced tab of any section, column, or widget – just look for the Profile Builder Content Restriction section:

Elementor content restriction

Upgrade to Profile Builder Pro for More Features

So far, everything that we’ve shown you is available in the free version of Profile Builder at WordPress.org.

However, there are a few unique options in the premium version that you can use to further enhance your Elementor registration forms – let’s go through them…

Access More Field Types

The free version of Profile Builder lets you add all of the native WordPress profile fields, but the premium version extends that with the ability to add your own custom fields using a variety of different field types:

Custom fields

This lets you collect and store much more information about users who register for your site.

Create Multiple Unique Registration Forms

The free version of Profile Builder lets you create a single custom registration form, but the premium version lets you create unlimited registration forms, each with their own unique sets of form fields and settings.

For example, if you have an online course marketplace, you could create one registration form for students and another for instructors.

Create Custom WooCommerce Registration Forms With Elementor

With the premium version, you get access to the WooCommerce Sync add-on so that you can create custom WooCommerce registration forms in Elementor.

The WooCommerce Sync add-on gives you new fields that sync with the WooCommerce billing and shipping information that you can use in your Elementor registration forms.

Use Conditional Logic in Your Registration Forms

In addition to more field types, the premium version also lets you use conditional logic in your Elementor registration forms so that you can display different sets of registration fields based on how a user answered previous questions in your form.

For example, you could ask users whether they want to be listed in the public directory. If they answer yes, you could collect additional information about them:

Conditional logic

Use Repeater Fields in Your Registration Forms

Another advanced field type that you get is the ability to use repeater fields in your Elementor registration form. For example, if you wanted to ask a user to list their education experience, you could add a repeater field that lets them add a new entry for each piece of their education history.

Inside the repeater field, you’ll be able to specify one or more fields that will repeat:

Repeater fields

Require Admin Approval for Elementor Registration Forms

With the premium version, Profile Builder lets you hold some/all of your new users for manual admin approval before they can start using their accounts.

You can enable admin approval by going to Profile Builder → Settings. You can either require admin approval for all new users or you can pick and choose certain user roles:

Hold users for admin approval on Elementor register form

Create Custom Elementor Edit Profile Forms

With the free version, Profile Builder lets you create an Elementor edit profile form where users can edit all of the fields from the registration form.

With the premium version, though, you can pick and choose which fields are available so that users can only edit certain parts of their profiles.

Create Your Custom Elementor Register Page Today

With Profile Builder, you can create your own custom register form in Elementor without Elementor Pro. And even if you do have Elementor Pro and its registration form widget, Profile Builder also gives you more flexibility (especially with its premium version) because Profile Builder…

  • Gives you more control over the form fields in your registration form, including letting you add your own custom fields. You’ll also get advanced features like conditional logic and repeater fields.
  • Lets you create multiple Elementor registration forms, each with unique fields and settings.
  • Integrates with WooCommerce for Elementor WooCommerce registration forms.
  • Offers new backend features, such as requiring manual admin approval for certain user roles.

To create your form for free, install the free version of Profile Builder from WordPress.org today. Then, upgrade to the premium version to get access to custom fields, conditional logic, unlimited registration forms, and more.

Profile Builder Pro

The best plugin to create a custom Elementor register form.

Get the plugin

The post How to Create an Elementor Register Form for Free (and Customize It) appeared first on Cozmoslabs.

WooCommerce User Registration: Full Customization Guide (2021)

$
0
0

Searching for a solution to customize how WooCommerce user registration works at your store?

For example, your store might need to collect more information from users during registration, which isn’t something WooCommerce lets you do by default.

Thankfully, you can easily customize how it works using a dedicated WooCommerce user registration plugin, which is what we’re going to show you how to do in this guide.

By the end of this post, here’s everything that you’ll be able to do:

  • Replace the default WooCommerce user registration forms with your own custom forms.
  • Extend your custom WooCommerce registration forms with as many custom fields as needed, including conditionally displaying certain fields and using repeater fields.
  • Add custom fields to the WooCommerce checkout page.
  • Create multiple different WooCommerce registration forms, including adding users to different WooCommerce roles based on the form they chose.
  • Create custom edit profile forms in the WooCommerce “My Account” area so that users can edit the information on your custom registration forms.

Basically, you’ll be able to create a 100% custom WooCommerce user registration system and make it as complex or as simple as you need.

Let’s dig in!

Examples of a Custom WooCommerce Registration System

Before we get into the how-to, let’s go over a few examples of the types of modifications that you’ll be able to make by following this tutorial.

Customize Registration Form on “My Account” Page

The default WooCommerce registration form on the “My Account” page looks something like this:

default WooCommerce registration

By following this tutorial, you’ll be able to replace it with a completely custom form that includes as many fields as needed – you can even add unlimited custom fields to collect additional information:

New WooCommerce registration form

Add Custom Fields to WooCommerce Checkout Registration

The default registration form on the WooCommerce checkout page looks something like this:

WooCommerce registration at checkout

By following this tutorial, you’ll be able to add as many new fields as needed. You can even use advanced tactics like conditional logic and repeater fields to still keep your checkout registration forms short while still collecting all of the information that you need:

New custom registration form on checkout

You can also use different sets of fields on the “My Account” page and checkout page registration forms.

Finally, if you want to go beyond the default WooCommerce registration system, you can also add your own custom registration forms anywhere on your site.

What You’ll Use to Customize WooCommerce Registration

To customize the WooCommerce registration process, you’ll need the help of a dedicated WooCommerce user registration plugin. Specifically, you need the Profile Builder plugin.

Profile Builder is a full-service WooCommerce registration and user profile plugin that has a dedicated integration with WooCommerce.

While the basic Profile Builder plugin is available for free at WordPress.org, you’ll need the premium version to access the WooCommerce Sync add-on. WooCommerce Sync lets you sync your custom registration forms with WooCommerce fields, such as shipping and billing fields. It also lets you replace parts of the default WooCommerce registration system with your own custom system.

To access this integration, you’ll need to purchase the Hobbyist plan. To access some other advanced features such as repeater fields, you’ll need the Pro license.

Overall, you can follow 90%+ of this tutorial using just the Hobbyist license and we’ll be sure to note which features require the Pro license.

Profile Builder Pro

The best WooCommerce user registration plugin

Get the plugin

How to Customize WooCommerce User Registration Using Profile Builder

Now, let’s get into the step-by-step tutorial part of our post and we’ll show you how to use the Profile Builder WooCommerce user registration plugin to customize your setup.

To follow this tutorial, the only things that we’ll assume are that:

  1. You already have a working WooCommerce store.
  2. You’ve installed and activated both the Profile Builder plugin and the WooCommerce Sync add-on. Again, you can get access to the WooCommerce Sync add-on by purchasing at least the Hobbyist license.

Let’s dig in!

1. Set Up Basic WooCommerce Registration Behavior

Before you can start customizing the WooCommerce registration process, you’ll first want to make sure you’ve properly configured WooCommerce to achieve the registration behavior that you want.

For example, do you want users to be able to register for an account from the checkout page? And if so, do you want to force them to register for an account or do you want to still give them the option of checking out as a guest?

To make these choices, go to WooCommerce → Settings → Accounts & Privacy. In this area, you’ll be looking at the Guest checkout and Account creation settings, which are both located at the top.

In the Guest checkout settings, you can choose whether or not shoppers should be able to place an order without an account. If you uncheck the box, shoppers will be forced to register before they can check out.

Second, you can use the Account creation settings to control where/when shoppers can register. For this tutorial, we recommend allowing users to register on both the checkout and “My Account” pages, but you can disable certain locations if you prefer. You could even disable both options and force users to register via a custom form that you place somewhere else (you’ll learn how to create this form in a second).

In the next steps, we’ll show you how to customize the registration forms/fields that appear in both of those locations.

If you’re not sure where to start, we recommend the following configuration as a good basic setup to follow this tutorial, though you can adjust things if needed:

How to customize WooCommerce user registration

2. Customize Your WooCommerce Registration Form

Now, you’re ready to create the custom registration form that you’ll use to replace the default WooCommerce user registration form.

To do this, go to Profile Builder → Form Fields.

Here, you’ll be able to choose exactly which fields to include on the WooCommerce registration form. You can use:

  • Default WordPress fields – for example, “Email”, “Name”, “Password”, etc.
  • Default WooCommerce fields – you can add dedicated fields for “Billing Address” and “Shipping Address” that sync with WooCommerce.
  • Custom fields – you can add your own custom fields to collect whatever information you want. You can choose from a variety of field types including text, drop-down, file upload, checkbox, and more.

Types of fields

By default, Profile Builder will have already added the bare minimum that you need for a WooCommerce registration form. That is, essential fields like “Email”, “Billing Address”, and “Shipping Address”.

You can use drag-and-drop to rearrange the order of all the existing fields. You can also click the Edit option next to a field to edit its settings and the Delete option to remove a field:

Editing a field

To add your own custom fields, use the Field drop-down at the top to choose the type of field that you want to add:

Add custom fields

For example, here we’ve added some additional fields that let shoppers choose whether they’re a wholesale or retail customer. With the Select (User Role) field, you can even register shoppers as different WooCommerce user roles depending on how they answer – check out our post on WooCommerce user roles to learn why this is useful:

Custom fields example

You can add whatever field types you want and however many fields you need. For each field, you’ll also be able to choose whether it’s required as well as other options.

Advanced: Use Conditional Logic

One of the advanced features Profile Builder gives you is conditional logic. With conditional logic, you can choose to show/hide certain WooCommerce registration fields based on how a user has answered previous fields.

For example, you could set it up so that a user needs to enter some additional information if they mark themselves as a wholesale customer.

In this configuration, the user will only need to enter their business phone number if they indicate that they’re a wholesale customer on the registration form:

conditional logic example

Advanced: Add Repeater Fields

Another advanced feature that Profile Builder gives you is the ability to use repeater fields in your WooCommerce registration forms.

Repeater fields let you give users the option to enter the same information multiple times. For example, if you’re selling to wholesale customers and you want to give customers the option to add multiple contact people for the account, you could create a repeater field that lets users add as many names and phone numbers as needed.

You can even display repeater fields on the WooCommerce checkout, which opens up a lot of possibilities.

To learn how it works, check out our guide on repeater fields in Profile Builder.

Note – you’ll need to purchase the Pro plan to access repeater fields.

3. Replace the “My Account” Registration Form With Your Custom Form

Once you’ve created your custom WooCommerce registration form, the next step is to use it to replace the default WooCommerce forms.

In this section, you can replace the default WooCommerce registration form on the “My Account” page with your own custom form.

For reference, here’s what the default form looks like:

default WooCommerce registration

To replace this form with your own, go to Profile Builder → WooCommerce Sync. Then, use the Choose Register form to display on My Account page drop-down and change it from None to Default Register:

Add your custom registration form

Now, users will see your custom registration form when they go to the “My Account” page (as long as they aren’t already logged in):

New WooCommerce registration form

4. Add Custom User Registration Fields for WooCommerce Checkout

At this point, you’ve replaced the WooCommerce registration form on the “My Account” page with your own custom form. However, if users register during checkout, they’ll still see the default WooCommerce registration form – it looks like this:

Checkout registration

We’re going to fix that in this step…

Because you might not want to use the same registration form on your checkout page, Profile Builder lets you choose which individual fields you want to display on the checkout.

You could use all of the registration fields to create the exact same registration form…or you could leave out some nonessential fields to shorten your form and reduce friction during the checkout process – you can choose whichever approach best fits your needs.

To make these choices, go back Profile Builder → Form Fields. Then, edit one of the form fields that you want to include on the WooCommerce checkout and set the Display on WooCommerce Checkout drop-down equal to Yes:

Enabling a field on WooCommerce checkout

Then, just repeat the process for as many fields as you want to include on the WooCommerce checkout registration form.

You’ll still be able to use the advanced features in Profile Builder, including conditional logic and repeater fields.

Here, you can see the new field on the checkout. It also uses conditional logic so that, if a shopper indicates that they’re a wholesale customer, it will display two additional fields on the checkout page:

New custom registration form on checkout

And that’s it! You’ve created your own custom WooCommerce registration forms for both the “My Account” page and the checkout.

Now, let’s talk about some other optional enhancements that Profile Builder can help you make to your WooCommerce user registration setup.

Optional: Create Separate Registration Forms for Different Users

So far, we’ve focused on the idea that you want to use the same form for all your WooCommerce shoppers (though you do have the option to customize the fields to set up custom user registration fields for the WooCommerce checkout).

However, you might have situations in which you want to use completely separate registration forms for different types of shoppers. For example, let’s keep going with our retail vs wholesale customer example.

If you want your public-facing store to be entirely focused on retail customers, you might not want to add any mention of wholesale to the registration form that retail shoppers use.

To accomplish this, you could still use all the steps that you saw above to have Profile Builder customize the native WooCommerce registration forms for retail customers. But then you could also create another separate form that you place on a different page for wholesale customers.

To create a different form, you can go to Profile Builder → Registration Forms → Add New.

Now, you can set up a registration form that’s 100% dedicated to wholesale shoppers. If you’ve set up a dedicated WooCommerce role for wholesale shoppers, you can also automatically assign people who use this form to the wholesale user role.

Then, you can add the form anywhere on your site using its shortcode:

Embedding a custom registration form

Another neat thing you can do is require manual admin approval for people who use certain registration forms. For example, you might not want to let just anyone register to be a wholesale user, so you could manually hold wholesale registrations for admin approval.

To enable this, you can go to Profile Builder → Settings. Then, set the “Admin Approval” Activated drop-down equal to Yes and then choose which user roles should require manual approval (e.g. the wholesale role):

Admin approval

Optional: Customize the WooCommerce Edit Profile Form

Because you’re creating a custom WooCommerce user registration form that collects additional information, you might also want to give shoppers the option to edit that custom information after they’ve registered (or, you might not, which is why this step is optional).

To accomplish that, Profile Builder also lets you create custom edit profile forms, which you can then use to replace the “Edit Profile” area in the default WooCommerce “My Account” page.

You can use your custom edit profile forms to let users edit:

  • All of the fields on your registration form.
  • Just some of the fields on your registration form.

To create a new WooCommerce edit profile form, go to Profile Builder → Edit-profile Forms → Add New (or edit the default form that Profile Builder adds).

Then, you can choose which fields you want to make editable. If you click the Add Field button, you’ll be able to add any one of the fields from your registration form:

Custom edit profile form

Once you’ve added all of the fields that you want your shoppers to be able to edit, you need to tell WooCommerce to replace its default form in the “My Account” area with your custom form.

To do this, go to Profile Builder → WooCommerce Sync and use the Choose Edit Profile form to display on My Account page drop-down to select Default Edit Profile (or the name of your form if you created a custom edit profile form):

Adding the edit profile form

Now, users will be able to edit those fields from the Account details tab in the regular WooCommerce “My Account” area:

Custom WooCommerce edit profile form

Create Your Own Custom WooCommerce User Registration Setup Today

The default WooCommerce registration system is one-size-fits-all, which may or may not work for your store.

Thankfully, it’s possible to customize how users register for WooCommerce.

With Profile Builder and the WooCommerce Sync add-on, you can create custom WooCommerce registration forms to replace the forms on the “My Account” page and on the WooCommerce checkout.

You’ll be able to add new fields, change the order, and even use advanced tactics like conditional logic and repeater fields.

If you need to go further, Profile Builder can also help you create unlimited different registration forms, including the option to feed the forms into different WooCommerce user roles and even hold certain user roles for manual approval.

You can also bring this same flexibility to the WooCommerce edit profile form in each shopper’s “My Account” area.

If you’re ready to get started, purchase Profile Builder today to get access to the WooCommerce Sync add-on and customize your store.

Profile Builder Pro

The best WooCommerce user registration plugin

Get the plugin


The post WooCommerce User Registration: Full Customization Guide (2021) appeared first on Cozmoslabs.

How to Customize WordPress Email Login Behavior (+ Registration)

$
0
0

Searching for a WordPress email login feature so that you can customize your site’s login process, such as requiring users to use their email address instead of a username?

By default, WordPress lets users log in with either their username and password or their email and password via the default login page.

But if you want to create a more user-friendly login experience, there are a few ways that you can optimize how WordPress email login works.

In this post, we’re going to show you a few different tactics that you can implement to improve email-based login on WordPress. Here’s everything that we’ll cover:

  • Force users to log in with email only. Instead of letting users enter their username or email (in addition to their password), you can force users to only log in with their email and password.
  • Create and customize a front-end login form. This lets you make it clearer to users that they can log in using their email address while also creating a more user-friendly login process.
  • Set up passwordless login. Instead of having users log in by entering their email address and password, you can just have them enter their email address and then send them a special link via email that lets them log in without ever entering a password.
  • Require users to confirm their email address upon registration. This helps you avoid typos or users accidentally entering the wrong email address.
  • Create a custom edit profile form. This lets users edit their email addresses from the front-end of your site – you can even require manual admin approval before the change goes live.

Best of all, you’ll be able to do most of this for free!

Keep reading to learn how to set everything up…

What You Need to Customize WordPress Login, Registration, and Edit Profile

To follow these tutorials, you can use the free Profile Builder plugin, which is available at WordPress.org.

Profile Builder is a complete solution for customizing everything about the WordPress login, registration, and edit profile process. You’ll be able to create more user-friendly experiences for your users while also getting access to lots of useful backend features to control how your site’s user profile system functions.

Profile Builder Pro

The best plugin to customize WordPress email login, registration, and edit profile behavior.

Get the plugin

To follow most of these tutorials, all you’ll need is the free version of Profile Builder. In a few spots, you might need the premium version for certain features, but we’ll be sure to let you know when that’s the case.

To get started, make sure to install and activate the free Profile Builder plugin from WordPress.org. Then, keep reading to learn how to use it to customize your site’s login and registration processes.

How to Customize WordPress Email Login Behavior

In this first section, we’ll show you how you can create your own custom WordPress login system, like requiring users to use their email address instead of their username.

Add a Front-End Login Form

By default, WordPress includes a login form at yoursite.com/wp-login.php that looks something like this:

Regular WordPress email login field

This login page is fine if you’re the only person logging into your site, but it’s not a good option if you allow public registration because it doesn’t match the rest of your site and the URL is hard to remember.

To fix this, Profile Builder lets you create your own custom login form that you can add anywhere on your site.

To get started, create a new page or edit the page where you want to add your login form. For example, you could create a new page called “Login”.

Then, add the [wppb-login] shortcode where you want your login form to appear. You can also add other content alongside your login form according to your preferences:

Adding login shortcode

And just like that, you’ll have a front-end login form that matches the rest of your theme:

WordPress email login form

If you’re using the popular Elementor page builder plugin, Profile Builder also adds its own login widget that you can use to add your login form to an Elementor design and style it using Elementor’s many style options.

Require Users to Log In Using Their Email

By default, WordPress lets users log in with either their username or their email. Profile Builder will use this same behavior for your custom login form at first. However, you also have the ability to change it so that users are required to use their email address instead of their username.

To configure this, go to Profile Builder → Settings. In the General Settings tab, scroll down to the Allow Users to Log in With drop-down and choose your desired configuration.

To make it so that users can only log in by using their email address (and not their username), set the drop-down equal to Email:

Force WordPress email login

If you set it to email only, the text on your login form will automatically change from “Username or Email” to just “Email”:

Login form

Customize Your Login Form Behavior

In addition to letting you force users to log in with their email, Profile Builder also gives you some other options to customize the behavior of your front-end login form. You can make these configurations by modifying the [wppb-login] shortcode.

One option is to redirect users to a certain page after they use the login form (like a front-end edit profile form, which Profile Builder also lets you create). You can do this by adding the redirect_url parameter to the shortcode. For example:

[wppb-login redirect_url="http://www.yourdomain.com/page"]

You can also redirect users after they log out by using the logout_redirect_url parameter. For example:

[wppb-login logout_redirect_url="http://www.yourdomain.com/page"]

Another customization that you can make is to add links underneath your login form to send people to your registration form or your password recovery form:

  • register_url – the URL to your custom registration form. We’ll show you how to create one in the next section.
  • lostpassword_url – the URL to your password recovery form. You can make a front-end password recovery form by creating a new page called “Password Recovery” and adding the

    Please enter your username or email address.
    You will receive a link to create a new password via email.

    shortcode.

For example:

[wppb-login register_url="/register" lostpassword_url="/recover-password"]

Here’s what your login form might look like with these added links:

Register and lost password fields

Enable WordPress Passwordless Login by Email

As an alternative to having users log in with their WordPress email and password, Profile Builder can also help you set up a technique called passwordless login.

With passwordless login, users can log in using just their email address without the need to enter a password.

Here’s how it works:

  • A user goes to your login form.
  • They enter their email address in the form – no need to add a password.
  • Your site sends them an email with a special link.
  • Users click that link to log in to WordPress.

This method is still secure because it requires users to have access to the email account associated with their account – there are even some arguments that passwordless login is more secure than traditional login because it eliminates the risk that a malicious actor could steal or guess the password of a person’s user account.

The neat thing is that you don’t have to completely replace the traditional login system if you don’t want to. Instead, you can still offer both traditional “email + password” login and traditional passwordless login and users can choose the method that they find to be more convenient.

To set up passwordless login on WordPress, you can use the free Passwordless Login plugin alongside Profile BUilder.

To get started, install the Passwordless Login plugin from WordPress.org along with the core Profile Builder plugin if you haven’t done so already.

Once you’ve done so, you can add the passwordless login form anywhere on your site using the [passwordless-login] shortcode.

You could even add it to the same page with your custom login form and explain that users can use their preferred approach:

Passwordless login shortcode

Here’s how that might look on the front-end of your site:

WordPress passwordless email login

How to Customize the WordPress Registration Form

Everything that we showed you above is useful for customizing WordPress email login behavior for users that already have accounts on your site. However, you also might want some options to customize email behavior when users register.

For example, you could make it so that users need to confirm their email to create an account, which can ensure that users enter a working email and don’t make a typo.

Those are the types of tweaks we’ll cover in this section…

Create Your Custom Registration Form

To control the form fields on your registration form, you can go to Profile Builder → Form Fields.

The free version of Profile Builder lets you use all of the native WordPress profile fields (including an email field), while the premium version lets you add your own custom fields to your registration form and even create multiple unique registration forms.

You can use the interface to add, remove, or edit fields. You can also use drag-and-drop to rearrange the order of the fields.

If configured Profile Builder to only let users log in with their email, it will automatically hide the username field on the front-end of your registration form:

Customize WordPress register form

If you want to make sure users enter a valid email, you can use the Email Confirmation field so that users need to enter their email twice (and have the fields match) to submit the registration form.

Once you’re happy with how your form works, you can add your register form anywhere on your site by using the [wppb-register role="author"] shortcode, where the role equals the user role that you want to assign to users who register via this form.

Here’s an example of what it might look like with both the email field and the email confirmation field:

Example WordPress register form

Require Users to Confirm Email When Registering in WordPress

To make sure users enter a valid email address when they register, Profile Builder lets you require users to verify their email addresses by clicking a link before they can create their accounts.

To enable this feature, go to Profile Builder → Settings and set the “Email Confirmation” Activated drop-down equal to Yes.

When you make this choice, you’ll also see another option to choose the confirmation page. This is the page that users will see after they click the confirmation link in their email. You can create it using a regular WordPress page and then select it using the drop-down:

Require email approval

How to Create a Custom Profile Edit Form to Let Users Change Their Email Addresses

In addition to creating custom login and registration forms, Profile Builder can also help you create front-end edit profile forms to let users edit some or all of their profile information, including their login email.

The key thing here is that users can do this from the front-end of your site, whereas they’d normally need to change their email from the backend WordPress dashboard.

With the free version of Profile Builder, users will be able to edit all the fields that are on your registration form. Or, if you upgrade to the premium version, you can create a separate edit profile field that includes a different list of fields.

To add your edit profile form anywhere on your site, you can use the [wppb-edit-profile] shortcode. Here’s an example of what it might look like:

WordPress edit profile form

With the premium version of Profile Builder and the Edit Profile Approved By Admin add-on, you also have the option to require certain profile changes to receive admin approval. For example, you could give users the option to change their email address but require those changes to receive manual admin approval before they’re live:

Require admin approval for edit profile

Create Your WordPress Email Login System Today

By default, WordPress includes a simple login and registration system that lets people use either their username or email address.

If you want to get more control over how that system works and create a more user-friendly login and registration system, you can use the free Profile Builder plugin.

Profile Builder lets you create your own custom login and registration forms, complete with adjustments to the default behavior such as disabling username usage and requiring users to log in and register using just their email addresses.

If needed, you can also adjust other behavior such as requiring users to confirm their email address on the registration form and also click a verification link in an email before they create their account.

You can also let users edit their email addresses from the front-end of your site and, with the premium version, require manual admin approval before those email changes are live.

If you want to test it out, install the free version of Profile Builder from WordPress.org today. Then, upgrade to the premium version to access lots of useful features including:

  • Unlimited custom registration and edit profile forms.
  • Requiring admin approval when users edit certain profile fields, like their email addresses.
  • Conditional logic for registration form fields.
  • Repeater fields.
  • WooCommerce integration to control WooCommerce login, registration, and edit profile fields.
  • …lots more.

Profile Builder Pro

The best plugin to customize WordPress email login, registration, and edit profile behavior.

Get the plugin

Still have any questions about controlling WordPress email login behavior with Profile Builder? Ask us in the comments!

The post How to Customize WordPress Email Login Behavior (+ Registration) appeared first on Cozmoslabs.

How to Customize the WooCommerce Login Page (No Code Needed)

$
0
0

Searching for a solution to customize the WooCommerce login page and otherwise control login behavior on your WooCommerce store?

If you allow (or force) registration on your store, you’ll want to create a user-friendly login experience so that your shoppers can easily log in to their accounts and access other key features.

In this post, we’ll show you step-by-step how you can customize the WooCommerce login page and other aspects of the WooCommerce login form using a free plugin.

We’ll cover a lot of different ways that you can customize the login process, but you’ll be able to pick and choose exactly which features you want to activate so that you can adapt everything to your store.

First, we’ll go over ways to adjust the actual login process including:

  • Creating a custom WooCommerce login form that you can add anywhere on your site using a shortcode.
  • Setting up redirects after users log in or out.
  • Adding links to let people register or reset their passwords.
  • Adding WooCommerce social login options so that shoppers can log in using Facebook, Google, or other networks.

Here’s a simple example of the custom login form that you can place anywhere on your site:

Custom WooCommerce login page example

Then, we’ll also cover some other options for customizing login and user profile behavior on your store including:

  • Creating a custom WooCommerce registration form.
  • Creating a custom WooCommerce edit profile form (including adding it directly to the regular WooCommerce “My Account” page).
  • Restricting certain content/products so that only logged-in users can see it.

There’s a lot to cover so let’s dig in!

When to Consider Customizing the WooCommerce Login Page

Having a custom login page can come in handy in a few different situations – mostly these have to do with situations where you’re requiring or encouraging users to register and log in to shop on your store.

For example, if you require users to have an account in order to purchase stuff on your site, you should customize the login experience to optimize it for them. You could create a special login page and maybe even automatically redirect users to their carts or your shop page after they log in.

Or, if you have a private store, a custom login page is a must so that users can log in to their accounts to access your store. With the WooCommerce login plugin that we’ll show you in this tutorial, you’ll even get built-in features to restrict access to some or all of your products so that only logged-in users can see them.

Or, you just might generally want to create a more user-friendly login experience for your visitors. You don’t get a WooCommerce login shortcode by default, which means you’re limited in how you can let shoppers log in. The plugin in this tutorial will change that and give you a shortcode that you can add anywhere on your site.

The Best WooCommerce Login Plugin

To customize the WooCommerce login page, you can use the Profile Builder plugin.

Profile Builder is a flexible plugin for customizing all aspects of user management on your site, including:

  • Login
  • Registration
  • Profile editing
  • Basic content restriction

Profile Builder also includes built-in integration features for WooCommerce so that you can easily add these features to your store.

For example, in addition to creating a custom login form, you can also customize the WooCommerce registration process (including the registration fields at checkout). You can also replace the default WooCommerce edit profile form in the “My Account” area with your own custom form.

Below, we’ll show you all the different ways that you can use Profile Builder to customize your store’s login, registration, and profile management.

Profile Builder Pro

The best WooCommerce login plugin to handle login, registration, and edit profile forms.

Get the plugin

How to Customize the WooCommerce Login Page With Profile Builder

In this first section, we’ll show you a few different ways that you can use Profile Builder to customize your store’s login page.

You can create a basic custom login page using just the free version of Profile Builder at WordPress.org. However, if you want to customize the WooCommerce registration or edit profile pages (which we’ll cover in the next section), you’ll need to upgrade to the premium version of Profile Builder to access the WooCommerce Sync add-on. The premium version also gives you access to other features, such as WooCommerce social login.

As we go through the tutorials, we’ll be sure to note what you can do for free and what features require the paid version.

To get started, make sure to install and activate at least the free version of Profile Builder from WordPress.org. Or, you can purchase the premium version of Profile Builder to unlock all the features.

How to Add a Custom WooCommerce Login Form

By default, WooCommerce doesn’t include its own WooCommerce login shortcode, so you can’t place a login form anywhere on your site. Instead, the default behavior is to show login options on the My Account page and at checkout.

With Profile Builder, though, you get a dedicated login shortcode that you can use to add a login form anywhere on your site – such as a dedicated login page. You can also add it in multiple places, if needed, and configure each login form to have different behavior.

For example, if you have a multi-vendor store, you could create separate login forms for shoppers and vendors.

To add your login form, you just need to add the [wppb-login] shortcode where you want the form to appear:

WooCommerce login shortcode in block editor

The login form will automatically adopt your theme’s styling – the example above would look something like this on the front-end:

Custom WooCommerce login page example

How to Add Password Reset and Registration Links to Your Login Form

To make your login form a little more user-friendly, Profile Builder also lets you add dedicated links below the form to let people reset their passwords and/or go to the registration page (we’ll show you how to create a custom registration page later on if you want to use this option).

You can add one or both of these options by modifying the login shortcode like so:

[wppb-login register_url="/register" lostpassword_url="/recover-password"]

Make sure to replace the register and lost password links with your own site’s information. You can also remove one of the options if you don’t want to include both options. For example, to only show the password reset link, you could use this shortcode:

[wppb-login lostpassword_url="/recover-password"]

Here’s what it might look like with both options:

Adding links

Profile Builder also includes a shortcode to help you create a dedicated password reset page. To use it, just add the [wppb-recover-password] where you want the password recovery form to appear.

How to Redirect Users After Login/Logout

Another useful modification that you can make is to automatically redirect users to a specific page after they log in (or log out).

You can use this in a lot of different ways. For example, you could use this to redirect people to a special seller page or buyer page. Combined with the content restriction features that we’ll detail later in this article, you could even restrict access to the page so that only logged-in users can see it.

As we mentioned above, you can also create multiple login forms, each with its own unique redirect rules.

To set up a custom redirect, all you need to do is add another parameter to the base login shortcode like so:

[wppb-login redirect_url="http://www.yourdomain.com/page"]

Make sure to replace the example URL with the actual URL that you want to send people to.

You can also add a redirect after a user logs out by adding the logout_redirect_url="http://www.yourdomain.com/page" parameter to the shortcode.

If you upgrade to the premium version of Profile Builder, you’ll also get access to a custom redirects feature that gives you even more control. For example, you could set up unique after-login redirects based on a user’s role or even for individual usernames:

Custom WooCommerce login page redirect rules

How to Add WooCommerce Social Login

Social login can be a great way to reduce the friction of your store’s login/registration process and make it easier for shoppers to get started. This is why most users prefer a social login solution to having to manually create an account or log in with their username and password.

With Profile Builder’s Social Connect add-on, you can easily start offering social login on your WooCommerce store and automatically integrate it into the custom login page that you’ve already created.

To set this up, you’ll first need to install the Social Connect add-on, which you can access by purchasing the Hobbyist or Pro license of Profile Builder.

Once you’ve installed the add-on, you can go to Profile Builder → Social Connect to choose which social networks you want to enable and which forms you want to include those networks on.

Profile Builder supports:

  • Facebook
  • Google
  • Twitter
  • LinkedIn

You can also enable/disable social login in three different areas:

  • Login form
  • Registration form
  • Edit profile form

WooCommerce social login settings

Further down the page, you can change the order of the enabled buttons and make some other relevant choices.

In order to enable social login, you’ll need to create an app at all of the services that you want to enable. We have detailed tutorials for each service:

Once you connect the service(s), your social login buttons will appear underneath the login form:

WooCommerce login page with social login

How to Customize Other Parts of the WooCommerce Login Process

In addition to helping you customize the WooCommerce login page, Profile Builder can also help you control other aspects of your store’s user profiles, including the registration form and edit profile form. You even get access to content restriction features, which lets you restrict access to some/all of your products for logged-in shoppers (or even just specific WooCommerce user roles).

You don’t need to install any new plugins to set these features up – you can do everything with the Profile Builder plugin that you’ve already installed.

How to Create a Custom WooCommerce Register Form

By default, WooCommerce has options to let users register via the My Account page or as part of the checkout process.

If you want more control over this process, you can use Profile Builder to create your own dedicated registration form(s) complete with custom fields and also customize the registration form on the WooCommerce checkout.

One nice thing is that Profile Builder also lets you create multiple WooCommerce registration forms, including an option to customize each form’s behavior (like assigning different user roles to users who register via each form).

For a detailed look, check out our full post on customizing WooCommerce user registration, but we’ll cover the quick version in this section.

To use Profile Builder for WooCommerce registration forms, you’ll need to purchase the premium version so that you can access the WooCommerce Sync add-on, which lets you sync the fields in your custom form with WooCommerce user information (such as shipping and billing fields).

To control your registration form’s fields, you can go to Profile Builder → Form Fields. You can mix-and-match basic profile fields, WooCommerce fields, and even your own custom fields if needed:

Custom WooCommerce registration page

You’ll also be able to customize each field, including using advanced tactics such as conditional logic.

You can also enable certain custom fields on the WooCommerce checkout registration form if desired by using the Display on WooCommerce Checkout drop-down:

Display WooCommerce registration fields at checkout

To display your registration form, you have two options:

  1. You can manually place the form anywhere on your site using the [wppb-register role="customer"] shortcode. If you have multiple WooCommerce user roles, you could replace “customer” with a different role.
  2. You can replace the default WooCommerce registration form on the “My Account” page. To do this, go to Profile Builder → WooCommerce Sync and choose the form using the drop-down (pictured below).

Replace default WooCommerce registration form

You can also create multiple registration forms if needed. To do so, go to Profile Builder → Registration Forms to create additional forms.

How to Create a Custom WooCommerce Edit Profile Form

To go along with your custom registration forms, Profile Builder also lets you create your own custom edit profile forms that let shoppers edit some or all of the fields on your custom registration form.

By default, Profile Builder creates an edit profile form that matches the fields on your custom registration form. You can place it anywhere on your site using the [wppb-edit-profile] shortcode.

Or, you can also have Profile Builder replace the default edit profile form in the WooCommerce “My Account” area by going to Profile Builder → WooCommerce Sync and using the Choose Edit Profile form… drop-down:

Replace default WooCommerce edit profile form

If you don’t want to give your customers access to edit all of the fields on your registration form, you can also create your own custom edit profile forms by going to Profile Builder → Edit-profile forms.

How to Restrict Access to Products for Logged-In Visitors

Profile Builder also includes features to let you restrict access to some or all of your store by requiring users to log in to view certain content/products. Or, you can also restrict content by specific user roles instead of just by logged-in status.

You could combine this with custom after-login redirects to send users straight to content that only they can see. Or, you can just restrict access to certain products so that only logged-in users can see them.

To set up content restriction, you’ll get a new Profile Builder Content Restriction box under any WooCommerce product, post, page, or other post type. You can use the options to restrict access to all logged-in users or to specific WordPress user roles:

WooCommerce content restriction

Create Your Custom WooCommerce Login Page Today

By default, you don’t get a WooCommerce login shortcode, which means you can’t customize the WooCommerce login page.

With Profile Builder, you can change that so that you not only get a login shortcode that you can add anywhere on your site, but you also get lots of options to control how it works, such as adding custom redirects or enabling social login.

Profile Builder can also do a lot more than WooCommerce login forms. You can also customize registration and edit profile forms. Plus, you can even restrict access to some or all of your products.

To get started with a basic login form, you can use the free version of Profile Builder at WordPress.org. Then, upgrade to Profile Builder Pro to access even more useful features such as:

  • WooCommerce social login for Facebook, Google, Twitter, and LinkedIn.
  • Custom WooCommerce registration forms, including customizing the checkout registration form.
  • Custom WooCommerce edit profile forms, including replacing the default edit profile form in the WooCommerce “My Account” area.
  • More advanced redirect rules, like setting up unique after-login redirects for certain user roles or even individual users.

Profile Builder Pro

The best WooCommerce login plugin to handle login, registration, and edit profile forms.

Get the plugin

Do you still have any questions about customizing the WooCommerce login page? Ask us in the comments and we’ll try to help!

The post How to Customize the WooCommerce Login Page (No Code Needed) appeared first on Cozmoslabs.

Best WordPress User Role Plugins & How to Use One

$
0
0

Searching for a WordPress user roles plugin so that you can edit roles and capabilities on your WordPress site?

Capabilities are individual actions that a WordPress user can take and a role is a group of one or more capabilities that you can easily assign to WordPress users.

With a WordPress user role editor, you gain the ability to create your own user roles or edit the existing user roles to control exactly which capabilities a user has access to (AKA exactly which actions a user can perform).

In this post, we’ll show you everything you need to know about these plugins. We’ll start with a quick look at four of the best WordPress role manager plugins, all of which have free options.

Then, we’ll show you step-by-step how you can use the free Profile Builder plugin to manage roles and capabilities on your site in a bunch of useful ways. You’ll be able to use a simple interface like below to manage capabilities for the existing WordPress user roles or your own custom roles:

Manage capabilities

Let’s dig in!

Four Best WordPress User Roles Plugin Options in 2021

All of these plugins have free versions at WordPress.org, though most also have premium versions with more features.

1. Profile Builder

Profile Builder plugin

Profile Builder is a full solution for working with all aspects of WordPress users and registration.

In terms of user roles, the free version of Profile Builder comes with a built-in role manager. You can:

  • Edit existing user roles.
  • Create new user roles, including cloning existing roles or creating new roles from scratch.
  • Add or remove capabilities from roles, including support for all built-in capabilities as well as the capabilities that plugins add. You can also add your own capabilities.

Once you’ve set up your user roles, Profile Builder also adds the ability to assign multiple user roles to a single user.

In addition to working with user roles and capabilities, Profile Builder can also go further and help you create custom registration, login, and edit profile forms.

For example, you could create a custom registration form that automatically assigns users to a specific user role. This lets you not just create and edit user roles, but also work with them in meaningful ways when it comes to user registration.

Finally, Profile Builder also includes content restriction so that you can restrict access to content on your site based on a user’s role.

If you upgrade to the premium version, you’ll also get more advanced login, registration, and edit profile features, along with useful features such as manual admin approval upon registration for certain user roles.

2. User Role Editor

WordPress user role editor plugin

User Role Editor is a popular freemium plugin that’s 100% focused on editing user roles and capabilities.

With the free version, you’ll get a dedicated interface where you can edit existing roles or add your own roles. Once you open a role, you’ll get a detailed capability manager to add or remove capabilities as needed (including support for capabilities from third-party plugins).

If you upgrade to the premium version, you’ll also get more advanced options such as controlling access to the following items by user role:

  • Admin menu items.
  • Widgets.
  • Meta boxes.

3. Members

Members plugin

Members is a popular user role editor and membership manager plugin that was acquired by MemberPress in November 2020.

It lets you create, edit, clone, or delete user roles and then manage all of the capabilities assigned to each role.

You also get the option to assign multiple user roles to a single user, as well as lightweight content restriction and a custom login form.

For more features, there are free add-ons to control access to blocks based on a user’s role, create custom privacy capabilities, create hierarchical roles, and more.

4. WPFront User Role Editor

WPFront user role

WPFront User Role Editor is another lightweight option for creating, cloning, or editing user roles. You’ll also be able to manage capabilities for each role that you create or edit, including support for capabilities from plugins.

Another useful feature is the ability to assign multiple user roles to a single user.

If you upgrade to the premium version, you’ll also be able to use roles to control access to admin menus, the media library, navigation menus, widgets, and other types of content.

How to Use a WordPress User Role Editor Plugin

Now that you know some of the best options when it comes to managing user roles, let’s get into some more actionable tips and we’ll show you step-by-step how you can use one of those plugins (Profile Builder) to create, edit, and manage user roles on your WordPress site.

Best of all, Profile Builder lets you do this 100% for free and it also includes those other helpful user profile features like creating custom registration, login, and edit profile forms.

For example, once you’ve created a custom user role, you could also use Profile Builder to create a custom registration form that automatically adds new users to that role.

To get started, make sure to install and activate the free version of Profile Builder from WordPress.org. Then, here’s how to use it…

Profile Builder Pro

The best free WordPress user roles plugin.

Get the plugin

1. Activate the WordPress Role Manager in Profile Builder

To use Profile Builder to create or edit user roles, you first need to activate its built-in role manager in the Profile Builder settings.

To do that, go to Profile Builder → Settings and set the “Roles Editor” Activated drop-down equal to Yes:

Activate WordPress user roles plugin feature

2. Create or Edit User Roles

Once you’ve activated the feature, you can go to Users → Roles Editor to edit any existing user role and also create your own custom user roles.

At first, the interface will list all of your current user roles, along with a quick summary of how many capabilities each role has and how many users have been assigned that role. In the screenshot below, you can see that we’ve already created some custom roles for our site.

If you want to edit an existing user role, all you need to do is hover over it and click Edit.

If you want to create a new user role, you have two options:

  1. You can click the Add New Role button at the top to create a new user role from scratch.
  2. You can hover over an existing user role and click the Clone option. This will create a new user role that starts with all the same capabilities as the role that you cloned. This is useful if you just want to make a few tweaks but otherwise keep a similar level of capabilities.

Add or clone a user role

3. Manage Capabilities for Your Role

Once you edit an existing role or create your own, you’ll be in the Edit Role Capabilities interface. If you created a new role, you’ll also need to give it a name.

In the example below, we’ve cloned the existing “Author” role to create a new role called “Freelance Author”.

Since we cloned the role, our new role starts off with all the same capabilities that the author role had. You can see these assigned capabilities listed in the interface (highlighted below):

Manage capabilities

To remove a capability from the role, you can click the Delete link.

To add one or more new capabilities (from the list of existing capabilities), you can click in the Select capabilities box to expand a list of options. You can also search to quickly find the option that you’re looking for in the list.

The list of capabilities includes all the core WordPress capabilities, along with any defined capabilities from plugins that you might be using:

Add a new capability

You can select multiple capabilities. Then, click the Add Capability button to assign all of those capabilities to your role:

Adding a capability

Profile Builder also lets you create your own custom capabilities in addition to selecting from the existing capabilities. You can do this by clicking the Add New Capability link under the Select capabilities box.

This will let you define your own custom capability name:

Add a custom capability

You would need to use code to actually define what that capability lets users do, so this feature is mainly for developers.

And that’s it! Once you publish or update your role, it will have the capability list that you created.

4. Assign User Role(s) to User

To start using your new user role, one option is to manually assign it to users. The other option is to create a custom registration page, which we’ll show you next.

One nice thing about Profile Builder is that it lets you assign multiple WordPress user roles to a single user, whereas normally the core WordPress setup only lets you assign a single role to a user.

To assign a user role, go to Users → All Users and edit the profile of the user that you want to assign to a role.

Then, scroll down to the Edit User Roles section in the edit profile area and use the checkboxes to select one or more roles for that user:

Assigning multiple roles with a WordPress user roles plugin

5. Create a Custom Registration Form for Your Role

If you allow public registration on your site, you probably don’t want to have to manually assign user roles to every person that registers.

To help you automate this, Profile Builder lets you create one or more custom registration forms that automatically assign people to a certain user role.

There are a few useful adjustments you can set up with this feature. You can:

  1. Create multiple registration forms, each with different rules for assigning a user role. For example, you could create one registration form for authors and another for readers.
  2. Let users choose their role by selecting from one or more options in the form. This lets you create a single unified registration form but assign users to different roles based on how they filled out the form.
  3. Require manual admin approval for certain user roles. For example, you could automatically approve a “Reader” but require admin approval if someone registers as an “Author”.

You can create a single custom registration form with just the free version of Profile Builder. You can create multiple instances of that form that assign users to different user roles, but you’ll need to use the exact same form fields on each.

To create multiple unique forms and access the admin approval feature, you’ll need to upgrade to the premium version of Profile Builder.

The premium version also gives you access to custom fields, which gives you more control over your registration form.

Create a Custom Registration Form

To edit your registration form, go to Profile Builder → Form Fields. Here, you can add, remove, or edit all of the core WordPress profile fields:

Custom registration form

If you want to let users choose their own role, you can add a field for Select (User Role) and use the checkboxes to control which roles are eligible for users to choose:

WordPress user roles plugin for registration

Here’s an example of what it might look like to let users choose their own role:

Front-end registration form

For more detail, check out our full guide to creating custom WordPress registration forms.

Once you’re happy with your form, you can embed it use the following shortcode, where role equals the name of the user role that you want to assign new users to:

[wppb-register role="author"]

You can place the shortcode in multiple locations and change the role as needed.

If you want to create multiple unique registration forms, you’ll need to upgrade to Profile Builder Pro. Then, you can create a new registration form by going to Profile Builder → Registration Forms.

Hold Certain User Roles for Manual Admin Approval

If you want to require manual admin approval for certain user roles, you need to upgrade to Profile Builder Pro to unlock that feature.

Then, you can go to Profile Builder → Settings and activate the Admin Approval feature. Once you’ve done that, you can use checkboxes to select which user roles should require admin approval:

I1Choosing user roles on edit profile

6. Let Users Change Their Role from the Front-End

This last option won’t apply to all sites. But depending on how you’ve set things up, you might want to let users edit their own role from the front-end of your site.

To do this, you can use Profile Builder to create a custom front-end edit profile form that lets users edit some or all of their profile information, including their user role.

With the free version, you can create an edit profile form that includes the same fields as your registration form. So if you added the Select (User Role) field to your registration form, you could let users choose from those same roles on their edit profile page:

Edit profile forms

You can embed your edit profile form using the [wppb-edit-profile] shortcode.

If you upgrade to Profile Builder Pro, you can also create your own unique edit profile forms by going to Profile Builder → Edit-profile Forms.

Get Started With a WordPress User Roles Plugin Today

WordPress user roles and capabilities let you control what users can do on your site.

With a WordPress user roles plugin, you can get better control over those settings by creating new roles, editing existing roles, and controlling the exact capabilities that each role has access to.

While there are several popular plugins, Profile Builder gives you access to a full role manager for free, along with other useful features such as custom registration forms and admin approval for certain roles.

To access the core WordPress user role editor and basic registration form features, you can use the free version of Profile Builder at WordPress.org.

Then, upgrade to Profile Builder Pro to access more advanced registration and edit profile forms, manual admin approval for certain user roles, and other useful features for working with WordPress users and user roles.

Profile Builder Pro

The best WordPress user roles plugin.

Get the plugin

Do you still have any questions about working with a WordPress user role editor? Let us know in the comments and we’ll try to help!

The post Best WordPress User Role Plugins & How to Use One appeared first on Cozmoslabs.


How to Setup a WordPress Member Directory (and Customize It)

$
0
0

If you have a membership site of any kind, you probably have a number of engaged users that are slowly emerging as community leaders. Wouldn’t it be nice if you could highlight those members on your website? Or if you’re looking to create a community of professionals and let your website visitors get in touch with them. As it turns out, you can. Using the right tool, you can easily create and add a WordPress member directory to your website.

In this tutorial, we’ll show you how to use the Profile Builder plugin and its User Listing module to create a WordPress user directory and customize it to fit your project needs.

Why Create a WordPress Member Directory

Adding a member directory to your WordPress website has several benefits.

Highlight Most Engaged Members

A great way to use a member directory is to highlight the most engaged members of your community. This allows potential members to see you have an engaged and active community. It also encourages other members to be more active so they can get featured in your directory.

Showcase Professionals in Your Area

There are many ways to create a membership site. One of them is to create a community of professionals in your area. This community can serve as a local support and collaboration network where members can meet and mingle with their peers. And with a member directory, you can easily showcase those professionals which then leads to the next two benefits below.

Allow Members to Contact Each Other

With a member directory, your members can contact each other. They can easily collaborate, get help or advice, and form professional relationships and friendships. This builds trust and loyalty between members. As a result, your community will get stronger which can help recruit new members.

Allow Visitors to Get in Touch With Your Members

Lastly, when you have a member directory, your website visitors can easily get in touch with your members. This allows them to hire them for their services without spending hours online looking for a trusted professional.

What to Look For in a WordPress Member Directory Plugin

When it comes to WordPress member directory plugins, there are a few key features you need to look for:

  • The ability to choose which user roles to include in your directory — this allows you to create a granular and targeted list of members
  • The ability to control how the user information is displayed on the front end — this gives you full control over what user profile information is displayed
  • Search and filtering options — so visitors and members can search and sort through members
  • Control over which user profile fields can be used for search — so your members and visitors can find members who meet a specific criteria

How to Set Up a WordPress Member Directory with Profile Builder Pro

Now that you know why you should create a WordPress member directory and what features to look for in a member directory plugin, let’s go through what you’ll need.

To set up a WordPress member directory, you’ll need the Pro license of the Profile Builder plugin and the User Listing module enabled.

Profile Builder Pro gives you the ability to create custom registration, login and edit profile forms and display them on the front-end of your website. It also allows you to add custom fields to your registration forms so you can create a detailed user profile for each of your members.

The User Listing module allows you to display a list of your members/registered users on the front-end of your WordPress website; essentially creating a WordPress member directory.

Steps to create a WordPress Member Directory

Let’s go through the steps of setting up a WordPress member directory on your site with the Profile Builder Pro and the User Listing module.

Install Profile Builder Pro

First things first: you’ll need to get the Profile Builder Pro plugin which includes the User Listing module.

Profile Builder Pro

Create beautiful front-end registration and profile forms with custom fields. Setup member directories, custom redirects, cutomize user emails & more using the all in one user management plugin.

Get the plugin

Log in to your account area and download the plugin files. Be sure to copy your license number as you’ll need to enter after you have activated the plugin.

After you have downloaded the plugin files, go to your WordPress dashboard and navigate to Plugins > Add New. Press the Upload Plugin button and then locate the plugin folder you’ve downloaded on your computer.

Press the Install button and once the plugin is installed, click Activate. You can then enter your license number to register your copy of the plugin by going to Profile Builder > Register Version.

Create Form Pages

Creating form pages is easy. All you have to do is click on Profile Builder > Basic Information and you’ll see a notice with a button prompting you to create the form pages. Click the button and the plugin will automatically create them for you.

Creating form pages

To view how each page looks, go to Pages and then select the page you want to view. As you can see from the screenshot below, the Profile Builder Pro plugin blends in seamlessly with your theme so your registration and login pages look on brand and match the rest of your site.

Registration form on the front-end

Setup Form Fields

Once you’ve set up the form pages for your site, you need to set up the form fields that you’ll use on the registration form. Profile Builder Pro comes with a number of fields already present but you can add more fields or delete the fields that aren’t relevant to you.

To set up form fields, go to Profile Builder > Form Fields. Here, you can add more fields by selecting a field from the drop-down menu and configuring its options. You can enter the field name along with a description to help users fill it out properly. You can also set the field as required or enable conditional logic on the field.

Adding new field to registration form

For example, you might want to add the Avatar field so they can upload their profile photo or a datepicker field so they can enter their birthday. Or you might want to delete the nickname field.

In this example, I’ve added a text area field that allows users to enter their occupation.

member directory single profile

Setting Up Redirects

Now that your form fields are set up, it’s a good idea to go through the redirects settings.

As you can see from the screenshot, there are a couple of different options here:

  • Set up individual user redirects based on username or user ID
  • Configure redirects based on user roles
  • Create global redirects for all users
  • Redirect default WordPress login and register pages to the ones created by the Profile Builder Pro plugin

This ensures that newly registered users are sent to the correct pages after they register or after they perform an action. You can create redirects after various actions:

  • Editing a profile
  • Logging into or logging out of your website
  • Confirming their email
  • Trying to access the dashboard
  • Resetting their password

For example, you can use these settings to send newly registered users to their profile page so they can edit their profile. Or you can send them to a page that allows them to see other members. Another page where you can send them is to a special member’s area where they access content or resources exclusive to your members.

Activate the User Listing Module

Once your member profile information and the registration forms are set up correctly, it’s time to enable the feature that will allow you to create your user directory. Go to Profile Builder > Modules. Make sure that the User Listing module is active. If it’s not, check the Active option. Then press the Save Changes button.

Activating User Listing Module

Once you’ve activated the User Listing module, you’ll see a new menu under the Profile Builder tab. This menu allows you to create, manage, and edit multiple user listings and display them on the front-end of your website.

Creating and Configuring Front-end User Listings

To create a new user listing, go to Profile Builder > User Listing. Click Add New. You’ll then have a range of options for configuring your user listing. For starters, give your user listing a name.

Then, go through the settings option to configure the following:

  • Roles to Display – this specifies which user roles will display on the front-end. If you don’t select a user role, it will default to existing roles. Keep in mind that if you’ve enabled the admin approval option, members will need to be approved to be seen in the directory.
  • Numbers of Users/Page – set how many users display on each page
  • Default Sorting Criteria – this setting controls how users are sorted in the directory. They can be sorted by any custom user fields and choosing Random will display users in any order.
  • Default Sorting Order – set whether the users display in ascending or descending order
  • Avatar Size – set the Avatar size in All-Userlisting and Single-Userlisting templates. By default, the plugin will pull the avatar image from Gravatar. As mentioned earlier, you can also add the Avatar field in your registration form if you want to allow users to upload their own profile photo.
  • Visibility – with this, you can set the User Listing to be visible only to logged in users. Optionally, you can set which user roles can see the user listing Restrict the User Listing visibility to logged in users only.

Setting up user listing settings

It’s also worth mentioning that you can restrict the visibility of your member directory using the built-in Content Restriction feature in Profile Builder Pro plugin. You’ll find this option under Profile Builder > Settings > Content Restriction.

member directory content restriction

Check the box to enable it and then customize the type of restriction, redirect URL, and the messages that will display to logged-in and logged-out users.

Configuring Faceted Menus

You can also configure the options for the Faceted Menus that allow you to search users based on multiple options saved in user meta information:

  • Label – this is the name for your faceted menu that will display on the front-end
  • Facet Type – you can choose between checkboxes, select, range or search facet type.
  • Facet Meta – lets you specify the meta field that will be used for the search option
  • Behavior – if you’ve selected checkbox or select facet type, you can narrow or expand the options
  • Visible Choices – if you selected checkboxes and select multiple facet types, you can choose how many options to display. If you don’t specify this, all options will be displayed.

member directory faceted search

This is where our custom field Occupation comes in handy. With this field, we can set up a faceted menu that lets other members or visitors to search your member directory based on members’ occupation or profession. The screenshot below shows you how this looks on the front-end:

member directory example

Another option for configuring the user listing is to choose which fields will be used for the search functionality.

Editing User Listing Templates

The last step before adding your user listing as a WordPress member directory onto your website is to edit the user listing templates.

The User Listing module has two templates: All-UserListing and Single-UserListing. Those templates are used to display all users and a single user respectively.

They can be edited to include the information you want so you can display your member directory exactly the way you want. Both of these templates are HTML templates. They might look intimidating but there’s a list of field tags for both these templates that you can add to each template to configure them to your liking..

The extra functions tags allow you to add extra features to your user directory. For example, the {{{faceted_menus}}} tag will allow users to search for members that meet the criteria you specified in the faceted menu setup step.

In this example, I’ve added the {{{faceted_menus}}} tag to ensure visitors can filter through our members based on occupation.

It’s worth mentioning that the All-UserListing template also includes Sort tags which allow you to specify how the users should be sorted.

As far as the Single-User Listing goes, I’ve included the Occupation field tag which will be visible on the individual user listing.

Editing Single User Template in WordPress member directory

Displaying the WordPress Member Directory on the Front-End

Now that you’ve configured everything to your liking, the last step is actually display your user listing on your website. First, publish the user listing you just created by hitting the Publish button.

Creating user listing page for your WordPress member directory

The plugin will generate a shortcode that you can add to any page on your site to display your member directory. Copy the shortcode and then go to Pages > Add New. Give the page a name and add the content as usual. Then, paste the copied shortcode. After that, publish the page and then view it on the front end to ensure everything displays the way you want.

And with that, your member directory is live on your website which means you can now start accepting user registrations or directing your existing members to the directory where they can browse and get in touch with other members.

Final Thoughts

Creating a member directory on your website is not hard when you have the right tools to do it. You can use a member directory in lots of different ways to highlight your members.

With the steps laid out in this article, you’ll be well on your way to create a WordPress user directory and customize it to your liking. Get started today with Profile Builder Pro and its User Listing module. Good luck!

Profile Builder Pro

Create beautiful front-end registration and profile forms with custom fields. Setup member directories, custom redirects, cutomize user emails & more using the all in one user management plugin.

Get the plugin

The post How to Setup a WordPress Member Directory (and Customize It) appeared first on Cozmoslabs.

How to Customize the WooCommerce Register Page (Add Custom Fields)

$
0
0

Looking to create a custom WooCommerce register page for your store?

Whether you want to create a dedicated registration page or add custom fields to the checkout register form (or both), we’re going to show you an easy, code-free way to customize all parts of the WooCommerce registration process.

By following this tutorial, you’ll learn how to:

  • Create a custom WooCommerce register page at any URL, complete with custom fields and useful features like conditional logic. You can even create multiple forms and connect them to different WooCommerce user roles.
  • Add custom redirects to send users to a certain page after they register.
  • Add custom fields to the WooCommerce registration form that shows on the checkout page (if you’ve enabled registration at checkout).
  • Create a custom WooCommerce edit profile form to go along with your register page.
  • Require manual admin approval for some/all new registrants.

Basically, you’ll be able to fully customize how users register at your store.

Here’s an example of one type of modification that you’ll be able to set up by the time you finish this tutorial:

Custom WooCommerce register page

Ready to get started? Let’s dig in…

What You Need to Create a Custom WooCommerce Register Page

To customize your store’s registration process, you can use the beginner-friendly Profile Builder plugin. Profile Builder gives you a code-free way to manage all aspects of your site’s users, including customizing the registration, login, and edit profile forms.

With the premium version and its WooCommerce Sync add-on, you can sync all of your users and forms with WooCommerce to give you full control over your store’s registration and user management.

Beyond that, Profile Builder Pro also comes with lots of other useful features such as restricting access to some/all of your WooCommerce products, creating multi-step registration forms, repeater fields, and more.

To get started with the tutorials below, make sure to purchase at least the Hobbyist license of Profile Builder Pro so that you can access the WooCommerce Sync add-on.

Once you’ve made your purchase, install both Profile Builder Pro and the WooCommerce Sync add-on and then continue on to learn how to set everything up…

Profile Builder Pro

The best plugin to customize the WooCommerce register page without any code.

Get the plugin

How to Customize the WooCommerce Register Page

Profile Builder gives you three main ways to customize the WooCommerce register page. You can…

  1. Customize the existing register form, which appears when an anonymous user tries to access the “My Account” page.
  2. Create one or more completely new register forms that you can add anywhere on your site using a shortcode.
  3. Customize the registration form fields that appear on the WooCommerce checkout, if you’ve enabled the ability to register at checkout in WooCommerce’s settings.

We’ll show you how to make all three changes below – you can choose as many of them as you want. That is, you could set up all three registration options, or you could just set up one or two. It’s completely up to you.

How to Customize the Existing WooCommerce Register Form

When we talk about the “existing” register form, we mean the simple three-field form that appears when an anonymous user tries to access the “My Account” page. Here’s an example of what it might look like – the exact design depends on your theme:

The default WooCommerce register page form

With Profile Builder, you can customize the register form to include additional form fields as needed and also set up other behavior like after-registration redirects.

To customize the form fields, go to Profile Builder → Form Fields. Here, you can customize all of the fields that appear on the register form. You can:

  • Add new fields using the drop-down at the top. You can choose from all the default WordPress/WooCommerce fields and also add your own custom fields if needed.
  • Delete any of the existing fields.
  • Use drag-and-drop to change the order of the fields.

Customizing the register fields

When you add or edit a field, you’ll be able to configure its labels, default values, whether it’s required, etc. For advanced uses, you can also set up conditional logic, which lets you show/hide certain registration fields based on how users have answered previous fields:

Editing a field

Once you’re happy with your changes, make sure to save your changes.

Now, all that’s left is to tell Profile Builder to replace the default WooCommerce register form with your new custom form. To do that, go to Profile Builder → WooCommerce Sync and set the Choose Register form to display on My Account page drop-down equal to Default Register:

Choose form to assign

Now, guest users will see your new custom form when they go to the “My Account” page:

Custom WooCommerce register page

How to Create a Custom WooCommerce Register Page

To make things easier for users, you might want to create a dedicated registration page instead of or in addition to the default form from the previous section. For example, https://yoursite.com/register.

To set this up, you can use Profile Builder’s registration form shortcode.

To get started, go to Profile Builder → Form Fields to control the fields that appear on your registration form.

Just as with the previous section, you can use this area to add, remove, or edit all of the fields that appear on your registration form:

Customizing the register fields

Once you’re happy with your registration form, you can display it anywhere on your site using the following shortcode:

[wppb-register role="customer"]

If you’re using custom WooCommerce user roles (e.g. for role-based pricing or wholesale customers), you can change the role=”X” shortcode parameter to a different user role.

In addition to adding the shortcode, you can also use the regular WordPress editor to include additional content as needed, which helps you further customize your registration page:

Adding the shortcode

Here’s how that might look on the front-end of your site:

Example of a custom WooCommerce register page

Create Multiple Unique Registration Forms

For more complex scenarios, Profile Builder also gives you the option to create multiple different unique registration pages. For example, with a wholesale store, you could create one registration form for retail customers and another registration form for wholesale customers.

You could then assign users to different WooCommerce user roles depending on which form they choose.

To create additional forms beyond the default form (Profile Builder → Form Fields), you can go to Profile Builder → Registration Forms. This area will allow you to create unlimited new registration forms.

You can customize each form using the same interface that you saw above and each form will get its own dedicated shortcode that you can use to embed the form anywhere on your site:

Custom WooCommerce register page shortcode

How to Customize Registration Fields on the WooCommerce Checkout

The final option is to add new fields to the WooCommerce registration form that’s integrated into the WooCommerce checkout process. If you’ve enabled the option for users to create an account during the checkout process (WooCommerce → Settings → Accounts & Privacy → Account creation), it looks something like this:

WooCommerce register checkout

With Profile Builder, you can customize this area to include additional fields as needed.

To add those fields, go to Profile Builder → Form Fields to pull up a list of all the form fields from your regular registration page. Then, edit one of the fields that you want to include on the checkout page and set the Display on WooCommerce Checkout drop-down equal to Yes:

Show field on WooCommerce checkout

To include more fields, you can repeat the same process for each field that you want to add to the checkout registration form.

Once you’ve added all the fields and saved your changes, you should see all those new fields on the checkout page – you can see an example of a custom field in the screenshot below:

New fields on WooCommerce checkout page for registration

And that’s it! We just showed you three options for customizing the WooCommerce register page at your store. Now, let’s go over some additional options for further modifying the behavior of WooCommerce registration and user management.

How to Further Modify WooCommerce Registration and User Profile Behavior

Here are some other useful changes that Profile Builder Pro can help you make to your store’s registration and user management.

Set Up Custom After-Register Redirects

Redirecting users after registration is a great way to create a more user-friendly store and/or promote your most valuable products. For example, after a user registers, you could redirect them to a page that shows the best-selling products at your store to encourage them to make a purchase.

Or, if you have a wholesale store, you could redirect new wholesale users to a dedicated page that explains your wholesale policies.

There are two ways that you can set up after-registration redirects with Profile Builder Pro:

  1. You can set up redirects at the form level by adding a shortcode parameter to the registration form shortcode.
  2. You can use the Custom Redirects manager to set up redirects for certain user roles.

To set up a redirect at the form level, add the redirect_url=”https://www.yourdomain.com/page” parameter to the shortcode. For example, like so:

[wppb-register role="customer" redirect_url="https://www.yourdomain.com/page"]

To use the custom redirects manager, go to Profile Builder → Custom Redirects and use the options to set up rules for After Registration:

Custom redirects

Assign Users to Default WooCommerce Roles

We touched on this a bit earlier, but it’s worth singling out how you can use your custom registration forms to assign users to different WooCommerce user roles (if your store has multiple roles).

One option is to use the role parameter of the registration shortcode to assign all users who use a certain form to a certain role. For example, [wppb-register role="retail_customer"] or [wppb-register role="wholesale_customer"].

Another option is to actually let people choose their WooCommerce role in the registration form, which you can do by adding the Select (User Role) form field. When you add the field, you can use the User Roles checkboxes to select which roles should be available for users to choose from:

Choose user role

Visitors will then be able to choose a certain user role when they register.

Hold New Registrants for Manual Admin Approval

If you want more control over the users that register at your store, Profile Builder Pro also includes a feature that lets you hold some/all new registrants for manual admin approval.

More specifically, you can require admin approval for certain user roles. For example, you could automatically approve new retail shoppers but require manual approval for wholesale customers.

To set up manual admin approval, go to Profile Builder → Settings and set the “Admin Approval” Activated drop-down equal to Yes.

Then, you can use the checkboxes to choose which user roles should require admin approval:

User roles for manual approval

Create a Custom WooCommerce Edit Profile Form

If you have custom fields on your register form, you might want to also give users the option to edit those fields after they register. To help you do this, Profile Builder also lets you create custom edit profile forms.

With the WooCommerce Sync add-on, you can also replace the default WooCommerce edit profile form in the “My Account” area with your own custom form.

To give users access to all of the fields from your main registration form (the one you set up in the Form Fields area), go to Profile Builder → WooCommerce Sync and set the Choose Edit Profile form to display on My Account page drop-down equal to Default Edit Profile:

WooCommerce edit profile

If you only want to give users access to some fields, you can create a custom edit profile form by going to Profile Builder → Edit-Profile Forms. You could then use the WooCommerce Sync add-on to assign this form to the WooCommerce “My Account” area as we showed you in the screenshot above.

Create Your Custom WooCommerce Register Page Today

With Profile Builder Pro and its WooCommerce Sync add-on, you can easily customize the WooCommerce register page, along with other aspects of your store’s user management.

In this post, we’ve shown you three different high-level ways to customize WooCommerce registration behavior:

  • Customize the default WooCommerce register form on the “My Account” page.
  • Create your own custom register page(s) using a shortcode.
  • Add fields to the registration form at WooCommerce checkout.

We’ve also covered some other ways that you can control your store’s registration process, like redirecting users after they register and holding certain user roles for manual admin approval.

Beyond WooCommerce user registration, Profile Builder Pro can also help you in other ways, like creating a custom WooCommerce login page or extending the WooCommerce “My Account” page.

To get started and gain more control over your store’s registration processes, purchase Profile Builder Pro today:

Profile Builder Pro

The best plugin to customize the WooCommerce register page without any code.

Get the plugin

Do you still have any questions about customizing or extending the registration page on your store? Ask us in the comments!

The post How to Customize the WooCommerce Register Page (Add Custom Fields) appeared first on Cozmoslabs.

WordPress Email Confirmation for New Users

$
0
0

Want to set up WordPress email confirmation for new users on your site?

If you allow public registration on your site, requiring email confirmation is a great way to cut down on spam and make sure your members are entering valid email addresses.

With the free Profile Builder plugin, you can easily create a custom registration form and require email confirmation for new users. And in this post, we’ll show you exactly how to set it up. Keep reading for the full step-by-step guide!

How to Set Up WordPress Email Confirmation for New Users

Profile Builder is a full-service solution for WordPress registration and user profiles. You can use the free version at WordPress.org to enable most of the features in this tutorial and there’s also a premium version that offers more features, such as the ability to create multiple unique registration forms and require admin approval for certain user roles.

Here’s the basic process to require email confirmation for new users – we’ll show you the full guide below:

  1. Create a custom front-end registration form with Profile Builder.
  2. Create a confirmation page that users will see after confirming their emails.
  3. Enable email confirmation for new users.
  4. Manually approve or delete users if needed (in cases where they don’t click the approval email).

Before you begin, make sure to install and activate at least the free version of Profile Builder from WordPress.org. Or, purchase the premium version to unlock all of the features.

Profile Builder Pro

The easiest way to require email confirmation for new WordPress users.

Get the plugin

1. Set Up a Custom Registration Form

To get started, you’ll use Profile Builder to create a custom registration form. This is not only more user-friendly for your users, but it also lets you add useful features that the default WordPress registration form doesn’t allow.

For example, you can add an extra email confirmation form field to make sure users enter the right email address (so that they’ll receive their confirmation emails).

To customize your registration form, go to Profile Builder → Form Fields. In this interface, you can:

  • Add new fields using the drop-down at the top. With the premium version, you can even add custom fields to collect additional information beyond the default WordPress profile fields.
  • Change the order of fields using drag-and-drop – click on the “#” column on the left to access the drag-and-drop functionality.
  • Delete existing fields.
  • Edit and customize fields by clicking the Edit Button. For example, you can mark certain fields as required or optional.

Custom registration form

For example, to add an email confirmation field to ensure accurate email addresses, you can simply select the Email Confirmation field and insert it into your form:

Adding an email confirm field to the WordPress registration form

Once you’re happy with your registration form, you can display it anywhere on your site using the [wppb-register] shortcode. You can also add a role parameter to assign people who use this form to a certain user role, like so – [wppb-register role="author"].

Here’s an example of what your registration form might look like:

Custom registration form on front-end

If you’re using Elementor, you’ll also get dedicated Elementor widgets to display your registration form.

2. Create Your Email Confirmation Page

Next, you’ll want to create your email confirmation page. This is the page that new users will see after they click the confirmation link in the email that your site sends them.

You can create your confirmation page just like a regular WordPress page – just go to Pages → Add New.

You can include whatever content you want, but we recommend including information that will help users get up and running on your site.

For example, if you have a membership site, you could highlight some key actions that new members should take. Or, you could include links to key pages on your site.


Once you’re happy with the page, go ahead and publish it. Here’s an example of what it might look like:

WordPress email confirmation page on front-end

3. Enable WordPress Email Confirmation for New Users

Now, you’re ready to enable WordPress email confirmation for new users.

To do this, go to Profile Builder → Settings and set the “Email Confirmation” Activated drop-down equal to Yes.

This will expand an additional “Email Confirmation” Landing Page setting where you can select the custom confirmation page that you created in the previous step:

Enable WordPress email confirmation for new users

And that’s it! Your custom registration page is now live and new registrants will need to confirm their email to activate their account.

If you’re having trouble with your confirmation emails making it to new users’ inboxes, we recommend using a dedicated email sending service instead of the default WordPress PHP Mail method. You can set this up using an SMTP plugin and services like SendGrid or Amazon SES.

How to Manually Approve or Delete Users That Haven’t Confirmed Their Emails

Most of your users will confirm their emails right away. However, you might have some users who don’t confirm their emails.

By default, WordPress stores these users in the wp_signups database table, which means you can’t access them from the All Users area in your WordPress dashboard.

That turns into a problem when:

  • the user deletes the WordPress confirmation email before activating their account;
  • the confirmation email ends up in the spam folder;
  • the email doesn’t get sent at all due to a server error.

When the above happens, there are three problems that appear:

  • the user can’t approve his account;
  • the user can’t try to register again with the same email or username (since WordPress is still waiting for the previous account to approve his registration);
  • the admin can only delete the un-confirmed email from the database and can’t manually approve the account.

Don’t worry! With Profile Builder, you won’t need to dig into the wp_signups table just to manage these users. You can delete them or manually approve them from a simple interface.

To begin, go to Users → All Users. From there, you can select the Users With Unconfirmed Email Address link to view only users who haven’t confirmed their email address:

How to manually approve or delete users

Then, you can hover over an unconfirmed user to access three actions:

  • Resend the confirmation email;
  • Manually confirm the user;
  • Delete the user.

You can also use the Bulk Actions drop-down to quickly apply these actions to multiple users:

Managing unconfirmed users

Enable WordPress Email Confirmation for New Users Today

Profile Builder gives you an easy way to create a custom registration form and require email confirmation for new WordPress users.

When users confirm their emails, you can send them to a custom confirmation page and you can also easily approve or delete users who don’t confirm their email addresses right from your WordPress dashboard.

You can access most of these features in the free version at WordPress.org. Then, consider upgrading to the premium version for the option to create multiple unique registration forms, require admin approval for certain user roles, and lots more.

Profile Builder Pro

The easiest way to require email confirmation for new WordPress users.

Get the plugin

The post WordPress Email Confirmation for New Users appeared first on Cozmoslabs.

WordPress User Avatar Tutorial: Let Users Upload Custom Profile Pictures

$
0
0

Searching for a way to let users on your site upload a custom WordPress user avatar or profile picture?

By default, WordPress relies on the Gravatar service for user profile pictures, which means that your site will show the avatar associated with each user’s email in Gravatar. However, this isn’t ideal because not all users have a Gravatar account and it means that users will have to edit their user avatar from the Gravatar website (instead of your WordPress site).

To create a more user-friendly experience and make it easier for users to customize their profile pictures for your site, you might want the option to let people upload a custom user profile picture from WordPress.

That way, your users can still benefit from being able to create their own personalized profile, but without needing to use a third-party service (like Gravatar).

That’s the topic of this post – we’ll show you step-by-step how you can use Profile Builder to give users the option to upload a custom user avatar from the front-end of your site in a few different ways. Here’s one example of a dedicated user profile upload form, but you can also include the option as part of a full registration or edit profile form:

Dedicated WordPress user avatar upload field

Ready to learn how it works? Let’s dig in…

What You Need to Allow Custom WordPress User Avatars

To let users upload their own custom avatar pictures, you can use the Profile Builder plugin.

Profile Builder is a full system for customizing the WordPress registration and edit profile behavior.

If you want, you can use it to create a custom registration form for your site to replace the default WordPress one. Or, you can keep using the existing WordPress registration form – it’s up to you.

If you do opt to create a custom registration form, Profile Builder lets you give users the option to upload a custom avatar when they create their account. You’ll also be able to add tons of other fields to your registration form if needed, including custom fields.

WordPress user avatar field on registration form

Then, you can also use Profile Builder to create a custom edit profile form that lets users edit some or all of their profile information from the front-end of your site. You can also give users the option to edit their avatar here. So:

  • If you included the avatar field on your registration form, users can edit their avatar field here if they change their minds.
  • If you didn’t, you can give users the option to upload their avatar after they’ve already registered.

WordPress user profile picture field on edit profile form

In addition to including the option to edit their profile picture as part of a full edit profile form, you also have the option to create a page that’s 100% dedicated to just the avatar picture. Here’s an example:

Dedicated WordPress user avatar upload field

The cool thing about Profile Builder’s user avatar field (and other features) is that it integrates with a lot of the other plugins that you might be using including:

  • bbPress
  • BuddyPress
  • WooCommerce

For example, let’s say you created a forum with bbPress. With Profile Builder, you can give users the option to choose the avatar that displays when they start a thread or make a reply in the forum.

Profile Builder does have a free version at WordPress.org. However, to access the avatar upload field, you’ll need at least the Hobbyist license of the premium version. You can purchase it by clicking here or using the button below:

Profile Builder Pro

The easiest way to let users upload custom profile pictures from front-end registration or edit profile forms.

Get the plugin

Or download FREE version

To get started, make sure to install and activate the Profile Builder Pro plugin on your site.

Then, here’s how to set it up…

How to Add a Custom Avatar Upload Field to Registration or Edit Profile Forms

In this first section, we’ll show you how to add a user avatar upload field to both your registration and edit profile forms. Then, in the next section, we’ll show you how you can create unique forms for either registration or edit profile, including creating a dedicated form just for letting a user control their avatar.

For example, maybe you don’t want to require users to upload an avatar right upon registration and you only want them to upload their profile picture from their own account page on your site, using an edit profile form. Don’t worry, we’ll show you how that works in the next section.

But for now, let’s assume you want to give users the option to set a custom user avatar on both the registration and edit profile forms.

1. Customize Your Form Fields

To begin, go to Profile Builder → Form Fields. This is where you can control all of the fields that display on your registration or edit profile forms, including the user avatar field.

In this interface, you can:

  • Add new fields.
  • Delete any existing fields.
  • Rearrange the order of fields using drag-and-drop.
  • Customize how each field works.

By default, this form will include regular profile fields to collect details like the user’s name, username, contact info, biography, password, etc.

Form field editor

You can feel free to customize these existing fields as much as you want.

When you’re ready to add your WordPress user avatar upload field, use the drop-down at the top to add the Avatar field:

Add form field

Then, you’ll be able to customize how the avatar field works. In addition to the general field options, there are a few important avatar-specific settings here:

  • Allowed Image Extensions – by default, the field supports uploads for jpg, jpeg, png, and gif. However, you can customize this if needed by entering the specific extensions that you want to allow.
  • Use Simple Upload – whether you want to use the simple browser upload field instead of the WordPress upload field (we’ll show you some example screenshots of this below).
  • Avatar Size – the size that you want to use for avatars – between 20 to 200 px.

Once you’re happy with those settings, click Add Field:

Customize field

You can then use drag-and-drop to change the placement of the avatar field in your form if needed.

So – what’s the difference between the WordPress upload field and the simple upload field?

Well, the WordPress upload field will use the styling from your theme and the WordPress Media Library interface – here’s an example of how it might look using the Astra theme:

Example of the WordPress upload

Clicking the button will open an interface that looks a lot like the WordPress Media Library uploader in the backend:

Media Library uploader

On the other hand, the simple upload field will just use the default browser design like this:

Clicking the upload button will open the normal file browser prompt that lets users browse the files on their computers.

Feel free to choose whichever approach fits your situation the best.

2. Display Your Forms

Once you’re happy with your form fields, you can use Profile Builder’s shortcodes to display the register and edit profile forms on the front-end of your site:

  • Registration form[wppb-register]
  • Edit profile form[wppb-edit-profile]

For example, to create the edit profile form where users can upload/edit their WordPress user avatar, just create a regular page and include the proper shortcode. You can also add static text on the page if needed.

Create edit profile form

Once you publish your page, users will be able to use it to edit all of the fields from the registration form. In the next section, we’ll show you how to customize which fields are available.

You can repeat the same steps to create a page for your registration form.

Profile Builder also includes lots of options for customizing registration form behavior, including letting you automatically assign a user role to people who use the form. To learn more, check out these posts on how to…

How to Create Separate Register and Edit Profile Fields (Including a Dedicated Profile Picture Form)

Above, we showed you how it works to include the user avatar upload field on both the registration and edit profile forms.

However, you might have situations where you only want to include the user avatar upload field on one or the other. Or, you might want to use different form fields for each, or even create a dedicated form just for letting people control their avatar pictures.

To help you set this up, the premium version of Profile Builder gives you the option to create unlimited unique registration or edit profile forms.

To begin, go to Profile Builder → Add-Ons and make sure that you’ve enabled the add-ons for Multiple Registration Forms and Multiple Edit Profile Forms.

Activate add-on

Then, to create a unique form, you can go to either Profile Builder → Registration Forms → Add New or Profile Builder → Edit-profile Forms → Add New, depending on the type of form that you want to create.

For this example, let’s say you want to create a custom edit profile form that’s 100% dedicated to the user avatar field.

You would go to Profile Builder → Edit-profile Forms → Add New and give it a name. Then, you could set it up so that it only includes the custom avatar field that you set up before:

Dedicated WordPress user avatar form

Now, when you embed that form using its unique shortcode, it will only display a single field for users to edit or upload their avatar picture:

Dedicated WordPress user avatar upload field

Get Started With WordPress User Avatars Today

By default, WordPress uses Gravatar to generate user avatar pictures. This is fine as a starting point, but it has two issues if you want more control over how your site uses avatars:

  1. Users cannot edit their user avatar for just your site. And if they want to change their overall avatar, they need to do it from the Gravatar website.
  2. Gravatar images are stored on and served from Gravatar’s servers, which can be an issue from a performance perspective. We didn’t talk about this above, but it’s another consideration.

With Profile Builder, you get a more user-friendly and flexible way to handle user profile pictures. You can let users upload their own custom avatar on your registration form, in an edit profile form, or from a dedicated profile picture form.

All of the avatar pictures will be hosted locally on your site’s server and users will be able to fully manage their avatars without leaving your site.

Are you ready to get started with your own WordPress user avatar system? Purchase Profile Builder today to get started:

Profile Builder Pro

The easiest way to let users upload custom profile pictures from front-end registration or edit profile forms.

Get the plugin

Or download FREE version

Still have any questions about how to set up WordPress user profile pictures with Profile Builder? Let us know in the comments!

The post WordPress User Avatar Tutorial: Let Users Upload Custom Profile Pictures appeared first on Cozmoslabs.

WordPress 2 Factor Authentication (Plugin + How to Set Up)

$
0
0

Security is key when you have a website with user registration and login functionalities.

This is why offering your site’s users the option to enable 2 factor authentication in WordPress when they log into their accounts might be essential in some cases. When users have access to sensitive information, systems, or data, you really don’t want hackers to steal their credentials. When using 2FA, password database theft or phishing campaigns will not affect the integrity of the protected accounts.

With the WordPress Two-Factor Authentication option from Profile Builder Pro activated, your visitors can log in securely using a third-party mobile authentication app (such as Google Authenticator) and not just their username and password.

This is exactly what we’ll talk about in this post. So let me show you how to set this up for your own website and secure your visitors’ accounts. Let’s get straight into it!

What You’ll Need to Enable 2 Factor Authentication on your WordPress Site

To enable this function on your website you can use the Profile Builder WordPress plugin, which is a full customization system for WordPress registration, login, and edit-profile behavior.

Apart from letting you create beautiful and fully personalized registration, login, and edit-profile forms, Profile Builder comes with lots of extra functionalities, such as email confirmation for new users, admin user approval, content restrictions, custom and conditional form fields, and many many more.

There is a free version of Profile Builder at WordPress.org, but in order to use the 2 factor authentication you do need one of the paid versions.

Profile Builder Pro

The easiest way to enable two-factor authentication for your website users.

Get the plugin

Or download FREE version

After your purchase, you’ll need to install and activate Profile Builder (Hobbyist or Pro) just like you would any other WordPress plugin. Just go to your WordPress dashboard and navigate to Plugins. Click the Add New button at the top and upload your purchased version.

Once you have your plugin up and running, it is time to set up two-factor authentication.

Activating Two-Factor Authentication for WordPress

To start this off, first go to Profile Builder → Settings from your WordPress dashboard and then navigate to the Two-Factor Authentication tab. Next, to activate the feature simply set the “Enable Two-Factor Authentication” option to Yes from the dropdown.

2 Factor Authentication Tab

You can then choose what user roles will have access to this functionality. Once the changes are saved, the users with valid roles will now have the option to enable Two-Factor Authentication from the Edit-profile form.

By default, Profile Builder will show a new ‘Authentication code’ field on the login form only for those users that have activated the functionality themselves. But, in addition, the plugin also supports this shortcode argument [wppb-login show_2fa_field=yes] that will force the authentication field to always appear on the Profile Builder login form, no matter if the users activate this functionality or not. However, in this case, the users that have not yet activated two-factor authentication on their account will be able to log in leaving the authentication field empty.

How WordPress Two-Factor Authentication Works

The Two-Factor Authentication functionality lets your website users authenticate themselves at login using third-party authenticator apps like Google Authenticator, Microsoft Authenticator, LastPass Authenticator, and others for improved security.

When the functionality is enabled, an ‘Authenticator Code’ field will show up on the login form. This is where the user will have to input their valid TOTP (Time-Based One-Time Password) provided by the mobile app they have chosen. Don’t worry, we’ll get more into this in the next section.

Authenticator Code Field on Login Form

But all of this is only possible when the users themselves activate and set up the two-factor authentication for their own accounts. You cannot force users to activate this functionality, only strongly suggest they do so.

So, how do users enable 2 factor authentication for their own account? Luckily that’s what the next section is about.

Activating Two-Factor Authentication for WordPress as a User

When this functionality is enabled on your site, a ”Two-Factor Authentication” section will appear at the end of the edit-profile form for every user, in the front-end. If a user checks the Activate checkbox, the rest of the Two-Factor Authentication settings will be revealed.

Activating 2 Factor Authentication as User

From here on the user will be able to set up the following fields:

  • Activate – this checkbox defines whether the user will need to use two-factor authentication at login or not.
  • Relaxed Mode – checking this checkbox allows for higher time drifting and adds a few more minutes for the user to check their mobile app and come back with the TOTP.
  • Description – what the user inputs here is what the authenticator app will display as the account name. By default, it will be set to the website name, but it can be customized at any time.
  • Secret – this field contains a randomly generated secret key the user needs to input in order to set up the new entry in their selected authenticator app. Clicking the New Secret button below generates a new secret code if needed and the QR Code button will show the scannable code. *A new secret code must be generated every time the user makes changes to the Description field.
  • Verify TOTP – this is where the users will input the Time-Based One-Time Password generated by their chosen authentication app after they’ve added the new entry. They’ll have to check the password validity (by clicking the Check button) before two-factor authentication is actually enabled. This is a way to make sure your users will not accidentally get locked out of their accounts if the two-factor authentication is not properly set up.

Using Google Authenticator with WordPress (or Other 3rd Party Apps)

In order for a user to activate 2 factor authentication for their account, they will have to either scan the generated QR code with the app of their choice or manually enter the Description and Secret key.

For example, when using Google Authenticator, this is where the user would manually input the description and key:

Google Authenticaticator Manual Entry

Once the user has added a new entry, the app will generate a TOTP for them to securely authenticate on the specified website. The code will only be available for a certain amount of time before it refreshes and a new code is generated. This should look something like this:

TOTP Genereted by Google Authenticaticator

The user will then be able to input this one-time generated code in the ‘Authenticator code’ field on the login form and safely log into their account.

Enable WordPress 2 Factor Authentication for Your Website Today

Using Profile Builder Pro and its Two-Factor Authentication functionality you can give your website users the peace of mind they need knowing that their accounts are safe and sound.

In this post, we’ve shown you how you can let your site visitors secure their accounts using mobile authentication apps like:

  • Google Authenticator;
  • Microsoft Authenticator;
  • LastPass Authenticator;
  • And any others.

We’ve shown you how to globally enable the functionality on your site, but also how the users themselves can enable it on their particular accounts.

Profile Builder lets you create a fully customized and cohesive experience for your website users, both at registration and login, giving them the option to furthermore edit what they share on their profile at any time. And now they can do it in an even safer way.

Purchase Profile Builder and start offering your site users more secure accounts today:

Profile Builder Pro

The easiest way to enable two-factor authentication for your website users.

Get the plugin

Or download FREE version

Do you still have any questions about how to activate 2 factor authentication on your website? Let us know in the comments and we’ll try to help!

The post WordPress 2 Factor Authentication (Plugin + How to Set Up) appeared first on Cozmoslabs.

How to Edit User Roles in WordPress? Step-By-Step Guide

$
0
0

Do you own a WordPress site and want to edit the default user roles? Maybe you want to add or remove certain capabilities for one or more of the available user roles? Or perhaps add a completely new custom user role?

Unfortunately, you can do none of these things on WordPress by default. Sure, it does give you 5 default user roles to help you manage your WordPress website, but it offers nothing in terms of control or customization.

However, as with pretty much all functionalities with WordPress, you just need a plugin to be able to edit user roles and also do much more. This is where Profile Builder comes in handy, as a user management plugin.

But before we dive into using Profile Builder to edit WordPress user roles, let me help you with some basic understanding of the default WordPress user roles. We’ll talk about the steps you need to follow in order to edit them, remove them, and add new ones too.

The Default WordPress User Roles

As we just mentioned above, WordPress offers a few user roles by default. They include the following:

  • Subscriber
  • Contributor
  • Author
  • Editor
  • Administrator

These user roles are listed in order of the capabilities they are given by default, with the subscriber having the least number of capabilities, and the administrator enjoying all the privileges.

The administrator is generally the owner of the website and can add or remove other users. Similarly, the admin user has access to all the areas of the website, including the ability to delete content, add or remove plugins, change the website theme, change the WordPress settings, update website files, and more.

The Need to Edit User Roles in WordPress

While these user roles can turn out to be enough in terms of user management for some website owners, most others are going to need some help. And that’s simply because, while WordPress does allow these 5 user roles by default, it doesn’t offer any customizations for them.

So basically, you’re stuck with the predefined access rules and can’t make any changes to what these user roles can or cannot do. Moreover, you’re also pretty much stuck with only these 5 user roles, without the ability to add new roles or remove any of these existing default user roles.

This can surely be an issue in many cases. For example, if you’re running an e-commerce store using WordPress and WooCommerce, you will likely want to create a customer user role that may not fit into any of the default user roles offered by WordPress.

Similarly, some website owners may want their authors to be able to edit other authors’ posts as well. In some cases, it may also make sense to allow subscribers to contribute a post that you can later approve or reject. But with the default WordPress user functions, you won’t be able to do any of these things.

This is precisely why you need a plugin to manage user roles on your website. A complete user management plugin like Profile Builder will help you here, giving you the following benefits:

  • Full control over all user roles on your WordPress website;
  • Ability to create new custom user roles;
  • Ability to add or remove capabilities from existing user roles;
  • Ability to remove user roles that you don’t need;
  • Clone certain user roles that you want to duplicate and later customize using the role editor.

While there are also other WordPress user role plugin options out there that may be able to do more or less the same things as Profile Builder, they do not offer many of the other features you get with Profile Builder.

Being able to edit user roles in WordPress is just one of the functionality areas of Profile Builder. The plugin offers much, much more in terms of user management functionalities, that would go a long way in helping you control and customize every aspect of the user management on your WordPress website.

How to Easily Edit WordPress User Roles Using Profile Builder

Editing user roles is surprisingly easy with Profile Builder. The process is straightforward and doesn’t involve any technical tasks. So let’s get to it!

Install and Set Up the Profile Builder Plugin

First of all, you’ll need to install and activate the Profile Builder Pro plugin if you haven’t already. You can do so by uploading the plugin you purchased from our website (download it from the Account page), or you can download it from the WordPress repository if you’re looking to try out the free version.

Once the plugin is activated, you need to enable the setting which activates the user role editor. Navigate to Profile Builder → Settings and scroll to find the “Roles Editor” Activated option. Click on the dropdown menu and choose Yes.

Activating user role editor

Scroll down to the bottom of the page and click on the Save Changes button. This will activate the User Roles Editor.

Now, when you hover over the Users menu item in the WordPress sidebar, you’ll be able to see a new Roles Editor option. If you click on it, you’re going to see a page like what you see in the image below:

User Roles Editor Page

As explained above, you can edit any of the existing user roles you see there, remove them if they are not needed (except for default user roles—you can’t delete those), and also add new custom user roles, by clicking on the Add New Role button at the top of the page.

But since we are discussing how to edit user roles, let me explain how you can do that in a few simple steps below.

Edit WordPress User Roles

Hover your mouse over to the user role you want to edit. Then click on the Edit option that appears right under it.

For this tutorial, we will edit the Author user role, so we click on the Edit button under the Author user role. Depending on the user you’re editing, you will see a page similar to what you see in the image below:

Editing a WordPress user role with Profile Builder

Here, you can see all of the capabilities the user role you’re currently editing has. You can also find the exact number of capabilities they have on the right side of your page, just as you like it’s shown in the image.

To make things much easier for you, Profile Builder has categorized user role capabilities into many different categories.

Now, in our case, let’s say we don’t want the Author user role to be able to delete the posts published on our WordPress website. For this, we’ll simply click on the Delete option right beside the “delete_published_posts” box, which is currently listed as one of the capabilities the Author user role has.

Next, we also want to add a capability that allows the authors on our WordPress website to be able to moderate the comments we get on published posts. So, to do this we click on the “Select capabilities” field in the top left side of the screen and start scrolling down the drop-down list until we find the capability that says “moderate_comments”.

When you click on a new capability to a user role you’re editing, you will see it in the Capabilities search field.

Adding new WordPress user role capabilities

You can add as many capabilities as you want, except of course for the ones that the user already has. Once you’re done adding the capabilities you want, simply click on the Add Capability button.

We can then see the new capability being added to the Author user role here.

New capability added to user role

When you’re done making all the changes you want to the user role you’re editing, click on the Update button on the left. You will then see a message at the top saying that the role has been updated.

Updating WordPress user role edits

This is how easy it is to edit user roles with Profile Builder. You don’t need to touch the code, yet you can make all kinds of changes to the user role you want to edit in a few easy clicks.

Create Custom User Roles

Now that you know how to go about editing user roles on your WordPress website easily and quickly, let’s walk through the process of creating a new custom WordPress user role on your website.

As we mentioned above, you need to click on the Add New Role button at the top after navigating to the User Role Editor. This is the page you will land on:

Add new user role page

Here, you’ll basically be able to build a new user role from scratch. You can add all kinds of capabilities, set the role slug on the left, and give the user role whatever name you want, by typing it in the field at the top and clicking the Publish button on the left when you’re done. Once you perform these steps, your new user role will go live.

Now, let’s make it even easier for you by doing it ourselves and explaining the steps using screenshots below.

Create a New User Role From Scratch – Example

Again, for the sake of this tutorial let’s assume we are running an e-commerce website built using WooCommerce and want an employee to manage our inventory, orders, and products on our website. We will add all the capabilities required to manage customer orders and update the product pages as the inventory changes.

We picked a few of the capabilities we think will be needed for this user role. Please note here that all of these capabilities are custom capabilities offered by Profile Builder since WordPress doesn’t offer any of these capabilities by default.

Adding custom capabilities to new user role

Let’s now click the Add Capability button. We will put the user role name as “Inventory manager”, which will also automatically set the role slug, but you can change it if you want to.

When we’re done adding capabilities, we can go ahead and click the Publish button. A message should appear at the top of the screen to let us know that the custom user role has been successfully created.

If you forgot to add a capability or simply want to edit your new user role, you can just go back, make your changes, and then hit the Update button. This will add all your new changes too.

Finally, to confirm that new users can actually be added for the role we’ve just created, we can go to Users → Add New and scroll all the way down. Here, you should find the new user role you’ve just created in the list of user roles available on your site. Below, you can see that the Inventory manager option is listed at the bottom.

New user role added to the list

Start Using Profile Builder with WordPress to Edit User Roles Today

While Profile Builder works great as a user role editor, it has a lot more to offer. As we said above, it’s a complete user management plugin and offers all kinds of features and functionalities you might need in order to manage users and user roles on your WordPress website.

So, apart from the ability to edit, manage and create user roles, here are just a few of the features that are available to you with Profile Builder:

If you’re looking for an all-in-one user management plugin for your WordPress website, that doesn’t require any coding skills, check out all the features it offers below.

Profile Builder Pro

Manage and edit WordPress user roles with the help of a simple, code-free plugin.

Get the plugin

Or download FREE version

The post How to Edit User Roles in WordPress? Step-By-Step Guide appeared first on Cozmoslabs.

How to Add reCAPTCHA to WordPress Forms (Login, Registration, and More)

$
0
0

Trying to add RECAPTCHA to WordPress?

Because WordPress is so popular, it’s an attractive target for spammers who are looking to create fake registrations or try to brute force your login page to take over your site.

One easy way to protect your site from spam and to secure your login process is to add a WordPress login CAPTCHA powered by Google reCAPTCHA. If you allow public registration, you also might want to add a CAPTCHA to your registration and lost password forms to prevent abuse there as well.

There’s no built-in reCAPTCHA WordPress functionality in the core software, but you can easily add reCAPTCHA to WordPress with a plugin, and that’s what this post is focused on.

In this beginner-friendly guide, we’ll show you how to add reCAPTCHA to WordPress login, registration, and lost password forms using the free Profile Builder plugin.

This method is free and requires zero code or technical knowledge – all you need to do is install a plugin and click some buttons and you can start protecting your site like this:

How to add reCAPTCHA to WordPress

Ready to get started? Let’s jump in.

What Is Profile Builder? How Does It Help You With WordPress reCAPTCHA?

Profile Builder is a free WordPress plugin that helps you upgrade your WordPress login, registration, and user profile functionality.

With Profile Builder, you have two options for using reCAPTCHA:

  1. You can add reCAPTCHA to your default WordPress login, register, and password recovery forms.
  2. You can use Profile Builder to create new, custom login, registration, and password recovery forms that include reCAPTCHA. The advantages of this approach are that you can place the forms anywhere on your site and you can also fully customize the fields on your registration form.

Or, you can do both! Let’s look at some examples…

Examples of the WordPress Login CAPTCHA

Here’s an example of what a WordPress login CAPTCHA looks like on the default WordPress login form:

WordPress login cAPTCHA example

And here’s an example of what the WordPress login CAPTCHA looks like on a custom form:

How to add reCAPTCHA to WordPress

If you allow registration, you can also add reCAPTCHA to the default or custom registration form, as well as your password reset forms.

Profile Builder Pro

Create beautiful front-end registration and profile forms with custom fields. Setup member directories, custom redirects, cutomize user emails & more using the all in one user management plugin.

Get the plugin

Or download FREE version

How to Add reCAPTCHA to WordPress

Now that you know how Profile Builder works, let’s get into how you can use it to set up reCAPTCHA on your site.

1. Install and Activate the Profile Builder Plugin

To begin, install and activate the free Profile Builder plugin from WordPress.org.

While there is a premium version of Profile Builder that adds lots of useful features, the reCAPTCHA functionality is available in the free version, so you won’t need to pay anything to add reCAPTCHA to your site.

2. Customize and Display Your Forms (Optional)

You can skip this step and go to the next one if you want to continue using the default WordPress login, registration, and lost password forms.

However, as we mentioned earlier, one of the advantages of using Profile Builder over another reCAPTCHA WordPress plugin is that Profile Builder lets you create your own custom registration, login, and lost password forms (as well as a front-end edit profile form, though you don’t need a CAPTCHA for that because it’s only visible to logged-in users).

You can use shortcodes to place these forms anywhere on your site, including in page builder designs from plugins like Elementor. This means that you can create a better URL (e.g. yoursite.com/login) and you can also customize the design of your login and registration pages.

What’s more, if you allow public registration, you can also fully customize the fields on your registration form.

If you do want to do this, go to Profile Builder → Form Fields to control the fields that appear on your form. You can add new fields and edit/remove the existing fields. You can also use drag-and-drop to change the order of the fields on your form.

For more details here, check out these posts:

Customize form fields

Once you’re happy with the fields on your form, you can use Profile Builder’s shortcodes to display your forms anywhere on your site.

Here are the shortcodes that you’ll need to add:

  • Registration form[wppb-register] – you can also add a role parameter to automatically assign users who use this form to a specific WordPress user role. For example, [wppb-register role="author"].
  • Login form[wppb-login] – you can also redirect users to a custom page after they login by adding a parameter like this.
  • Lost password form [wppb-recover-password]

For example, to create a dedicated login page, you would create a new page (Pages → Add New) and include the shortcode. You can also add your own custom content if needed:

Create custom login page

3. Create Your Google reCAPTCHA API Key

In order to connect your WordPress site to the Google reCAPTCHA service, you need to generate a reCAPTCHA API key from Google.

This API key is free to generate and use (up to one million requests per month, which your site will almost certainly never come close to exceeding).

To create a key, you can click this link.

First, enter your website name in the Label box.

Then, you can choose your reCAPTCHA type. Profile Builder supports two types of reCAPTCHA v2 protection, which is the most popular method of implementing Google reCAPTCHA:

  • “I’m not a robot” Checkbox – the normal “I’m not a robot” checkbox that you’ve probably encountered on sites from time to time. For legitimate users, all they have to do is check the box. If the visit seems suspicious, however, they’ll need to solve a CAPTCHA in addition to checking the box.
  • Invisible reCAPTCHA badge – this does not require the user to click a checkbox. Instead, it activates when the user clicks the existing button on your form. It will only display a CAPTCHA for traffic that seems suspicious – legitimate users won’t have to solve a CAPTCHA (unless there’s a false positive).

To learn more about the differences, you can consult Google’s docs.

For this example, we’ll use the “I’m not a robot” Checkbox method of reCAPTCHA v2, but you can use the Invisible reCAPTCHA badge if you prefer.

To finish things out, do the following:

  1. Add your website’s domain name to the Domains box;
  2. Accept the terms of service;
  3. Click the Submit button.

Generate reCAPTCHA API keys

On the next screen, you’ll see two pieces of information – your site key and your secret key. Leave this tab open and keep this information handy because you’ll need it in a second when you’re working in your WordPress dashboard:

reCAPTCHA keys

4. Add the reCAPTCHA Field to Your Form With Profile Builder

Now, you’re ready to add reCAPTCHA to your WordPress forms.

Whether you’ve created your own custom forms per the previous section or you’re using the native WordPress forms, you’ll do this in the same way.

To begin, go to Profile Builder → Form Fields. Then, add a reCAPTCHA field to the form.

How to add reCAPTCHA to WordPress field

Once you add the field, you should see the field’s settings, which is where you can configure your reCAPTCHA behavior.

First, use the ReCAPTCHA Type drop-down to choose what kind of CAPTCHA to add to your site. This should match the selection that you chose when you created your reCAPTCHA API key in the previous step.

Next, paste in the Site Key and Secret Key that you got in the previous step.

Finally, choose which forms you want to use reCAPTCHA on. You’ll get separate options for your custom Profile Builder forms and the default WordPress forms.

When you’ve made your choices, click the Add Field button:

Add reCAPTCHA keys to WordPress

And that’s it! You should now see the Google reCAPTCHA on all of the forms that you’ve selected.

Set Up Your WordPress reCAPTCHA Today

If you want to add reCAPTCHA to WordPress forms, Profile Builder gives you an easy way to protect your login, registration, and password reset forms.

You can either create new custom forms that include reCAPTCHA or you can add reCAPTCHA to the default WordPress forms (or both)!

If you’re ready to get started, install and activate the free version of Profile Builder from WordPress.org today.

And if you want to learn about all of the other useful ways that Profile Builder can help your site, click here to learn about Profile Builder Pro.

Profile Builder Pro

Create beautiful front-end registration and profile forms with custom fields. Setup member directories, custom redirects, cutomize user emails & more using the all in one user management plugin.

Get the plugin

Or download FREE version

Do you still have any questions about how to add Google reCAPTCHA to WordPress? Let us know in the comments!

The post How to Add reCAPTCHA to WordPress Forms (Login, Registration, and More) appeared first on Cozmoslabs.


How to Hide Products by User Roles in WooCommerce?

$
0
0

Do you want to easily hide products by user roles in WooCommerce?

Some WooCommerce store owners have a unique requirement where they want to hide certain products from all but a few specific groups of users. There may be many reasons for this, including selling exclusive products only to the more loyal customers, with a membership.

In fact, a more general use case of restricted product pages can also be when the store owner wants to run offers for their premium members only. They may want to sell some of their best products at a discounted price to them.

Whatever the reason, it’s important to be able to manage product visibility by user roles for WooCommerce.

Profile Builder Pro is designed to offer this functionality, along with many other useful features that help with the user management of your WooCommerce website. And it can do it for free!

Profile Builder Pro

Restrict product pages by user roles the way you want easily, quickly and with all possible customizations.

Get the plugin

Or download FREE version

How to Hide WooCommerce Products by User Role Using Profile Builder

Now that we have revealed that Profile Builder is the solution you’re looking for to manage user-specific products on your WooCommerce website, let’s take a quick look at the steps involved in the process:

  • Enabling content restriction functionality in Profile Builder;
  • Choosing the type of restriction you want to use by default;
  • Applying custom restriction settings to individual products. This is used when you might want a custom individual type of restriction instead of the default one.

So, let’s break these steps down into more actionable explanations so that you can follow along and hide specific products from the shop page on your WooCommerce site with ease.

Activate the Content Restriction Functionality

Before we get to hiding WooCommerce products, you’ll first need to install and activate the Profile Builder plugin on your WordPress site. You can download it for free from WordPress.org and then install it from Plugins → Add New → Upload Plugin in your WordPress dashboard.

The content restriction functionality is disabled by default in Profile Builder as not all websites are going to need it. So, in order to hide products by user role in your WooCommere store, you need to activate it first.

Click on the Settings option under the Profile Builder menu on your WordPress dashboard. Then click on the Content Restriction tab at the top. It’s the first option under that tab – Enable Content Restriction – that you need to set to Yes. So, click on the drop-down list and choose Yes.

Enable content restriction to hide products by user roles

Set Up Default Content Restrictions

On this same page, you can also choose the type of content restriction that you want to be used by default. This content restriction type will be applied site-wide to all products/posts/post types where the functionality is enabled without any customization. This includes the product pages where you leave the Settings Default option selected. But we’ll get back to this later.

Now, if you choose Message as your preferred type of restriction, by default, Profile Builder will show a message on restricted product pages. However, you can customize this message and make it your own if you scroll down a bit on this page.

Default restriction message

Alternatively, you can choose to redirect all visitors on restricted product pages to a page of your choice. It can be a membership page or pretty much anything you want it to be. Just click on the Redirect option and paste the URL of the page you want the visitors to be redirected to.

Default redirect settings

Once you’re done customizing the settings you want, you can scroll down to the end of the page and click on the Save Changes button. This will enable the content restriction functionality on your WordPress website.

Now you know how Profile Builder’s content restrictions work, but it’s time to learn about using your website’s user roles to implement these restrictions.

Hide Individual WooCommerce Products by User Roles

As I said above, Profile Builder is one of the most flexible user management plugins out there. It offers an incredible amount of customization and flexibility with pretty much all of its features.

That being said, when looking to use WooCommerce to hide products by user roles, the plugin offers a special meta box at the end of every product page where you can set this functionality up. There are 3 different types of content restrictions that you can apply to your individual WooCommerce product pages to hide them based on user roles. They are all designed to achieve different end goals. So let’s walk you through them below.

First things first, in order to access the Profile Builder Content Restriction meta box, you’ll need to navigate to the product page that you want to hide from the back-end and scroll all the way down. You’ll find this content restriction box at the end of every product page. Here, you can choose from the 3 different content restriction settings available.

Content restriction meta box - 3 ways to hide WooCommerce products by user roles

Settings Default – Using General Content Restriction Settings

The first option when customizing individual product restrictions is Settings Default. This option will be chosen by default and will apply the default settings you have previously set in the Content Restriction tab from Profile Builder’s general Settings presented above.

It can be either to show a message on restricted product pages or to redirect them to a particular page, depending on what you have chosen there. This will save you a lot of trouble, not having to individually update every product’s content restriction settings.

However, you’ll still be able to customize the content restriction settings on individual products if you want to. So again, if you don’t want to individually customize a specific product, don’t make any changes here and the default settings will apply to that product page.

Showing a Default or Custom Message

The second option here is Message. This simply allows you to show either the default or a custom message on that particular product page for the restricted users. Choosing this will overwrite the default content restriction settings you may have set in the general settings.

So, for example, even if you have chosen the Redirect option in the general settings of Profile Builder, you can choose the Message option here to show the default or custom message on this particular product page.

If you want to have a custom message instead of the default message on restricted products, you can write it in the custom message section:

Custom message for hidden WooCommerce products by user roles

As you can see, you also have the ability to choose a different message for logged-in users and logged-out users, by writing a unique message in each of the fields.

Select User Roles and Grant Access

Now speaking of users, the next step for fully customized product restrictions by user role, is to actually select the users you want to keep out of your specific product pages.

So, right after the Type of Restriction section, you’ll find the Display For section. Here, you can choose the user roles that you want to allow access to the product page you’re restricting. Once you click on the ‘Logged In Users’ checkbox, you will be able to select any other specific user role to allow them access to the product. These can include the Administrator, Author, SEO Manager, SEO Editor, Shop manager, or any other user role you have set up on your website.

Hiding WooCommerce products by user roles

The user roles that have remained unchecked won’t be able to see that specific product. They will either get the default restriction message (or a custom message set by you), or get redirected to a page of your choice, depending on the settings you choose.

And since we’re on the topic, with Profile Builder you can even create your own custom user roles or edit the already existing ones. This way you can personalize the user experience even more.

Redirecting Restricted Users

That brings us to the Redirect option. Again, you can choose which user roles can access the product and which user roles get redirected to some other page, just like I’ve shown you above. If you choose to create new user roles, those will then appear in the Display For section of the meta box.

So again, for example, if some of your product pages need updating or optimization by your team, you can allow those user roles access to those products, while restricting it for all the other user roles.

Similarly, you can use the Redirect setting option to redirect the restricted users to a page telling them that the product will be available soon. Of course, you can also just as well redirect them to a similar product that they may be interested in.

You can also choose a custom redirect URL here even if you have a default redirect URL saved in the settings.

Custom redirect to hide individual WooCommerce products by user roles

Once you’ve chosen your settings, scroll back to the top and click on the Update button for your changes to take place. That’s it! You have successfully applied your product restriction settings.

To confirm that the product restriction has actually come into effect for the specific WooCommerce user roles, you can visit the restricted product page as one of the restricted users. In my example, this is what a user role with no access should see if I choose the Message restriction type:

Message shown when accessing a hidden WooCommerce product by a restricted user role

Other Important Content Restriction Features

We have covered most of the content restriction functionality of Profile Builder that helps you manage product visibility in WooCommerce. However, Profile Builder has more to offer.

There are also some advanced content restriction functionalities that you can use in specific cases. They can also help convert more users into premium members if that’s what you’re looking to achieve.

So with that said, let us also take a look at those advanced functionalities.

Adding Media in Default Content Restriction

When you edit the default content restriction settings as explained above, you can also make use of media. This means that you can display an image or a video instead of text informing the users about the hidden WooCommerce product.

Of course, this would only work if you’re choosing the Message option. With the Redirect option, you can have your media elements embedded on the redirected page itself.

The same goes when updating restriction settings for individual products. You can choose to add media to your custom restriction message. In addition to this, when talking about product page content restrictions, you can also add a form that will only be displayed to restricted users. You can do this if you have a contact form plugin installed on your WooCommerce website. However, you do need to have a form created through your contact form plugin to be able to do so.

Media or form on restricted page

This functionality would allow you to get the details you want of users that land on restricted product pages. You can notify them when you can offer those products to them again, or even offer them some other similar products depending on their interest.

You can use Profile Builder’s Mailchimp integration add-on to send emails to these users as well.

Start Hidding Products by User Role in WoCommerce Today

Finally, Profile Builder Pro comes with a whole lot of other user management features outside of content restriction. Some of them include:

Give Profile Builder Pro a try if you’re looking for the most seamless and effective way to manage users on your WooCommerce website. Or download the free version if custom forms and content restrictions are all you need.

Profile Builder Pro

Restrict product pages by user roles the easy way, quickly and with all possible customizations.

Get the plugin

Or download FREE version

Do you still have questions about how to hide WooCommerce products by user roles? Ask them away in the comments below!

The post How to Hide Products by User Roles in WooCommerce? appeared first on Cozmoslabs.

5 Best WooCommerce Social Login Plugins (WooCommerce Facebook and Google Login)

$
0
0

Thinking about offering WooCommerce social login with Facebook and Google (or maybe even more) for your website’s users? It’s true that there are a lot of options available out there for you, so let us present you the top 5 WooCommerce social login plugins to help you choose your favorite.

Anyone experienced with running a WooCommerce store understands how important it is to optimize the checkout and customer registration process. The longer and more tedious the process is, the lower the conversion rate gets, as many customers would just give up on the purchase. Even the statistics reveal that as many as 77% of the users prefer social login as a way to register and login on any website, be it a WooCommerce store or a membership website.

However, there’s no built-in functionality in WooCommerce to allow visitors to register or log in using their social accounts. But as with pretty much everything related to WordPress and WooCommerce, there’s a plugin to save the day. In this case, we’re talking about social login plugins that work with social networks and WooCommerce to offer Facebook login, Google login, and more.

But you may still be wondering why using Facebook or Google to login into WooCommerce would be of any help. So, before we review the 5 best WooCommerce social login plugins, let’s dive a bit deeper into the reasons for using a social login plugin for WooCommerce in the first place.

Why Use a WooCommerce Social Login Plugin

One of the most important components of running a successful WooCommerce store is to consistently refine the sale process on your store to improve conversion rate. However, one of the biggest hurdles for a faster checkout is the tedious user registration process and related login issues.

But what if I told you that you can put these issues to rest once and for all and ensure a completely smooth, seamless user registration and login process? Well, that’s precisely what you can do when you implement social login functionality on your WooCommerce website. It would allow your users to register and log in using their social accounts like Facebook, Google, Twitter, etc.

Here’s a quick look at some of the biggest benefits of doing so:

  • You may be losing a lot of customers during the checkout process as they might be hesitant to go through the often lengthy registration process. This can be easily avoided if they could register with one of their favorite social media platforms in just a few clicks;
  • Most users already have way too many login credentials to remember. Adding another set of credentials for them to try and not forget—this time for your site—might be off-putting for some users;
  • It could help with customer retention, since this way the login process is way easier and quicker;
  • When the sign-up process is easy, more users sign up and successfully complete the checkout process. This would result in increased conversion rates on your WooCommerce store;
  • Your users would have an increased level of security and also tend to trust your store more, as they would be able to associate large social networks to your WooCommerce site in some way.

Since WooCommerce doesn’t support social login functionality by default, you’ll need a plugin to add social login to your WooCommerce website.

What You Need From a WooCommerce Social Login Plugin

The most important thing you’ll need when looking to choose a WooCommerce social login plugin for your site is the possibility to use at least the main social platforms for login. So, with that in mind, let’s quickly list down the most popular social networks you would want the plugin to support:

  • Facebook
  • Google
  • Twitter
  • LinkedIn

Most users are going to use either Facebook or Google, that’s why we will put special emphasis on these two social networks. But all of the plugins listed below do offer social login for other social platforms as well.

With that said, let’s review the 5 best social login plugins for WooCommerce.

Best 5 WooCommerce Social Login Plugins

1. Profile Builder Pro

Profile Builder

The reason Profile Builder Pro is one of the best social login plugins to use for WooCommerce Facebook or Google login is simply because it’s capable of doing much more than just implementing social login functionality on your store. But we’ll get back to that in a bit.

Now coming back to the social login functionality for WooCommerce, when using Profile Builder you’ll need to install the Social Connect Pro add-on, available with the Hobbyist and Pro licenses of the plugin. You can download it from your account page here on Cozmoslabs.com after purchasing the plugin.

Once you have downloaded the Social Connect add-on, you’ll need to install it by uploading it to your WordPress dashboard. Just click on the Add New option under the Plugins menu, then the Upload Plugin button at the top, and the Browse button to upload the downloaded Social Connect add-on.

Installing Social Connect add-on from Profile Builder

Then click on the Install Now button, and once installed, hit the Activate button. That’s it. Now the social login functionality has been added to your WooCommerce website.

You will now find the Social Connect option under the Profile Builder menu item in your WordPress dashboard. You can click on it to set up the social login functionality on your WooCommerce website.

Social Connect add-on settings

Here are some of the things you will be able to do here:

  • Choose the pages where the social login options are displayed;
  • Set up WooCommerce login with Facebook, Google, Twitter, and LinkedIn;
  • Customize the order in which these different social login buttons are displayed on the login/register form;
  • Decide the location on the page where these options are displayed;
  • Choose between large and small social login buttons;
  • Customize the text, style, and other elements for these buttons;
  • Allow or prevent the ability for users to unlink their social profiles from their account on your WooCommerce site.

Profile Builder Pro

Easily set up social login on your WooCommerce store with user-friendly settings, step-by-step documentation, and all kinds of customizations.

Get the plugin

Or download FREE version

After you’ve chosen you preferred social platforms to use, you’ll need to retrieve the API IDs from each social network you want to set up as a login option on your WooCommerce site. So, for instance, for WooCommerce login with Facebook, you will need to create a Facebook App ID.

However, if you choose to go with this plugin and need a bit of guidance, detailed documentation for how to generate each social network’s IDs are available to you on the add-on’s settings page:

Generate API keys for WooCommerce Social Login

You will be able to set up and manage all aspects of the social login functionality on your WooCommerce website right from this one single page. The ease of use offered by Profile Builder here is unparalleled and this is what gives it the edge over other social login plugins for WooCommerce.

As far as costs go, the premium version of Profile Builder (which includes the Social Connect add-on) starts at around  €69 ($78) per year.

Profile Builder Extra Functionalities

However, as I said in the beginning, Profile Builder includes a huge range of user management features in addition to the social login functionality for WooCommerce. It comes as a complete user management plugin and would go a long way in helping you implement a wide range of user-related functionalities on your WooCommerce website.

Here’s a quick look at some of its highlighting features other than being an excellent option for WooCommerce Facebook and Google login:

2. Nextend Social Login

Nextend Social Login

Nextend Social Login is another good WordPress plugin that allows your visitors to register and log in using their social accounts for free. However, to use social login with Facebook, Google, Twitter and others in WooCommerce, you’ll need a paid license.

The plugin also gives you the option to redirect the users to a custom URL after they log in or register using their social account.

Here’s a quick look at its most important features:

  • Supports social login on WooCommerce with Facebook, Google, Twitter, LinkedIn, Yahoo and more;
  • WooCommerce integration available only with the pro version;
  • Ability to redirect users to a specific URL after registration or login with a social account;
  • A fair bit of customization for the settings, style, and design of the social login buttons;
  • Restrict specific user roles from using the social login functionality.

Just as a note, all of these features are also available with Profile Builder Pro in the other areas of its user management settings.

While there is a free version of this plugin, this doesn’t include the WooCommerce integration and it only supports login with Facebook, Google, and Twitter. If you need the social login functionality on a WooCommerce store, you’ll need to purchase at least their Standard license, which is priced at €46 ($53) and is available to use on one site.

3. WooCommerce Social Login

WooCommerce Social Login

WooCommerce Social Login is a social plugin available directly on the WooCommerce website. It’s primarily designed for only one purpose – allowing potential customers to register and log in using their social accounts so that they can have a faster checkout experience.

This would lead to an increase in the conversion rate and sales. This plugin also supports some other networks and services in addition to social networks. The list includes:

  • Facebook
  • Google
  • Twitter
  • LinkedIn
  • Amazon
  • Yahoo
  • VK
  • PayPal

If you have many users who may want to use their account on some of these other networks for social login, then using this plugin may make sense. In addition, an interesting feature this plugin offers is the ability to monitor the number of accounts registered on your WooCommerce store using different social networks.

Just like Profile Builder Pro, WooCommerce Social Login also allows users to unlink their social accounts from your store whenever they want.

The WooCommerce Social Login plugin is priced at $79 and billed annually.

4. WP Social

WP Social

If you’re after a plugin that helps you add an element of social media touch to your store while also offering social login, then WP Social may be a good fit for you.

The big plus of this plugin is that in addition to supporting a long list of social networks, it also offers social share and social counter functionalities, all available for WooCommerce too.

The social share functionality allows users to share posts, pages, and products on their social media accounts. You can implement this social share functionality for your product pages so that users who like your products can share it on their social accounts and drive more sales to them through referral traffic.

Similarly, the social counter functionality allows you to display the number of social followers or subscribers you have. If your store has a large social following, it may make sense to use it as social proof to increase trust among potential customers. This can also help drive up the conversion rate.

So, to recap all the available features, here’s what this plugin has to offer:

  • Support for the main social platforms and additional ones (Dribble, GitHub, Vkontakte, and Reddit);
  • Social share functionality to share posts, pages and products on social media;
  • Social counter functionality to display social following;
  • Customization options for all of the available functionalities (only with the paid versions).

WP Social is a very good option if you’re on a budget and don’t need a lot of customization, since it does include most of the functionalities in it’s free version. However, if you need to create a more customized and professional-looking experience for your clients, including customizing the icons, login/registration forms, or using design templates, you’ll need to purchase a pro version, which starts at $26/year (for use on one site only).

5. AccessPress Social Login

AccessPress Social Login

AccessPress Social Login is a simple social login plugin that works with WooCommerce if you choose its pro version. The plugin doesn’t offer a lot in terms of customizations, but you can choose from 30 different premade templates that go well with the overall theme and design of your store. It also offers support for 12 social networks with its paid license—including LinkedIn, Instagram, Foursquare, Yahoo, Reddit, and more.

You can use a specific shortcode to display the social buttons anywhere on the page, as well as arrange the order of the social buttons.

It supports the 3 most popular social networks in its free version: Facebook, Google, and Twitter. You would be able to disable one or two of these 3 social networks, depending on which ones you want to support on your store. However, as mentioned above, you would need to purchase the pro version as the free version doesn’t work with WooCommerce.

AccessPress Social Login’s main features are:

  • Support for 12 social platforms;
  • 30 premade responsive templates for social buttons;
  • Option to use a shortcode anywhere in the post/page to display social login.

The best thing about this plugin is the price point, which is the lowest on this list. The plugin usually costs $20 with 6-month support, but they do run a 50% holiday discount at the moment.

Enable WooCommerce Facebook and Google Login Today

It’s easy to see how enabling the social login functionality on your WooCommerce store can go a long way in increasing conversion rate and customer retention. However, choosing Profile Builder Pro for the task would also allow you to set up and manage other aspects of user management.

It would help you have full control over every area of your website, improve user experience, and drive more sales and subscriptions. All on top of offering social login to your visitors.

Profile Builder Pro

Easily set up social login on your WooCommerce store with user-friendly settings, step-by-step documentation, and all kinds of customizations.

Get the plugin

Or download FREE version

Do you still have questions on how to enable WooCommerce login with Facebook and Google? Don’t hesitate to tell us in the comment section below!

The post 5 Best WooCommerce Social Login Plugins (WooCommerce Facebook and Google Login) appeared first on Cozmoslabs.

How to Redirect Users After Login in WooCommerce (Easily & Quickly)

$
0
0

The ability to redirect users after login is an important functionality for WooCommerce sites. It not only helps increase sales by redirecting customers to an optimized products or shop page, but also offers a better user experience overall.

If you don’t set up a login redirect for your WooCommerce store, users may end up on the back-end of your site and this may lead to poor user experience.

Profile Builder not only allows you to set up login redirects for WooCommerce, but it also helps you customize other important pages, like your registration and logout page.

So, let me walk you through the process of setting up different types of login redirects for WooCommerce using the Profile Builder Pro plugin.

What You’ll Need for WooCommerce Login Redirect

Profile Builder Pro is one of the best options available out there when it comes to user management. It comes with a plethora of features and functionalities to help you have full control over every user management-related area of your WordPress or WooCommerce website.

You can easily create custom redirects for different pages on your WooCommerce website using Profile Builder. However, you will need the Pro version of the plugin to be able to set them up using the Custom Redirects Add-on.

Profile Builder Pro

Create fully customized redirects after login for your WooCommerce store in the easiest and fastest way possible.

Get the plugin

Or download FREE version

Once you’ve purchased a Profile Builder Pro license, you’ll be able to log in to your Cozmoslabs account and download your plugin from your account page. Just click on the Plugin Download button to download Profile Builder Pro and install the archive on your WooCommerce site by uploading it to the plugins area. Don’t forget to activate it once installed.

Download Profile Builder Pro

Activate the Custom Redirect Add-on

Now it’s time to activate the add-on. Hover your mouse on the Profile Builder menu and click on the Add-Ons option. Find the Custom Redirects add-on in the list and click on the Activate button.

Activate Custom Redirects

Custom Redirects will now show up as one of the options under the Profile Builder menu. Click on it to set up login redirects for WooCommerce.

Types of WooCommerce Login Redirects

Profile Builder Pro offers a lot of customization to allow you to set up login redirects exactly the way you want them. The plugin helps you set up 5 different types of login redirects:

  • Login redirects by username or user ID;
  • Login redirects by user roles;
  • Global redirects that basically work as general redirects;
  • Login redirects specifically on the default WordPress forms and pages;
  • Individual shortcode redirects.

So let’s dive deeper into these different login redirect setups.

Login Redirect by Username or User ID

If you want to redirect certain individual users after they log in to your site, you can set up a redirect specifically for them by using their username or user ID. Let me help you with the exact steps you need to follow below.

Hover your mouse on the Profile Builder menu and click on the Custom Redirects option under it. You will land on a page where you’ll be able to create all the types of redirects we listed above.

However, for setting up user-specific redirects, you’ll need to use the section right at the top.

Login redirect for specific users

So, for example, if you want to redirect a user on your site with the username “Steve,” we will input Steve in the Username field.

Now, as we are redirecting this user on login, we will choose “After Login” as the Redirect Type. Finally, we need to put in the Redirect URL and click on the Add Entry button to create this redirect.

Redirect specific users

That’s it. Now, when the user “Steve” logs in to our site, he will be redirected to the URL we have put in the Redirect URL field.

As you can tell, you can set this redirect up using the user ID as well. You just need to click on the User ID checkbox and input the user ID instead of the username.

Login Redirect by User Roles

Redirecting users by user roles is just as simple. This is the most common type of redirect since it’s used by many WooCommerce sites to redirect different users, like customers, authors, store admins, and more.

So let me explain how to set up login redirect by user roles on your WooCommerce site.

First, click on the Custom Redirects under the Profile Builder menu item if you aren’t already on that page. Scroll down a bit to find the User Role based Redirects section.

Create a login redirect by user roles

Choose the user role you want to redirect. I’ll choose the Customer user role in this case.

Click the Redirect Type dropdown menu and choose the “After Login” option. In the last field, enter the URL you want your customers to be redirected to upon login.

If Cozmoslabs was a WooCommerce store, the redirect URL for us would have probably been our shop page. So, I used that just as an example, as you can see below.

Creating user role login redirect

Here, you can create multiple login redirects for different user roles. So for example, if we also wanted to redirect our authors to our blog page on login, we can create a redirect for the Author user role too.

You will be able to find all the redirects you create below the respective section of that redirect type.

Check all redirects created

Global Login Redirects for WooCommerce

If you want to set up a general redirect that redirects all users who log in to your site to a specific page of your choice, you’ll need to use the Global Redirects section. You can find it below the User Role based Redirects section.

Just choose the “After Login” option from the Redirect Type dropdown menu and enter the redirect URL on the next field. Then click on the Add Entry button and all users will get redirected to the URL you have entered.

Global login redirect for WooCommerce

Login Redirect for Default WordPress Pages

If you have created a custom login page for your WooCommerce store (which you should, if you haven’t already), you may not want your users to land on WordPress’ default forms and pages. The default WordPress pages include the WP login, registration, lost password, and author archive pages.

However, if you have a custom login and registration page, you may not want to keep the default WordPress login and registration pages accessible to your users. They are far too limited in their functionality and customization. Instead, you can create custom login and registration pages using Profile Builder’s form builder functionality.

With that said, let me show you the steps you need to perform to redirect the default WordPress login page to the custom one you have created on your WooCommerce store.

Scroll down to the last section on the Custom Redirects page, the Redirect Default WordPress Forms and Pages section. Choose the WP Login page from the dropdown menu as the Redirect Type, and then enter the custom login page URL in the Redirect URL field.

Redirect default WordPress pages

Once you click on the Add Entry button, no user will be able to access the default WP login page. They will get redirected to your custom login page instead. You’ll need to do the same for the registration page as well.

Individual Redirects Defined in Shortcodes

If your website has even more specific needs, Profile Builder also offers the opportunity to set up individual redirects defined with shortcodes. Here’s a list of all the shortcodes available to implement this.

Using Tags for Dynamic Redirect URLs

When you scroll down to the end of the Custom Redirects page, you will find a list of tags on the right, under the Available tags for dynamic URLs section.

Tags for creating dynamic redirect URLs

Profile Builder’s Custom Redirects add-on also allows you to use tags to create dynamic redirect URLs for your users. So for example, if you use the {{user_id}} tag as the Redirect URL, your users would get redirected to their respective user profile page.

Setting up login redirect with tag

Redirect after Registration for WooCommerce

Just like with the login, you can also set up redirects after registration for your WooCommerce store. The process to do so is exactly the same, except that you have to choose the “After Registration” option from the dropdown menu instead of “After Login” as the Redirect Type.

Redirect after registration for WooCommerce

As you can see in the image above, we will be redirecting the users to our website’s homepage after registration. We have used the homepage tag to redirect them. Once we click on the Add Entry button, this redirect will come into effect.

Registration redirect created

Logout Redirect for WooCommerce

As you can see in the dropdown menus on the Custom Redirects page, there’s a long list of pages you can create redirects for. One of them is the logout page as well.

This is extremely useful when you want your users to still be engaged with your WooCommerce store even after they log out. If you don’t have a specific page to redirect them to after logout, you can at least redirect them to your website’s homepage. This will be a better option in terms of user experience instead of letting them land on the logout page.

WooCommerce logout redirect

Redirect Priority

As discussed above, there are a total of 5 different types of redirects you can create for different pages on your WooCommerce site, including the login, registration, and logout page.

However, what if you want to use multiple redirect types for different purposes? Maybe you want to redirect a few specific users and redirect a particular user role, while also setting up a global redirect for the rest of your users.

Well, Profile Builder takes care of this for you. There’s a well-thought-out redirect priority in place:

  • User-specific redirects are given the topmost priority and the other redirect rules will be overridden for the users covered under this redirect;
  • User role redirects come next, and they override the global redirect settings;
  • Global redirect settings apply to users and user roles that are not covered under the above two types of redirect.

However, you can also customize these priority settings depending on your needs. If you want to have a particular topmost priority and override all the other redirect settings, you can simply add the following parameter to individual shortcode redirect:

redirect_priority="top"

Also, another thing to keep in mind is that if you’re using multiple registration or edit profile forms on your WooCommerce store and have chosen any redirect settings there, then they will be given the topmost priority by default and override all the other redirect settings.

Redirect priority

Set Up Login Redirect for WooCommerce Right Away!

If you have gone through the above tutorial, you now know how easy it is to set up login redirects for your WooCommerce store using Profile Builder Pro. In addition, you can also set up redirects for the registration and logout pages just as easily.

However, you can do much more with Profile Builder Pro in terms of complete user management for your WooCommerce site. You could edit, add or remove user roles, create custom registration, login and edit profile forms, restrict access to content and much more.

Give it a try today and have full control over every aspect of your WooCommerce site’s user management.

Profile Builder Pro

Set up custom login, registration, and logout redirects for WooCommerce, in addition to a whole lot of other user management features.

Get the plugin

Or download FREE version

Do you still have questions on how to set up WooCommerce login redirects? Ask us in the comments section below!

The post How to Redirect Users After Login in WooCommerce (Easily & Quickly) appeared first on Cozmoslabs.

How to Password Protect Content, Posts, and Categories in WordPress

$
0
0

There are many use cases for password protected content in WordPress. This is especially true for content creators who create premium content to actively monetize it in the form of subscriptions or memberships.

But as it is with everything related to WordPress, password protecting posts doesn’t have to be difficult. If you’re wondering how to password protect WordPress content, posts, and even categories without having to mess around with code, then let me tell you that all you need is a flexible user management plugin like Profile Builder to get the job done in a few easy steps.

Why Password Protect Posts in WordPress?

There can be many reasons for password protecting posts in WordPress. One of the most popular reasons is membership website owners looking to restrict their premium content.

A membership website has premium content that is only sold to its premium members in exchange for a fee. It needs to make sure that its premium content is only accessible for its paid members and restricted for everyone else. The premium content here may be a premium category with all the restricted posts or a few specific tutorials posted in the form of posts.

Similarly, some WordPress websites sell a few of their posts bundled as some kind of course or try to build a user base or premium community by making a few of their important posts private. This is different from password protecting an entire WordPress website though.

Regardless of the reason, our user and content management plugin, Profile Builder Pro, is here to save the day. However, if you run a membership website and want to restrict content for non-members, then you might want to check out Paid Membership Subscriptions, which is a complete WordPress membership site plugin.

Profile Builder Pro

Restrict and password protect posts in WordPress in a few easy steps and do much more with Profile Builder Pro.

Get the plugin

Or download FREE version

We will get into more details below as we walk you through our step-by-step tutorial for password protecting content, posts, and categories on your WordPress website.

How to Password Protect WordPress Content or Posts

Now, in order to password protect any type of content on your WordPress site, the first thing you’ll need is a way for your users to ask for access to restricted content.

This can be achieved by requesting your visitors to sign up to your site in order to view this restricted content. This way, whenever a user stumbles upon a restricted post, they will be prompted to use their username and password in order to be granted access. And this is where Profile Builder comes in handy.

Even though the paid version of Profile Builder Pro offers a wide range of content management functionalities, for this type of basic content restriction that we’re going to talk about in this tutorial, the free version of the plugin works just fine. So let’s get started!

Install the Profile Builder Plugin

Profile Builder Pro is a complete user management plugin that offers a huge range of features, including the ability to password protect certain areas of your WordPress website. You can easily restrict some of the posts on your website, or any other areas for that matter, and deny access to them to everyone who doesn’t log in with their username and password. And you can do it for free!

So, to start things off, you’ll need to download the free version of the plugin from WordPress.org and upload it to your site (Plugins → Add New → Upload Plugin). Alternatively, you can also simply search for “Profile Builder” in the search bar of the Plugins section (Plugins → Add New).

Next, install your plugin by hitting the Install Now button, followed by the Activate button.

You can now start using the password protect functionality on your site.

Create Custom Login and Registration Pages

When you’re setting up a password protected post in WordPress, you will first need to create a registration page visitors will use to sign up, and a custom login page so that returning visitors can easily log back into their accounts.

To create these pages, all you have to do is use the proper shortcodes for each. In fact, you can even create multiple registration/login pages using these same shortcodes.

Creating a custom login page with Profile Builder is extremely simple. You just need to copy the [wppb-login] shortcode, then create a new page and paste this shortcode on it.

Creating the Custom Login Page

Now, this page will automatically turn into a front-end user login page.

Custom Login Page

The exact same process applies to the registration page, you’ll just need to use the [wppb-register] shortcode instead.

Enable Content Restrictions for WordPress Password Protected Content

Now that you have a way for users to log in, it’s time to set up the password protected posts on your WordPress website. You can password protect as many posts as you want.

However, you’ll first need to activate Profile Builder’s content restriction functionality if it’s not already activated on your site. To do so, go to Profile Builder → Settings and then click on the Content Restriction tab.

Content restriction tab

You need to make sure the Enable Content Restriction dropdown menu is set to Yes, as you can see in the image above. For the second option – Type of Restriction – you’ll need to choose Message.

Keep in mind that these are going to be your default content restrictions settings, but you can still overwrite these settings for individual posts as well if you ever need to.

Now, if you scroll down a bit, you’ll find the section that allows you to write a message to be displayed to restricted users. Here you’ll be able to customize the message your logged out visitors will see when they try to view a restricted piece of content. But, most importantly, this is where you’ll be able to grant them access in exchange for their username and password.

Message Customization for WordPress Password Protection

As you can see above, after we’ve entered our custom message, we’ve simply added the login shortcode here as well. In our example, we’ve also included 2 extra arguments along with the shortcode, in order to help new users easily create an account or recover their password. But you can leave the [wppb-login] as it is if you don’t want to include any arguments.

Now we just need to scroll down to the end of the page and click the Save Changes button.

Password Protect WordPress Posts

Now you can go to the posts and set them up as password protected posts on your WordPress site. Go to the specific post you want to restrict and scroll down to the Profile Builder Content Restriction section, at the bottom of the page. Let me show you an example below.

Profile Builder Content Restriction Box for posts

This is what we see when we scroll down to the bottom of the post we want to restrict. Now, because we have already set up the default content restriction settings in the main Profile Builder settings area, we don’t need to make any changes here except for checking the Logged In Users checkbox.

This will allow the website to ask logged-out users for a password when they land on a password protected post. So, once you’ve clicked on the Logged In Users checkbox, you can scroll back up and click on the Update button for that post.

Now, when we try to view this particular post without logging in, we are greeted with our custom message and are required to enter our username and password in order to access the post.

WordPress Password Protected Post

This is all you need to do. It’s a very simple and quick process that allows you to set up as many password protected posts in WordPress as you want in no time.

How to Password Protect WordPress Categories or Post Types

But what if you want to restrict entire post types or categories? While Profile Builder works perfectly fine if you want to password protect content in WordPress that’s in the form of individual posts or pages, you’re going to need a bit of extra help if you need to restrict entire categories or post types on your site.

And this is where Paid Member Subscriptions, one of the most complete and functional membership plugins for WordPress websites, comes in.

Paid Member Subscriptions Pro

Set up a fully functional membership website with restricted categories and premium content with ease.

Get the plugin

Or download FREE version

Whether you wish to start a full-on membership website, or simply want to restrict some specific post types or categories, using Paid Member Subscriptions is surprisingly simple and efficient.

Install the Paid Member Subscriptions Plugin

First things first, you’ll need to purchase and then download Paid Member Subscriptions from your Cozmoslabs account page.

Make sure to download both the main plugin and the Pro extension from your account and then upload those zip files to your WordPress site.

Cozmoslabs Account Page

To upload the plugin on your site, go to Plugins → Add New → Upload Plugin. Select the previously downloaded files and then install and activate them one by one.

Enable Global Content Restriction

Next, you’ll need to activate the Global Content Restriction add-on, available with the Paid Member Subscriptions Basic or Pro licenses only. 

Navigate to Paid Membership Subscriptions → Add-ons, find the Global Content Restriction in the add-on list, and then activate it.

Paid Member Subscriptions Add-ons Page

Now, if you want to password protect entire categories or post types on your WordPress website, you’ll need to set up at least one subscription plan. You can make this plan free, so users only need to sign in to access restricted categories, or you can even charge a one time or recurring fee.

This is what makes Paid Member Subscription such a great option for managing membership websites since it offers subscription plan setups bundled up with customized content restrictions and lots of membership features, all in one place.

Password Protect WordPress Categories

With that said, let me walk you through the steps you need to perform to set up a subscription plan and password protect a category on your WordPress website.

First, go to Paid Membership Subscriptions → Subscription Plans. Then click on the Add New button at the top.

Creating a New Subscription Plan

You’ll land on the page where you can set up and customize your subscription plan. If you don’t want to charge users for signing up to your site, you can simply add a name to your plan and then leave all of the other setting as they are by default. But if you want to benefit from other membership features, here’s a detailed documentation on Subscription Plans and how to set them up the right way.

Next, scroll down to the bottom of the page, where you will see the Global Content Restriction section. This is where you’ll set up the password protected categories in WordPress.

Global Content Restriction Box

Now choose the Post Type from the dropdown menu. For our use case, we’ll go with the “post” option since we want to password protect an entire post category. Next, click on the Add Taxonomy link and choose the Category option from the dropdown menu that appears.

Password Protecting a WordPress Category

As you can see in the image above, a list of all the categories available on our WordPress website shows up. You can choose the categories you want to restrict or password protect and then scroll back up on the page and click on the Save Subscription button.

Update the Registration Page

Now, in order for this restriction to work, there’s one more step you need to take. Remember the registration page you’ve created in the beginning using the [wppb-register] shortcode?

Well, because in order for your users to have access to this type of restricted content, they need to sign up for a subscription plan as well, you’ll need to use a different sign-up form this time around.

To do this, go back to the registration page you’ve already created with Profile Builder, and replace the [wppb-register] shortcode with the new [pms-register] shortcode. This new form will display a list of all the subscription plans you’ve created, right here on the registration page. In our case, we’ve only created one free tier, so all new users will be automatically subscribed to this plan upon sign-up.

Now, all the posts under the restricted category, “Simply stories” in this case, will return the set restricted message and login form, for non-logged-in users. The visitors will only be authorized to view posts from this category by using their username and password.

Password Protected WordPress Category

In order to customize the message shown here, you can apply the exact same steps you followed when setting up Profile Builder’s content restrictions. Just go to Paid Member SubscriptionsSettingsContent Restriction tab, instead of Profile Builder’s Content Restrictions this time. You can even copy the exact same message and login form here as well.

Password Protect Posts in WordPress in Few Simple Steps

After going through the above tutorial, you should now have a pretty clear idea of how to go about password protecting your posts in WordPress. And if you’re a membership site owner, then you can just as easily password protect entire categories in WordPress, or any other premium content for that matter, using Paid Member Subscriptions.

Just make sure you choose the right plugin for your needs and follow the few simple steps we explained above. You’ll then be good to go with implementing fully customized content restrictions on your WordPress website.

Profile Builder Pro

A complete user management plugin that lets you restrict posts in WordPress in a fully customized way.

Get the plugin

Or download FREE version

Do you still have questions on how to password protect content, posts, and categories in WordPress? Let us know in the comments!

The post How to Password Protect Content, Posts, and Categories in WordPress appeared first on Cozmoslabs.

How to Set Up Event Registration in WordPress

$
0
0

Are you looking for an easy way to set up event registration on your WordPress site?

WordPress is a powerful CMS that offers tons of functionality out of the box. However, it doesn’t let you set up event registration or restrict content for specific user roles. For obvious reasons, this is not ideal for event organizers.

If you organize events, you want to offer easy registration so that as many people sign up for your events as possible. And in this tutorial, we’ll show you exactly that.

So let’s talk about how you can set up event registration in WordPress using the Profile Builder Pro plugin and its add-ons.

The Need to Use an Event Registration System in WordPress

WordPress lets you create and customize user registration forms. However, they’re not suited for setting up event registration or offering prospective attendees an easy way to sign up for your next event.

The solution is to use an event registration system.

This gives you an easy way to set up and manage event registrations from a central platform. You can create custom event registration forms that would help people register for your event while also allowing you to collect the data you need from them.

Having a solid event registration process in WordPress also ensures that you don’t have to worry about collecting payments and keeping track of ticket sales. This helps you focus on promoting your event rather than worrying about the technical side of things.

Additionally, you want to be able to personalize your event website according to your branding and requirements. This is possible with the flexibility and robustness that WordPress offers.

On the flip side, if you create an event website using a SaaS platform like Eventbrite, the entire event registration experience will be plain and generic. This doesn’t help you put out a good first impression and can negatively impact conversions.

Types of Events that Could Use WordPress Event Registration

Let’s take a look at some different types of events you can set up using a robust event registration system:

  • Online events. Online events are a great way to gather a huge audience for a special event or to showcase your content. For instance, you can host an online webinar where you demonstrate how to use a new product and answer people’s questions.
  • Conferences. If your business hosts frequent conferences to promote content or discuss topics in detail, you can use an event registration system to let your audience and staff members register easily from your event website.
  • Camps. Hosting camps is a great way to help your audience learn something new or improve their lifestyle. For instance, you can organize a 7-day “Yoga Retreat” or you can also host a “Cook-off Camp” that helps young chefs and cooking enthusiasts show off their skills.
  • Workshops. You can create workshops for your audience to enhance their knowledge around a certain topic or for teaching detailed topics that require you to go more in-depth.

How to Set Up Event Registration in WordPress

Here, we’ll show you how you can set up event registration in WordPress using the Profile Builder plugin. Firstly, we’ll talk about what you can do for free for a basic setup. After that, we’ll go into more specific features, using the pro version of the plugin.

Profile Builder Pro lets you easily set up event registration by creating custom registration forms and personalizing them. Then you can easily display these forms using shortcodes, creating attractive-looking event registration pages. This gives you full control over how your registration forms look and feel on your website.

In addition, the plugin lets you create custom login, edit profile, and password reset forms for the front-end of your site as well. And it also comes with advanced user modules that help extend the functionality of the event registration system even more. But we’ll touch on this later on.

So, let’s get started with the tutorial!

Step #1: Get the Profile Builder Plugin

If you’re only looking for a simple custom registration form for your site, that can work as an event registration form, you can safely use the free version of Profile Builder, available for download at WordPress.org. Alternatively, you can also simply search for “profile builder” in the plugins area of your WordPress dashboard (Plugins → Add New). Next, install and activate the plugin.

Profile Builder Free

But if you want to take advantage of the full Profile Builder Pro experience and its add-ons, you can purchase a license here.

Now, using the download link sent to you at the time of purchase, or by accessing your account page, download the plugin’s .zip file.

Cozmoslabs Account Page

Then, navigate to Plugins → Add New, click the Upload Plugin button and drag the .zip file into the Upload meta box and click on the Install Plugin button. Make sure to activate the plugin after it’s done installing.

Step #2: Customize Form Fields

Next, you can start customizing the form fields for your event registration form. To do this, navigate to Profile Builder → Form Fields from the WordPress admin panel.

WordPress Event Registration Form Fields

Here, you’ll see a list of the default WordPress form fields and custom ones added by Profile Builder. Using the Select an option dropdown menu, you can select the field you want to add to your form.

The username, password, and email fields are mandatory and cannot be deleted, but you can add lots of other relevant fields depending on what information you need from your attendees. You could ask for their age, profession, website, and so on.

Setting Up WordPress Event Registration Form Fields

When you add a new custom field, you’re going to need to choose a Field Title, Meta-name, and set whether it’s a Required field or not using the dropdown menu. Depending on the field type you’re editing, you might need to fill in different types of information.

Once you’re ready, click on the Add Field button. Repeat this step to add as many custom fields as you need for your event registration form.

Step #3: Create a New Event Registration Form and Page

Now, with custom form fields added to your WordPress site, you can create your event registration page.

Using the Free Version of Profile Builder

When using the free version of the plugin you can only create one registration form that will include all of the fields you’ve chosen in the previous step.

All you have to do to create your brand new event registration page is copy the [wppb-register] shortcode on a blank page. This will display your custom registration form on the front-end of that page.

You can give the page an appropriate name, such as “Event Registration” and, in the end, it should look something like this:

Event Registration Page in WordPress

Using Profile Builder Pro

Now if you’re working with the premium version, there are a few more customization options available to you.

First of all, if you already have a registration form on your WordPress site, you can create the event registration as a new one, using the Multiple Registration Forms add-on. First, go to Profile Builder → Add-ons and enable the add-on by clicking the Activate button to its right.

Multiple Registration Forms Add-on

Next, navigate to Profile Builder → Registration Forms and click on the Add New button. Here you’ll be able to create a new registration form, separate from the one you might be using to let your users sign up for your website.

Add New Field to the List Section

Give your new event registration form an appropriate title and select the user role you want to assign when users register for your event using the Set Role dropdown menu. You can also select whether to log in users automatically after they register using the dropdown menu below.

Additionally, you can also choose to redirect users after they complete the registration form. Select Yes using the dropdown menu and enter the URL of the page using the text field next to URL. For instance, you can redirect users to a thank you page or registration confirmation page. This helps them feel more valued and confirms that they have successfully registered for your event.

Next, using the Add New Field to the List meta box, select the desired fields and click on the Add Field button to add custom fields to your event registration form.

Add New Field to the List Section

You can drag-and-drop form fields as desired to rearrange them and click on the Edit button to quickly edit form field information. Similarly, you can also delete default fields and add your custom-created ones only. Once you’re done, click on the Publish button at the top right of the page.

Now, copy the shortcode under the Form Shortcode meta box. Create a new page with a descriptive title (you can add other relevant information if you want), and paste it to this new event registration page.

WordPress Event Registration Form Shortcode

Step #4: Enhance the Event Registration Experience

Profile Builder Pro, out of the box, comes with lots of advanced add-ons that help enhance the event registration experience even further.

Let’s take a look at a few of them and how they can upgrade your event registration process:

Email Customizer

Email Customizer

The Email Customizer add-on lets you personalize all emails that are sent by Profile Builder Pro from your website to your attendees.

Using this add-on you can fully customize your participants’ registration experience. Thus, rather than sending them generic confirmation emails, you can send them emails that are personalized to the event you’re hosting.

Multiple Registration Forms

Multiple registration forms

I’ve already touched on the Multiple Registration Forms add-on in a previous section, but let me give some more insight.

Not only can you create multiple registration forms on your site, but you can also create multiple event registration forms for attendees on your event website.

This way, you can capture different information based on the event users are registering for and assign them different user roles. For instance, you can create two registration forms when hosting a workshop event; “Teacher registration” and “Student registration”. Or maybe you’re hosting a conference and you need separate registration forms for speakers, vendors, and conference participants.

This will make it easier for all types of attendees to register for your event.

Front-End User Listing

Front-end user listing

Profile Builder Pro’s User Listing add-on lets you easily create lists of registered users on your WordPress site. You can use this to display a list of registrants on the front-end to encourage more attendee registrations.

Or, you could display a list of all of the teachers attending your workshop or speakers presenting at your conference, for example.

Multi-Step Forms

Multi-Step Forms

Profile Builder Pro also offers a Multi-Step Forms premium add-on. This lets you create a multi-step form that may include two or three different forms on the same page. This offers a more seamless registration experience while also allowing you to gather detailed information from the user when they register.

In order to display a multi-step event registration form on the front-end of your WordPress site, simply paste the shortcode on the page you’d like to display the registration form, just like I’ve shown you before.

Site visitors can fill in the form and click on the Next button to view the next set of custom fields:

Event registration WordPress preview

Set Up Event Registration in WordPress Today

Setting up event registration in WordPress can be difficult, especially if you don’t have the right event management system. This is why Profile Builder Pro is a great option for event organizers and business owners who want a “one-off” solution to creating and managing events.

Additionally, Profile Builder Pro comes with a lot of other user management features outside of event registration. Some of these robust features include:

Ready to quickly set up event registration in WordPress? Get Profile Builder Pro today!

Profile Builder Pro

The best even registration plugin for your WordPress site.

Get the plugin

Or download FREE version

Do you still have questions on how to set up event registration in WordPress? Ask them in the comments section below!

The post How to Set Up Event Registration in WordPress appeared first on Cozmoslabs.

Viewing all 116 articles
Browse latest View live