Quantcast
Channel: Profile Builder Archives - Cozmoslabs
Viewing all 116 articles
Browse latest View live

MailPoet for Profile Builder

$
0
0

Sending newsletters is now easier with the new MailPoet Integration Add-on. This Profile Builder Add-on allows your users to subscribe to your newsletters lists created with the MailPoet Newsletters plugin.

Let’s walk through the configuration steps.

Installing the plugins

Since this is an integration add-on, you will need to install both Profile Builder and MailPoet Newsletters plugins, in order to make MailPoet Integration Add-on to work.

Adding the MailPoet Subscribe checkbox to the form

Adding the MailPoet Subscribe field to the Profile Builder form is made from the Profile Builder -> Manage fields tab.

Mailpoet-Manage-Fields

Here you need to select a list from your already configured MailPoet lists, so that users can choose to subscribe to that specific list.

You can add an appropriate field title, decide whether to be checked by default and also whether to display on Edit Profile forms. When you are done click Add Field.

Mailpoet-Add-field

Resulted front-end form

Let’s see how it looks on the Registration form. I have added two MailPoet Subscribe fields allowing users to choose between two different lists to subscribe to.

You can see the two fields at the bottom of the form. Notice that the “Subscribe to daily newsletter” checkbox is ticked by default, as I have set it up earlier.

The MailPoet Subscribe fields can be placed on Edit Profile forms too, allowing users to subscribe to new lists or unsubscribe from existing ones.

Ready to subscribe new users

Now you can let users choose from different newsletter lists you set up from MailPoet Newsletter. Get the add-on now by following the link below.

Get Profile Builder – MailPoet Integration Add-On


The post MailPoet for Profile Builder appeared first on Cozmoslabs.


Add Conditional Logic User Registration Forms with Profile Builder

$
0
0

One frequently requested feature from our Profile Builder users, was the ability to add conditional logic user registration forms, or user profile forms for that matter.

Conditional Fields are an easy way to show or hide fields based on user selections. Using conditional logic you can implement dynamic front-end registration forms for your users.

Here’s a quote from one of our customers:

I need to be able to capture unique custom fields based on the type of user registering.
They self select which type they are during registration and based on their selection should be displayed different registration fields.

This is just one of the multiple scenarios where adding conditional logic user registration forms is required. Or you could ask a question and depending on the selected answer, display different fields to users. The use cases are numerous.

Why and when to use Conditional Logic User Registration Forms

Conditional Logic is mostly required when you need to control what information your user is asked to provide and tailor the registration form specifically to their needs. It offers a lot of flexibility for displaying form fields and makes sure your forms are clean, short and highly usable.

By not exposing your users to irrelevant registration fields you’ll most likely be increasing sign-up rates.

Also, don’t overdo it. Building dynamic forms just for the sake of it is not recommended at all. Make sure to add conditional logic only when it’s absolutely mandatory and it makes your users life easier.

Below we’ll go into an example of using conditional logic, to highlight the flexibility it offers while also capturing the user information you need.

Adding Conditional Logic to a Field

You can easily enable conditional logic on a custom field using Profile Builder.

Under Profile Builder -> Manage Fields, when adding a new field or editing an existing one you’ll find the “Conditional Logic” option under Field Properties.

conditional logic user registration forms

Conditional Logic Rules

When defining a conditional field you can add certain rules that offer a lot of flexibility in terms of displaying or hiding that field in the front-end.

  • Show / Hide – select what happens with the field when condition(s) returns true
  • All / Any – all conditions must be true / at least one condition must be true
  • is / is not – condition is true if the field value is or is not the value added in option
  • + (plus) sign – for adding as many conditions as you like

Let’s say we have two user roles registering (Vendors and Buyers) and we need to collect different information for each one using the same register form. Vendors will need to fill in extra fields like Company Name, VAT number and Website. Buyers will only need to enter their First and Last Name for registration.

Here’s how the fields will look in the Manage Fields interface.

Conditional Logic Manage Fields

We’ll have the default username, email & password fields, then add a Select (User Role) based on which we’ll display the rest of the fields.
Next, we set up Company Name, VAT number and Website as conditional fields, to be displayed only if the user selects “Vendor”.

conditional_field_company_name

Now let’s have a look at how the front-end registration form will look like:

By default, when “Buyer” is selected the Company Name, VAT number and Website fields won’t be visible.

buyer-registration

They appear only after a user selects the Vendor option.

vendor-registration

Conclusions

Conditional logic makes filling in the registration form an easier, more intuitive task for your user.

One of the biggest benefits of adding conditional logic user registration forms is that by creating clean and short forms you will lower registration abandonment rates while also capturing the information you need.
This is because each user will only be prompted with the fields mandatory for his registration scenario.

Profile Builder offers an intuitive UI for adding conditional logic fields and creating interactive forms that react to user’s previous selections.

Have you tried using Conditional Logic in your WordPress front-end registration forms? Share your thoughts in the comments section below.

The post Add Conditional Logic User Registration Forms with Profile Builder appeared first on Cozmoslabs.

Add Repeater Fields to User Registration and Edit Profile Forms with Profile Builder

$
0
0

One of the heavily requested features by Profile Builder users was the ability to add multiple fields or groups of fields dynamically to front-end forms, without having a predefined number.

The user should be able to repeat a certain field or set of fields, when registering or editing his profile in the front-end. Most of the requests were regarding the upload of multiple files or PDF documents, or multiple images for creating user galleries.

That’s how the Repeater Fields Module was born. It makes adding Repeater Fields to User Registration and Edit Profile Forms fast and easy.

How to use Repeater Fields

Repeater Field can be used when you need your users to insert similar information from your users, such as: add multiple phone numbers, upload multiple pdf, images or another type of files.

To activate the Repeater Fields in your back-end, you have to go to Modules tab, inside Profile Builder and there select “Active”.

Under the Manage Fields tab, you have a field type called “Repeater” that will give you full control over the repeater fields that appear on the front-end register and edit profile forms.

Once you have selected the Repeater field you will need to set out several Field properties, such as Field Title, Limit, then simply click “Edit field group” button and select which fields should be repeated.

The number of fields generated by users in the front-end forms can be also limited from the back-end by adding a general limit or one per User Role.

In the example bellow, for the upload of user pictures, we chose a General Limit of three and with a default pop-up message “To add up to 7 pictures, join us to become a contributor!”. Also, we added another two limitations, up to 7 user pictures for Contributors and unlimited for Editors.

To manage your Repeater Fields you have to click the Edit field group. From there a secondary interface will open and you will manage the fields or group of fields that you want to duplicate.

For this example, I have added a Heading field with the title “Upload Picture” and an Upload field with the title “Select picture”.

How Repeater Fields look like

In the front-end of your Registration Form or Edit Profile Form, you will have your Repeater Fields displayed. Here we have the three entries, where users can upload several pictures.

repeater_upload_pictures

We also set a general limitation of three pictures for uploading, with a custom message when the limit has been reached.

repeater_limitation_reached_popup_message2


Displaying the Repeater field in User Listing

Now that we have a Repeater field and we uploaded a few pictures, let’s see how we can display them using Profile Builder’s User Listing module.

If you don’t already have a user listing, simply create a new page where you place this shortcode: [wppb-list-users name="userlisting"].
Make sure that the User Listing module is active in the Profile Builder -> Modules tab.

From the Profile Builder -> User Listing tab, edit your listing entry. We’re going to modify the Single-Userlisting Template, to include the repeated upload field.
The variable names for our repeater field example are:

{{#meta_upload-pictures}}
   {{meta_select_pic}}
{{/meta_upload-pictures}}

Using the following syntax, we have added the user’s avatar, first name, and uploaded pictures. Make sure you get the correct variable names from the Available Variables tab.

<p style="text-align:center;">{{{avatar_or_gravatar}}}</p>
<p><strong>User:</strong> {{meta_first_name}} </p>
<p><strong>Uploaded pictures:</strong>
  {{#meta_upload-pictures}}
    <div style="clear:both; padding-bottom: 20px; overflow: hidden;">
       <img src="{{meta_select_pic}}" style="max-width: 300px; display:block; margin-right:auto; margin-left: auto;"/>
    </div>
  {{/meta_upload-pictures}}
</p>

Then, update the User Listing.

This is the final result when viewing John Doe’s user list profile. As you can see, John Doe is just a subscriber, so he gets to upload only 3 cat pictures.

user-list-repeater-field

Conclusions

This repeater fields module represents an effective way to easily duplicate a field in the front-end registration and edit profile forms.

The main advantage of this module is that new and existing users can easily add several pieces of information of the same type without a predefined number, things like uploading various documents or images, all without leaving the front-end page.

How are you using Repeater Fields in your front-end forms? Let us know in the comments section below.

The post Add Repeater Fields to User Registration and Edit Profile Forms with Profile Builder appeared first on Cozmoslabs.

Building Multi-Step Registration Forms with Profile Builder explained

$
0
0

Getting people to register for a website can be hard, but with Multi-Step Registration Forms you can change those unpleasant forms into user-friendly ones.

There are a few recommended steps you can follow in order to build a more user-friendly form:

  • build value around your registration form
  • eliminate unnecessary fields
  • group fields in a logical way and build registration processes
  • secure your forms and the privacy of future users
  • properly identify and explain errors

When to use Multi-Step Forms

Usually, for businesses, it’s pretty hard to convince people to go to the registration page and complete a long and annoying form because it can be frustrating.
That’s why when you are dealing with this type of long forms it’s better to break them into multiple steps based on the type of information or multiple pages.

There is a high chance it will also increase your conversion rate.

You can use Multi-Step Registration Forms in various cases and combinations, such as moments when you want to:

  • divide registration by the topic of the information (tabs)
  • split questions in two types (easy and hard)
  • separate questions by a certain number of pages (pagination)
  • divide by both pagination and tabs

Keeping all the above in mind, we started working on Multi-Step Forms, an add-on developed for our Profile Builder plugin. The add-on gives users the possibility to build multiple step forms, personalized and in a user-friendly way.

Now, to get this add-on up and running, you have to follow some steps, which includes Profile Builder installation and add-on activation.

How to install Multi-Step Form into your website

To make the Multi-Step Forms Add-on work, you will have to install the latest version of Profile Builder (version 2.5.1) because the add-on is not compatible with previous versions of our plugin.

When your download is complete, you can upload the .zip file in the Add Plugin page of the WordPress Dashboard. After that, navigate back to the Plugins Page and activate the Multi-Step Forms Add-on.

How to build Multi-Step Registration Forms with Profile Builder

Let’s suppose you are a B2B company that offers several creative and digital services, and you want your clients, which means other companies to register to your website, to complete information about themselves and build employee profiles.

Therefore, we will create the form back to the back-end interface by adding custom fields. Into the Manage Fields Tab in Profile Builder Dashboard, you will find your Fields List with Field Proprieties for Registration and Edit Profile pages. There you can add a form BreakPoint, which means that your fields will be displayed in divided pages.

Into the Manage Fields Tab in Profile Builder Dashboard, you will find your Fields List with Field Proprieties for Registration and Edit Profile pages. There you can add a form BreakPoint, which means that your fields will be displayed in divided pages.

multi-step registration forms

Further, you have another section for Multi-Step Forms where you can enable where to display your forms, which means Profile Builder Default Registration Form or Edit Profile Form. Also, from there you can set up which settings to be displayed: pagination or tabs.

In the example from above, we choose, only selected “Enable Tabs” as we want to display the fields based on some categories. The name of the tabs can be edited from “Edit Tabs Title”, and they will start showing up at the moment when you will add a BreakPoint.

multi-step-resgistration-forms-proprietes22

First, the representant of the company will fill in details about themselves, such as Name, Username, E-mail and Password.

multi_step_registration_forms_blog_post_frontend_form

In the Registration Form, your users will navigate to the next page, only when they will complete all the details required in the selected one.

Below, we used Cozmoslabs as an example to fill in the form with information about company profile and created employee profiles for three of our team members.

screenshot-wpnuggets-com-2016-11-24-15-46-56

If some details are required and others not, then your users will be able to access the next page without completing those fields. Above, we added a “Social Profiles” fields, with non-required fields, where a user can add links to the business social profiles.

In the next step, the user will have to choose a subscription plan and complete billing information about the company.

screenshot-wpnuggets-com-2016-11-24-15-27-33

Personalized style can be added for Tabs, Pagination and Next / Previous buttons using their specific CSS class.

This is it, you can now create Multi-Step Registration Forms and customize them in a user-friendly way so that your users will be guided all along the way.

Conclusions

Now, to sum up why you should consider using Multi-Step Registration Forms, let’s make a list:

  • your audience can easily scan your content and that will keep them focused
  • it increases engagement with form and also might boost your conversion rate
  • it presents the questions in a logical and grouped way
  • it doesn’t scare users with long content

Get Profile Builder – Multi-Step Forms Add-on

The post Building Multi-Step Registration Forms with Profile Builder explained appeared first on Cozmoslabs.

Extend bbPress User Profile with bbPress Add-on for Profile Builder Pro

$
0
0

Enabling User Profiles for your website can have several benefits, especially if your type of business requires interaction among users. To build forums with user profiles for WordPress-based websites, there are several plugins available, but we will particularly talk about bbPress User Profiles.

The Pro Version of our Profile Builder plugin now supports bbPress integration and forum user profiles can be extended with the help of the new add-on.

How to use bbPress Add-on for Profile Builder

bbPress is an Advanced add-on, available with a Profile Builder Hobbyist or Pro license only and, in order to make the bbPress add-on work, you’ll need to follow some steps from the documentation page and install the following plugins:

How to extend bbPress user profile fields

Let’s suppose you have a course platform or community website with WordPress specialists and an open forum, with various topics regarding this platform. A similar example to this can be Inbound.org, a community platform built for internet marketing specialists.

Further, you want your WordPress specialists to get to know each other and interact over the forum topics of discussion.  But, to make this happen you have to give them the chance to check if they are compatible with the other one, by building a custom user profile, filled with professional information or skills.

bbpress_addon_forums

Starting from the forum page, you can see the profile of the person who has started the topic, click on the name and check her / his user profile. There you can see you profile photo, click on your profile, check topics started & replies created, and also see favorite topics and subscriptions.

bbpress user profile

If you are the author of the topic when you click on the name, you will be redirected to the forum edit profile form, where you will complete the custom edit profile fields you have created back into back-end, to the Manage fields dashboard.

bbpress userprofile edit

From the left menu, you can access several sections, such as:

  • “Topics Started”, where you will find and access the topics opened by the person in question
  • “Replies Created” – with all user replies
  • “Favorites” – find user’s favorite forum topics
  • “Subscriptions” – check user’s forum and topic subscriptions

bbpress_topics_started

Conclusions

You may consider using extending bbPress User Profile with our Add-on for Profile Builder since you can:

  • transfer bbPress user profile to Profile Builder user profile
  • automatically redirect all forum user links to the extended user profile,
  • use your avatars added via Profile Builder Register form
  • list bbPress users via the Profile Builder User Listing module.

Get Profile Builder – bbPress Add-on

The post Extend bbPress User Profile with bbPress Add-on for Profile Builder Pro appeared first on Cozmoslabs.

How to build online communities using Profile Builder & BuddyPress

$
0
0

Building a community website can be a great idea not only because you can control the experience of the user, manage SEO and inbound traffic, but also because I think a community is more about nurturing a constant, active presence and happy experience.

If we speak about the integration between our Profile Builder & BuddyPress plugin, this will extend the user profiles of BuddyPress, by replacing the default Registration form, Profile Editing, and User Listing with customized ones, created with custom user fields from Profile Builder.

As you may already know, BuddyPress is a powerful community plugin for WordPress that gives you the ability to build any type of community website, with member profiles, activity streams, friend connections, user groups, discussion forums and private messaging, just like a social network.


How to use Profile Builder & BuddyPress

This integration is packed as an advanced add-on, available only with a Profile Builder Pro license only. And, to have them up and working on your website you must install and activate:

To make sure the both plugins are correctly installed and running working properly, first follow the steps from the documentation page.

Why and when to use Profile Builder & BuddyPress

Building a community website on WordPress can be difficult and it sure takes a lot of time, planning or effort, but fortunately there are various types of plugins to help you out, depending on your needs.

One of those plugins is BuddyPress that enables the possibility to build a social network website or add custom community features to an existing website. BuddyPress has been already used for campus websites by universities, niche social networks created by a specific group of people, focused communities on a product or service or integrated with bbPress to expand the features of community forums.

We are now going further and think you could use Profile Builder & BuddyPress together to build a WordPress niche community website like Independent Fashion Bloggers, which has a community that runs on BuddyPress integrated within the website.

Create and Manage Custom User Forms and Profile fields

Some users say that social networks and forums are similar, but I think plugins like BuddyPress are going a few steps beyond forums because they allow interaction between a user and create their own social profile.

Now regarding our WordPress Community websites, we will divide the overall picture into three sections:


1. New type of fields for Registration and Edit Profile forms

The first benefit of this integration is that if you already have an active BuddyPress Registration and Edit Profile form, you can replace them with Extra Field Types from Profile Builder (WordPress Dashboard -> Profile Builder -> BuddyPress), including Repeater Fields and Conditional Logic. You can read the documentation, of Manage User Fields to check out all the field types

profile builder & buddypress - colorpicker and map

2. Single-userlisting templates 

The next new feature of the add-on is about flexibility and when using this module you can customize the templates so that they will fit your needs. First, if you have been using BuddyPress before, you can simply replace BuddyPress Profile View with Profile Builder’s Single User Listing (WordPress Dashboard -> Profile Builder -> BuddyPress – Choose Single-userlisting), a template that lets you customize your profile from the front-end of your website, by using HTML code and User Field Tags.

profile builder & buddypress-single-userlisting

3. All-userlisting template

This module is similar to the previous one with the remark that you will have to use HTML code or the User Field Tags from all-userlisting section  (WordPress Dashboard -> Profile Builder -> BuddyPress – Choose All-userlisting).

buddypress-all-userlisting

Besides using the User Field Tags templates from Profile Builder, you can also use all the existing tags from BuddyPress, such as BuddyPress Avatar, BuddyPress Cover Photo, Buddypress Last Active, BuddyPress Add Friend Button, BuddyPress Latest Update, BuddyPress Friends Tab, as you can check up the documentation.

profile builder & buddypress - member listing

4. Register and Edit Profile Forms

Thanks to the integration of Profile Builder & BuddyPress you can customize which fields to be displayed on the Registration Page and which ones to be on the Edit Profile.

buddypress-fields-visibility

5. Keep using all the BuddyPress features you’ve been used to

More than continuing with the same features, you can now use the Field Visibility from Profile Builder where you can set up particular visibility options in the same way BuddyPress allows it.

BuddyPress’s Default Field Visibility option allow users to choose from the following options: Everyone, Only Me, All Members, My Friends.

registration-form-edit-field-visibility

Another feature that needs to be mentioned is the import of BuddyPress fields to Profile Builder, which means that you can move BuddyPress user data to Profile Builder by simply clicking on the Import BuddyPress Fields button. After the import, our plugin will create corresponding fields for the existing ones.

Conclusions

The integration between BuddyPress and Profile Builder make it easy for website owners that want to build a community website with social network features or add these to an existing one.

The biggest benefits of this integration are:

  • Replace existing form or user profile fields from BuddyPress with customized ones created with Profile Builder
  • Website owners can display registration forms customized for their interest
  • Use BuddyPress Tags together with Profile Builder User Fields Tags
  • Import BuddyPress fields and use Profile Builder field management

If you are using the BuddyPress Integration add-on, you can share your opinion in the comments section below

Get BuddyPress for Profile Builder Add-on

The post How to build online communities using Profile Builder & BuddyPress appeared first on Cozmoslabs.

SlideHunter: From blog to WordPress membership site with 150.000+ users [Case Study]

$
0
0

Let’s take a short rocket ride to see how SlideHunter, the online resource for PowerPoint templates, went from a simple blog to WordPress membership site, with a subscription base of over 150.000 users.

Who is SlideHunter and what they do?

SlideHunter is a free online resource that offers PowerPoint templates. Their website was born after the founder got frustrated about the backgrounds available and decided to change something. The business has started as a blog with a freemium strategy so they could offer free slide designs for everyone.

The journey started back in 2012 and the idea behind the project came from the consultancy and business world. This is where Julian Magnone, the founder had a recurrent need of using business templates. At that time SlideHunter had only a few visits per week, but soon enough the website became popular and now reached a subscriber base of over 150.000+ users.

After building the website, Julian realized that there are several things to improve and started looking for a way to provide a membership feature on their website. This way they meet the free version of Profile Builder on the WordPress plugin directory and decided to implement it right away.

What we liked from Profile Builder was the flexibility it offered and the customization possibilities especially for WordPress Developers. Using hooks and filters, it was very easy to adapt the plugin to our needs.

How are SlideHunter and Profile Builder working together?

Developing compelling pitches takes a lot of effort and can become a daunting task if you are not very familiar with the elements needed to succeed (design, content, delivery). A great story is not delivered efficiently if it doesn’t have a visual support behind and there are a few elements we all consider when building pitches: keep a balance between content and design. Both of them should convey the same idea & story, have some elements that stand out and grab the attention of your audience and all slides should be connected together visually by offering a consistent look.

Julian wanted to help business people who need an appropriate template, so he started to write blog posts and offer free PowerPoint templates with free Illustrations created in Adobe Illustration. With his templates, people could use nice diagrams with business characters and avatars, various backgrounds and freebies. But, as a business, he needed to enhance the value offered to subscribers, so he needed a solution that would help him convert the blog to a whole new membership website, where users could register themselves, in order to download templates, see fewer ads and get updates for new pieces of content.

So, after installing the plugin, he created a Registration Form with custom fields and integrated within SlideHunter website. As you can see below, he also added some benefits on why someone should create an account.

“It was simple, worked nicely from the beginning and offered us the flexibility we were looking for. Again, thanks to the use of hooks inside the WordPress plugin,” says Julian Magnone, owner of SlideHunter.

In order to decide between Profile Builder and other plugins they used in the past, Julian was hunting for plugin solutions on WordPress.org, evaluated a range of options and  considered the following aspects:

  • The Performance (the overall performance won’t be affected by having a large base of subscribers)
  • The Flexibility to Customize how the plugin works via filters and hooks in WordPress (notifications emails being sent, smooth registration process, use of ReCaptcha, etc.)

After researching for the all-in-one solution he needed, SlideHunter went further with the free version of Profile Builder, which was the best fit for its need. More than this, Julian emphasizes that if he hadn’t managed to identify a plugin that would help him make the switch from a blog to the new membership website, then any other solutions would have required more complex development steps and in-house functionalities.

Going from blog to WordPress membership site and beyond

As regarding the advantages of time & productivity of converting the blog to a membership website, they could focus on designing and uploading the Free PowerPoint templates. Also, there was more time to work in the code of the business, rather than keeping an eye on the user base.

The installation was straightfoward and easy-to-use. The plugin could be adapted seamlessly to our website. It helped to gain more subscribers over time by customizing the registration process.

SlideHunter has increased the percentage of returning visitors compared to the new ones, by sending frequently customized emails to existing users, recommend them templates, and also updates on the free ones listed on the website.

The post SlideHunter: From blog to WordPress membership site with 150.000+ users [Case Study] appeared first on Cozmoslabs.

How to create custom WordPress user roles with Profile Builder

$
0
0

Creating custom WordPress user roles within a site offers you various possibilities for segmenting your users, based on the type of audience that you want to target.

Below, I’ll walk you through how to create your own custom user roles by using Profile Builder.

Why and when to use Roles Editor from Profile Builder

WordPress comes along with a few default user roles that are all that is needed for a site that requires user registration and user login. However, there are a few cases where a certain type of websites requires a custom user role that doesn’t fit the default ones:

  • Administrator: a user role that has access to all the administrative functions of the website;
  • Author: a user role that offers access to users to publish and manage their own posts;
  • Contributor: a user role that offers access to users who can write and manage their own posts, but yet can publish them;
  • Editor: a user role that can publish and manage posts of all users, including their own;
  • Subscriber: a user role that has access to read content posted on a site and edit his profile.

pb_roles_editor_edit_capabilities

These default user roles have capabilities that can help most type of websites. But, for example, if you are running an online magazine with two type of content: free articles to read and private articles, available only for Premium Subscribers, you will basically need a new type of user role for your Premium Subscribers. Along with this, you should consider creating a user role for someone in your team, that will moderate comments. 

How to use Roles Editor

The Roles Editor is available on both versions of Profile Builder, free and Pro starting with the version 2.6.2 or higher.

To ensure that Roles Editor will work on your website, please make sure to update Profile Builder to the last version, mentioned above and follow all the steps described in the documentation.

To sum up the process, you need to activate Roles Editor from your WordPress Dashboard → General Settings → Save Changes, and then move forward to the Roles Editor sub-page, under Users section.

pb_roles_editor_general_settings2

Create and Manage The Custom WordPress User Roles from Profile Builder

Edit User Roles

Same as for user roles, there are various capabilities available and if you need something specific, you can extend them by creating new ones, or by installing other plugins. An example of these type of plugins is WooCommerce, that offers you capabilities specific to an eCommerce site.

Edit Capabilities

Now, for our Online Magazine, we said we want two type of users with two type of capabilities, to do different actions:

The first one is your Premium Subscriber, that will can read the private articles published on the site:

  • read;
  • read_private_posts;
  • read_private_pages;

For this one we will create a mew User Role from scratch, within the WordPress Dashboard -> Roles Editor -> Add New Role.

pb_roles_editor_create_new_role2

And the next one is your Comments Moderator, that will do the following actions:

  • read all the posts;
  • edit articles, both public and private;
  • moderate_comments;

Here, we already have the Editor that includes these capabilities, so we choose to clone this user role and delete the capabilities we don’t need:

pb_roles_editor_comments_moderator2

Conclusions

So, we passed through all the steps required to set up custom WordPress user roles within a site and I hope this tutorial helped you understand better user roles and capabilities. If you liked this article or have a few more questions regarding Profile Builder’s Roles Editor, please share them below, in the comments section.

Meanwhile, we are going further with the Free Version of Profile Builder, that recently reached 1 Million Free Downloads (Stay tuned for another article, on this topic!) and regarding the new features, here they are:

  • You can now register users with different roles, by having the feature of selecting a user role inside the registration form (Read more in the documentation)
  • We’ve added ReCaptcha in the free version, in order to help you fight against spam registration and brute force login attempts (Read more in the documentation)

The post How to create custom WordPress user roles with Profile Builder appeared first on Cozmoslabs.


The Road to 1 Million Downloads

$
0
0

During this week, we slowed down a little bit and took some time to celebrate the moment when Profile Builder, our WordPress profile plugin, reached 1 million free downloads.

It’s time to celebrate together! – A million thank you!

To say the least, we are pretty excited to reach this milestone. And it’s all thanks to YOU. Each one of you that found Profile Builder useful, used it for his projects and recommended it to someone, helped us reach this milestone.

Some time ago, we celebrated together with our friends from Cobalt Sign, a mobile development company that celebrated 1 Million Downloads for their successful app, Ready Set Holiday. And by monitoring the free downloads of our products, we identified a constant growth into Profile Builder’s free downloads, in the WordPress plugin repository.

After that, we started to monitor the growth on a daily basis, to see how much it takes to reach the 1 Million Downloads mark. We realized that Profile Builder is quickly approaching the same number of downloads and it would take us three – four weeks to get there.

That was the moment when we decided to organize a community party and show our gratitude to our friends and people that helped us grow as a company. In our adventure trying to book AMBASADA, the venue for our party we found just one spot available, May 23rd afternoon.

So we went for it. And without being 100% aware, on the morning of May 23rd, as we were getting ready for the party, preparing the goodies while closely checking the downloads count, we realized that the magic moment will happen on the same day.

profile_builder_wordpress_repo_downloads

The journey of Profile Builder

Profile Builder’s journey started when the company was still activating as a full-time WordPress design and development agency, under the umbrella of Reflection Media.

At that moment, my colleague Cristian wrote a tutorial on WordPress User Registration Templates and Custom User Profile Fields that started to bring a lot of traffic and build strong back-links, from Google, StackExchange, WordPress.org forums and many others.

Since many people were struggling with this, we decided to build a small plugin. This is how Profile Builder got born.

It lets you customize your website by adding a front-end form for all your users, giving them a more flexible way to modify their user-information, register new users and log in. All shortcode based and really straight forward to use.

Growth

During the last years, since the company focused on building and selling WordPress products, we had a yearly growth with values ranging from 28% to over 100%. And if we particularly watch the growth of Profile Builder, we notice a couple of milestones:

Last year, Profile Builder had 24 releases, where 4 of them were major releases that added complex functionalities and add-ons, such as:

  • User Listing refactoring
  • Conditional Logic fields
  • Repeater Fields & Group of Fields
  • Multi-Step Forms add-on
  • Social Connect add-on
  • Custom Profile Menus add-on
  • MailPoet add-on
  • bbPress add-on

Also, during the last four years, Profile Builder got featured in 10+ articles, blogs and plugin directories, among them, counting: Chris Lema, WPMUDEV, WP Explorer, CodeInWP or Business to Community.

What changed since we launched the initial version

WordPress

The current version of WordPress is the result of all the hard work that this community have provided it in the past year. When Profile Builder started its journey in 2010, WordPress was still counting the version 2.9.

As we look back, it feels like this content management system has come a long way to what it is today, and it reached a great pinnacle of success by empowering quasi 30% of the websites, around the world. Now, almost 7 years later we have Profile Builder releasing the 2.6.2 version few days ago, and WordPress quickly approaching to the 4.8. version.

Our Plugin

As far as changes to the plugin go, we’ve only had two major versions. V1 was the original plugin and while functional, it was limited in what you could do with it. You could even say V1 was a prototype, a proof of concept.

We had to completely rethink the entire interface in V2 and from that perspective. V2 will probably be the last major version as we’ve moved forward to an incremental update cycle, similar to what WordPress is doing, with a lot of focus on backward compatibility. While there have been huge changes between version 2.0 and the current 2.6.2 version, we’re still trying to make sure things are easy to use and understand.

Challenges & Lessons Learned

Our biggest challenge and a critical point for Profile Builder was making the transition from consulting to full-time product development. It was a scary moment as we literally gave up half of our revenue so we can focus on building better products. But that soon turned out to be one of our best decisions to date.

As for lessons learned, build something that solves a problem. Find a pain point and provide a solution for it. People will come. Then listen to their requests and constantly improve your product.

Moving Forward

Of course, things won’t stop here. We’ll continue to improve Profile Builder in the future and aim for:

  • better user interface
  • more integrations with other plugins and platforms
  • small tweaks and features we constantly get from our clients
  • continuing developing a plugin that works for our clients, not just in some use cases

A big thank you for helping us get further than we ever imagined!

The post The Road to 1 Million Downloads appeared first on Cozmoslabs.

Easily Restrict Content based on User Role with Profile Builder

$
0
0

Looking for an easy way to restrict content based on user role? If you run a community site on top of WordPress which allows user registration, you probably need a simple way to control which users can access certain pages.

In this tutorial, we’ll show you how to easily restrict access to certain WordPress pages by user role using Profile Builder.

You’ll have everything set-up and ready by following the 3 easy steps below:

Enable Content Restriction feature in Profile Builder

To ensure you get access to the Content Restriction feature within Profile Builder you’ll need version 2.6.9 or higher. Next, go to your WordPress Dashboard, download & install Profile Builder or if you’re using an older version, update the plugin to the latest version.

Then, under Profile Builder menu tab, navigate to General Settings and make sure you enable Content Restriction.

Set up Custom Restriction Messages

After activating the restrict content feature, you’ll notice a new submenu item appearing under Profile Builder tab, named Content Restriction.

From here you’ll be able to setup the type of restriction, as well as customize the default restriction messages users will see if they don’t have access to certain content.

You can also choose to display a short preview of the restricted content.

Based on these settings, if a non-logged-in user wants to access the content, he will get a short preview containing the first 20 words or any number set in the settings, similar to the one below.

Restricting a Page, Post or Custom Post Type based on User Role

After setting up the restriction messages, in your WP admin panel simply navigate to each post, page or custom post type you want to restrict. Below the content editor you’ll notice a section called “Profile Builder Content Restriction“.

From here you can set up the type of restriction, select which user roles will have access to the content, as well as add custom restriction messages if required.

In the example below, the post content will be available for all our logged in users that have the user role of “Administrator” or “Author” attributed.

Furthermore, if we want to customize the restriction message for this specific post, we can type in something different than the default ones.

Also, if you want to send your users to another page, you can enable the redirect feature. Inside our post, we will redirect all of the users that don’t have the following roles assigned: Editor, Subscriber, SEO Manager or SEO Editor.

Note: You can replicate the same steps for restricting content based on user role for any other page, post or custom post type on your website.

Conclusions

Restricting Content based on User Role is pretty straight forward using Profile Builder.

You can use it in multiple scenarios, from providing members only content, to restricting access to personal or confidential data, or simply setting a WooCommerce store available to members only.

Are you currently restricting access to parts of your website? Let us know your ideas and methods in doing so in the comments section below.

The post Easily Restrict Content based on User Role with Profile Builder appeared first on Cozmoslabs.

Approve Users from Admin Email using Profile Builder

$
0
0

If your WordPress site enables front-end user registration with admin approval, the easiest way to approve users without logging in every time a new registration is made, is to do it directly from the admin email, by simply clicking a link.

Using Admin Approval in combination with Admin Email Customizer module from Profile Builder PRO, approving new users from email is really straight forward.

Admin Approval from backend

By default, when activated, the Admin Approval feature allows you to approve newly registered users by logging in the WordPress dashboard and going to Users -> All Users -> Admin Approval.

Profile Builder - Admin Approval Backend

While this approach works perfectly fine, it can be pretty time consuming to do over and over again, especially if you’re dealing with a significant number of new user registrations on a daily basis.

Approve Users from Admin Email

A more efficient approach, that will save time is to be able to approve new users directly from the admin email, by clicking a specifically formed approval link.
Approving users from admin email can be done is three easy steps.

1. Enable Admin Approval

After installing Profile Builder, under Profile Builder menu navigate to General Settings page and make sure “Admin Approval Activated” is set to “Yes“. You can also select which user roles will need to go through admin approval.

2. Activate Admin Email Customizer module

Next, under Profile Builder menu, go to Modules and make sure to activate Admin Email Customizer. This will allow you to customize the email an admin receives on a new registration and add the approval link to it.

Profile Builder - User Listing - Activate Module

3. Insert the approve user link in the admin email

Once activated, a new menu item called “Admin Email Customizer” will appear. By clicking it you’ll be able to customize all the specific admin emails. For this tutorial we need to customize the “Registration with Admin Approval” email.

After locating this box, you’ll notice in the right side a list of Available Tags that can be used inside the email content. In order to approve users from admin email we’ll use one of the two available tags: {{approve_url}}, {{{approve_link}}}. The first one will output the url which can be used to build an approval link, while the second one will output directly the clickable approval link.

After inserting one of the two tags in the email content, make sure to click “Save settings” and you’re done.

Now, every time a new user registers the admin will receive the notification email containing the approval link.

Once clicked the admin will see if the operation has been successful. If so, the new user will be approved, notified and able to log in to the website.

Approving users from admin email is a fast and convenient way to control your website user registrations, that is really easy to setup using Profile Builder.

To approve users from admin email you’ll need both Admin Approval and Email Customizer modules, available in the PRO version of Profile Builder.

The post Approve Users from Admin Email using Profile Builder appeared first on Cozmoslabs.

Add Conditional Logic Fields to WooCommerce Checkout Page

$
0
0

Profile Builder – WooCommerce Sync add-on makes it super easy to add custom user fields to the WooCommerce checkout page, as well as manage the Customer Shipping and Billing Address fields.

It allows you to extend the WooCommerce checkout page, with support for all Profile Builder Pro custom field types, including conditional logic and repeater fields.

In this tutorial, we’ll focus on how to add conditional logic fields to the WooCommerce checkout page.

Uses for Conditional Logic on WooCommerce Checkout

The most frequent use cases for adding conditional logic revolve around:

  • offering options that require extra user information to be collected
  • collecting different type of information for different type of users

Basically, every time you need to show some extra fields (or groups of fields) according to the user choice, conditional logic is the way to go.

For the purpose of this tutorial, we’ll be using the following plugins:

  • WooCommerce – the popular eCommerce plugin, for adding a shop functionality to your website
  • Profile Builder (Hobbyist or Pro) – for creating and managing the custom user fields that we want to add to WooCommerce checkout
  • WooCommerce Sync add-on (included in Profile Builder premium versions) – for adding conditional logic fields to WooCommerce Checkout page

Adding Conditional Logic Fields to WooCommerce Checkout

Assuming you’ve already installed and configured WooCommerce to fit your online store needs, we’ll proceed to installing and setting up Profile Builder and WooSync add-on.
Both are installed just like any other WordPress plugin.

Make sure to activate both Profile Builder and WooSync add-on, then navigate to Profile Builder -> Manage Fields.
Here you have a list of all the custom user fields which can be added to front-end forms (like Register or Edit Profile) created with Profile Builder.

From the “Manage Fields” interface you can add all types of custom user fields and also choose which ones you wish to display on the WooCommerce checkout form. For the purpose of this tutorial let’s say you’re selling tickets for an event and as an organizer you want to know if the participants have any dietary restrictions.

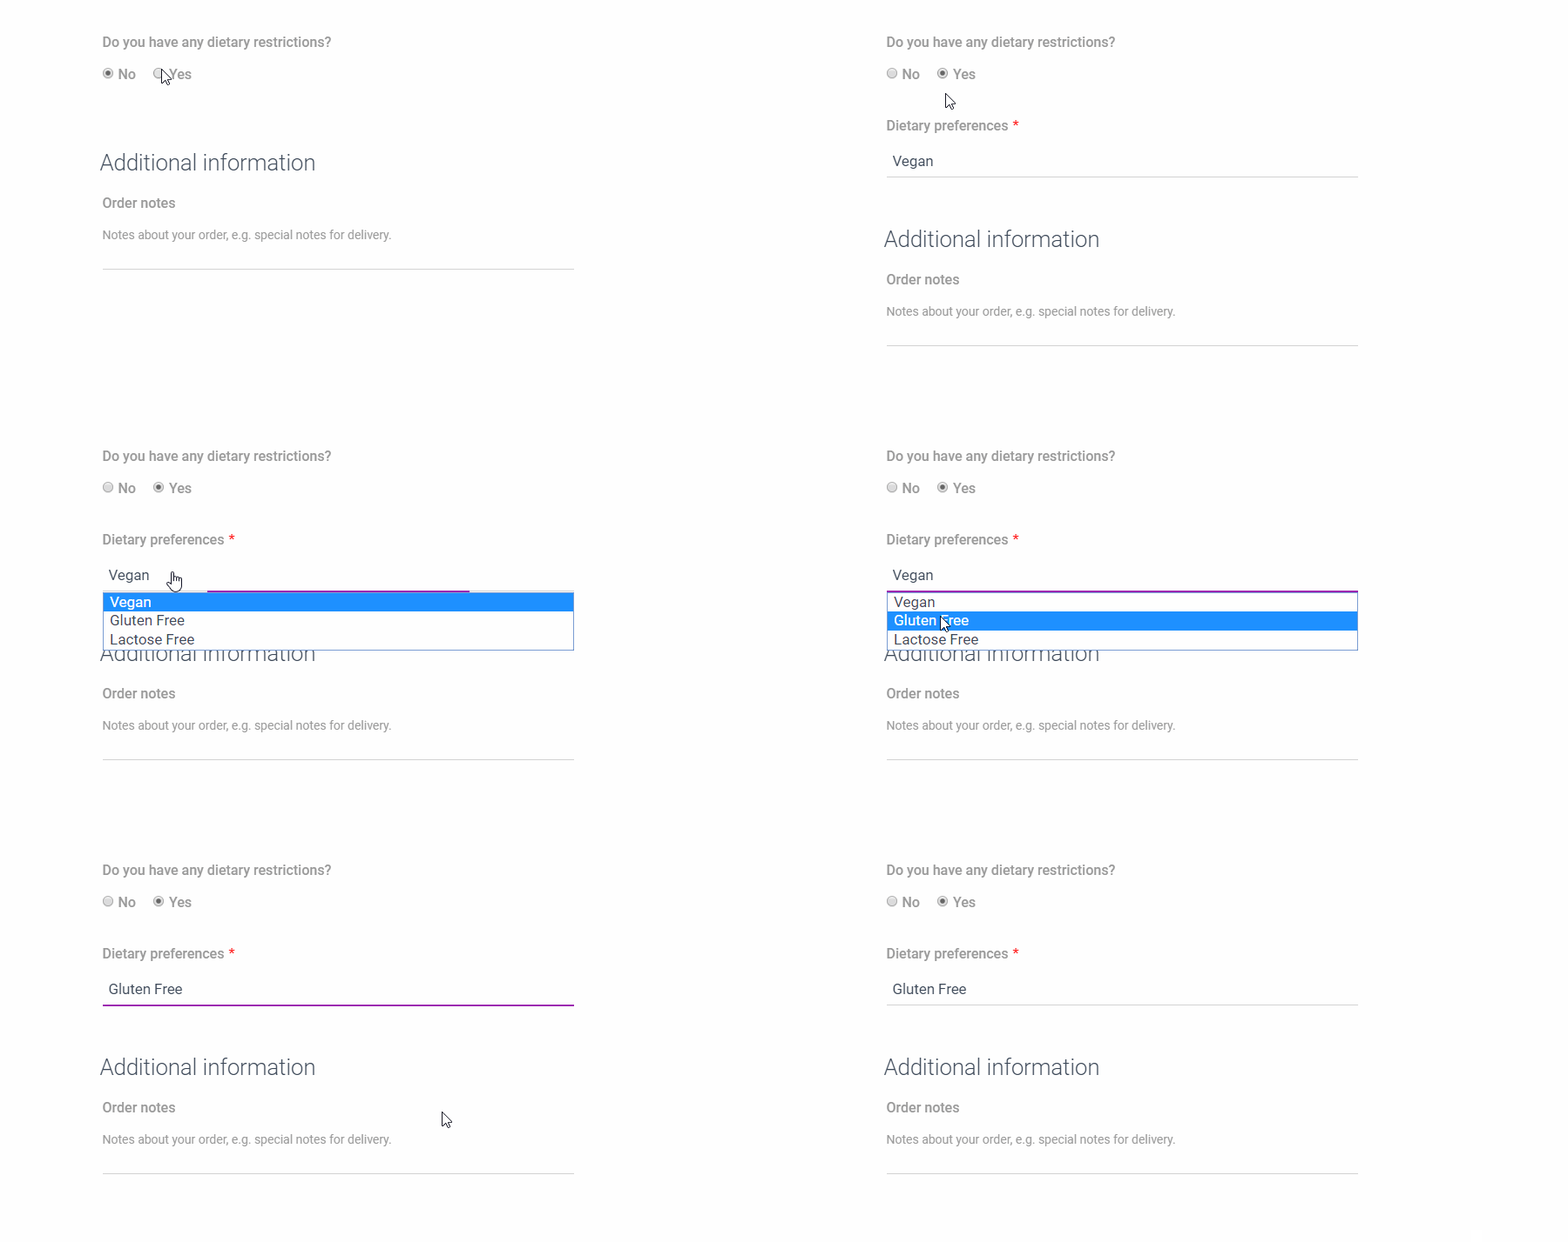
On the WooCommerce checkout page, when users purchase a ticket, we’ll ask the users if they have any dietary restrictions and only if they answer “Yes”, we’ll display a list of options to pick from, like “Vegan”, “Gluten free” or “Lactose free”.

For this, under Manage Fields page, click Add New field, select Radio. Enter a field title like “Do you have any dietary restrictions?” and two options: “Yes” and “No”. Then make sure to tick the checkbox stating “Display on WooCommerce Checkout“. This will make sure this field is displayed on the Checkout page.

Next, we’ll add a new Select field, that will allow users to select their specific dietary restrictions. We’ll set it up to display conditionally, only if the user selects “Yes” to “Do you have any dietary restrictions?”. You can add multiple conditions for each field that has conditional logic enabled, as well as pick from several conditional logic options.

After adding these fields let’s see how the WooCommerce Checkout form will look like.

As you notice, you’ll first see the dietary restrictions question. If the user selects “Yes”, he can then select a dietary preference.

This was a basic example of adding conditional logic fields to WooCommerce checkout with the help of Profile Builder and WooSync add-on. This allows you to remove extra clutter from forms and make sure you capture all the necessary data when required.

You can expand on the example above and add as many conditional logic fields as your project needs to the WooCommerce Checkout page.

The post Add Conditional Logic Fields to WooCommerce Checkout Page appeared first on Cozmoslabs.

Set up a WordPress Private Website with Profile Builder

$
0
0

We are happy to announce that starting with version 2.8.9 you can set up a Private Website in WordPress with the help of Profile Builder. This feature is available in all versions of Profile Builder.

If you’re looking to make your website visible to members only, then this feature is for you. A lighter version of this would be restricting access to certain pages.

To activate the option just go to Profile Builder -> Settings -> Private Website tab and select “Yes” for the “Enable Private Website” dropdown, then click “Save Changes“. Once activated the entire website, including RSS Feeds and the REST API, will be available only to logged in users.

WordPress private website use cases:

  • a personal site where you can share photos with your family
  • a company website where team members can share resources
  • a personal blog that you can use as a private diary
  • an under construction website that is not yet fully ready for public viewing

Here are a couple more recommendations to improve the user experience:

  • create a Login Page where you paste the [wppb-login] shortcode that creates a frontend login form so you can lead users away from the default WordPress login page (wp-login.php) and in the “Redirect to” dropdown select the created page
  • create a Register Page where you paste the [wppb-register] shortcode to create a frontend registration form for new users. To allow non logged in users to access this page than you must add the page in the Allowed Pages multiple select
  • on the Login page if you don’t want the visitors to see the menu structure of your site you can set the Hide all Menus setting to yes
  • if you want to display just some of the menu items to the non logged in users and not hide them all you can use our “Custom Profile Menus” addon.

If you want your WordPress website turned into a Private WordPress Website download and install Profile Builder.

The post Set up a WordPress Private Website with Profile Builder appeared first on Cozmoslabs.

How we increased Profile Builder’s usability by acting on user feedback

$
0
0

Improving your product’s user experience is an ongoing task. Or at least, it should be.

Adding feature after feature in the hope of attracting more customers can easily become the norm and usability starts suffering. Without focusing on the big picture and constantly asking why, it’s easy to get off track. We’re guilty of it as well.

Usability, or simply put, ease of use, should be your number one priority.  Trying to be everything for everyone is a clear path to disaster.

This is of course, easier said than done. 

In this article, we’ll summarize the usability issues we’ve encountered in Profile Builder , our first and most popular plugin, and how we solved them.

Keep in mind we’re by no means usability experts, just constantly trying to improve our products.

How do you know you have a usability problem?

In order to fix it, you first need to be aware it exists. 

So we did something we should have done a long time ago, which is ask users who install, use and then remove Profile Builder from their website, what’s the reason for it.

Just ask people why they stopped using your product and you’ll be surprised by how many are willing to share with you the details.

My colleague Madalin, implemented a feedback form which was triggered when someone tried to deactivate Profile Builder from their website.

Besides asking them the reason for deactivation/removal, we gave them options to choose from, to save time and increase the number of responses we get.

After running the form for around three weeks, we got around 4K replies and the results below:

We also made sure to switch the order of the answers so that the results are not influenced by the position of a suggested answer.

While “Lacking certain features” was something to be expected, since the results were collected from free version users, two percentages were concerning:

  • Hard to use” counted for over 30% of the answers. It was a clear sign that there’s friction in the on-boarding process of some first time users.
  • Poor documentation” had over 16%, so while not critical, it was definitely a sign we could work on improving our documentation.

Improving Profile Builder usability

Now that we know we’re not perfect, let’s see what we can do about it.

We made it our top priority and each team member was given the task to play with the plugin, put himself in the shoes of a new user, and think of ways (and write them down) to improve the user experience.

After a couple of days, during one of our team meetings, each one of us shared the things he wrote down. I must admit there were quite a few.

The good part is that some of them were duplicates, suggested by multiple team members (definitely a good sign). Those were added immediately to the development todo list.

The rest were brainstormed and prioritized. In the end we narrowed it down to the following list:

  • Redirect to Basic Information page after plugin activation (to guide and give new users a big picture of what they can do with the plugin)
  • Add a “Create Form Pages” button on Basic Information page to automatically create the Register, Edit Profile, Login, Lost Password, Userlisting etc. pages containing the forms.
    • If the pages with the shortcodes already exist, the button will become “View Form Pages” and take you to a listing of all PB form pages.
  • Visual shortcode insertion from the WordPress editor – a button that when clicked will open a popup and  allow you to select the type of form and enter the arguments related to it (so you don’t have to copy paste the shortcode and search the docs for how to add a redirect argument for example)
  • Converting shortcodes to dynamic Gutenberg blocks 
  • Transform Settings page into a tabbed interface (to declutter the current PB menu)
  • Bypass “Anyone can register” setting from WordPress and remove notification (it just adds friction and an extra step in setting everything up)
  • Remove other plugin notifications from all PB pages (users can get confused by global plugin notifications, especially when trying to set up a new one)
  • Rename / Change text (we’re creating forms, but the word “Form” was nowhere to be found in our menu items name)
    • “Manage Fields” became “Form Fields” 
    • “Manage Default and Extra Fields” became “Manage Form Fields”
    • “Registration & Edit Profile” became “Register and Edit Profile Forms”
    • and so on…
  • Miscellaneous polishing (large list of tiny visual & text changes) 

Here’s a before and after look at Profile Builder plugin menu.

Profile Builder menu before and after the changes listed above

This is how the new tabbed Settings page looks like:

It groups General Settings, Admin Bar visibility settings, Content Restriction & Private Website functionality.

Basic Information page now allows you to create all forms and corresponding pages in one click:

Keep in mind these are all rather small and quick changes we felt we can do in a relatively short amount of time and which can have a positive impact on usability.

Let’s see what happened after implementing the majority of improvements listed above. Meanwhile we also added features ( like the ability to create a private website) to the free version.

After this, we continued to run the feedback form and collected the following data:

Let’s see how things evolved:

  • Lacking certain features is now 21% ( down from 31% )
  • Hard to use is now 16% ( down from 32% )
  • Unsatisfactory support is now 5% ( the same )
  • Poor documentation is now 9% ( down from 16.2% )
  • Other is now 49% ( up from 15% )

As you notice “Lacking certain features” went down from 31% to 21% and most importantly “Hard to use” dropped from 32% to 16% (that’s a significant 50% drop!).

The change seemed quite impressive. Since the percentage drop from “Hard to Use” & “Lacking certain features” went into “Other”, and we also ask users to detail their reason in one or two sentences, I started to analyze the responses we got from people selecting “Other”.

The big majority of responses here were not related to the plugin functionality. 

We got a lot of responses like: “this is temporary”, “temporary deactivation”, “just testing things out”, “upgrading to pro”, “don’t need – good work though”, “great plugin, just don’t need it anymore”. 
So the majority of replies from “Other” were not something we could change or control (not actionable).

Analyzing the responses in “Other” I also found things which could go into the “Lack of features” category and some under “Hard to use”, but not a lot of them, to justify the drastic percentage change.

Conclusions

Focusing on ease of use and constantly collecting feedback from your users should be an ongoing task for every product company.

While I’m fully aware that the percentage change is not 100% accurate, it’s a clear sign of usability improvement.

The exact numbers are less important, what’s important is taking small steps in improving your products.

Even a tiny change of wording can go a long way. Take this review for example which was left by one of Profile Builder’s free users, after noticing the simple menu text change from “Manage Fields” to “Form Fields”.

After this, we’ve started to collect user feedback on deactivation from all of our plugins.  So Paid Member Subscriptions is next to get a proper usability polishing. 

If you’re a Profile Builder user let us know what you think about the new improvements.

Also, if you haven’t tried Profile Builder yet and are looking for a reliable user registration plugin, take it for a spin or play with our demo version.

The post How we increased Profile Builder’s usability by acting on user feedback appeared first on Cozmoslabs.

Profile Builder Customization Toolbox

$
0
0

Through the years of doing support for our WordPress plugins we received numerous requests for little features or customizations that our clients wanted. All of our products make use WordPress actions and filters, so for many of the available functionalities, you can change the outcome or modify it to your liking using a hook.

While searching for and using hooks isn’t a problem for users with developer experience, our customer base is large and has different qualifications.

There’s always the option to keep on adding extra options and settings in the plugin, but because we want to keep our plugins clean and simple, we decided against cluttering the interface.

Solving the issue

Most of these customization requests were handled through snippets of custom code that we sent to our users who were requesting them.

This approach was not ideal, because not everyone would be able to benefit from them, so we wanted to make them available to more users. Thus, the Developer Knowledge Base area of our documentation was born.

This page helped our users a lot, but manually adding the code to your website and modifying parameters or messages from a function wasn’t exactly natural and comfortable for everyone.

Now we take this a step further by providing an interface for these popular customizations through the Customization Toolbox add-on for Profile Builder.

The first release will cover Profile Builder, but we are working on providing a similar add-on for Paid Member Subscriptions.

The add-on is Free and works with any version of Profile Builder. The available options might differ based on the Profile Builder version you are running (Free, Hobbyist or Pro).

To download it, go to the add-on page and then manually upload the archive on your website by going to Dashboard -> Plugins -> Add New.

After you activate it, you’ll be able to find the settings under the Profile Builder menu, by going to the Toolbox page.

The available options are organized in a tabbed interface. Most of the options will only need you to enable them, while some others are requiring extra settings. You can check out the documentation page here.

Current Feature List

Forms:

  • Allow or deny email domains from registering
  • Bypass Email Confirmation on specific forms
  • Remember me checked by default
  • Remove validation from the back-end profile page
  • Consider ‘Anyone can Register’ WordPress option
  • Save Admin Approval status in usermeta
  • Redirect ‘/author’ page if user is not approved
  • Save ‘Last Login’ date as usermeta
  • Save ‘Last Profile Update’ date as usermeta

Fields:

  • Make Datepicker fields start on Monday
  • Hide Repeater Fields from the back-end profile page
  • Always capitalize ‘First Name’ and ‘Last Name’ default fields
  • Ban certain words from being used in fields (can affect: username, first name, last name)
  • Enable extra field types: Email field and URL field

Userlisting:

  • Change placeholder text for Search box
  • Modify base URL for Single Userlisting
  • Make the Single Userlisting URLs work with user nicename
  • Remove repetition counts from Faceted Menus

Shortcodes:

  • Compare
  • Usermeta
  • Resend Activation Email
  • Format Date

The add-on is in no way comprehensive and cannot cover all aspects from the plugin, but it strives to do so. We are also looking to expand it in the future by adding more features.

If you have any suggestions or other type of feedback, either leave a comment below or open a ticket via our support page.

To download the add-on, click on the button below:

Get Customization Toolbox – Profile Builder Add-On

The post Profile Builder Customization Toolbox appeared first on Cozmoslabs.


Admin Approval on Edit Profile fields with Profile Builder

$
0
0

We are happy to announce the release of the Edit Profile Approved by Admin Add-on for Profile Builder. The Add-on extends the functionality of Profile Builder by allowing administrators to approve profile changes made by users on individual fields. Until the fields have been approved the old values will be displayed for everyone else.

The functionality of the add-on has multiple use cases, some of them would be:
– be sure that users don’t change fields in their profile, that show up on your site, to improper words
– review the email address of the user before it is changed
– monitor changes of your user profiles
– approve avatar image changes

Setting up admin approval on fields

After we activate the Edit Profile Approved by Admin Add-on we will see new options for our Fields:

You can simply activate admin approval on a field by clicking the “Requires Admin Approval on Edit Profile” checkbox.

Fields that have “Requires Admin Approval on Edit Profile” enabled will have a check mark on the field list next to them.

How it works on the front-end

After a user updates his profile and if fields that require admin approval have been modified, those fields will be marked accordingly (yellow background and a description) and also will be notified at the top of the form.

Administrators have a couple of extra options on the edit profile forms, after activating the addon, that will allow them to filter users that require approval and approve individual fields.

Notification Emails

* The administrator of the site will receive a notification email when a user has updated his profile and has modified at least one field that requires approval.
* The user will receive a notification email after an admin has reviewed his profile and clicked the “Finish Review and Send Notifications”

Documentation

For more details on how to install the add-on or it’s functionality please visit the documentation page

Get Profile Builder – Edit Profile Approved by Admin Add-on

The post Admin Approval on Edit Profile fields with Profile Builder appeared first on Cozmoslabs.

Add Users on Map in WordPress – Tutorial

$
0
0

Projects where you need to add users on map in WordPress can require more time for development as you need to deal with more then just a Google Maps with some POI’s on it. While it’s not really a technical problem, the extra time can eat into the existing budget for the project or even increase it.

WordPress map plugins are one thing, but to add users on map in WordPress requires a different setup:

  • you need the possibility for users to have their own profile and add the location themselves
  • once users can place POI’s on the map you need to list all the users
  • searching for users, or filtering them based on various information extends the functionality of your map

There are many member directory plugins, but for this tutorial we’ll use the Map field in Profile Builder Pro, then list the users using the User Listing Module.

Allow users to select a POI on the map

For this to work correctly, each users needs to be able to select his own POI that will be displayed on the map. The information inside the POI needs to be tied to his own profile, like the avatar, first and last name, etc.

We start by adding the Map field in Profile Builder -> Form Fields.

Since this is a Google Maps implementation, we’ll need an API key. You can learn how to generate one via the documentation page.

For this api key, we need to enable two Google API’s:

    • the Google Maps Javascript API – needed for the actual map
    • the Google Maps Places API – needed for the search bar inside the map so users can search for their address

These APIs are paid, so make sure you check the Google Maps Console for updated pricing before moving forward.

While there isn’t much else needed beside the API key to get this working, we’ll also setup the settings:

      • “POI’s Load Type: POIs of all the users for the filter* (no pagination)”
      • add a few extra info to the “POI Bubble Info”.

Now we can visit our registration form generated by Profile Builder and see the map selection. A similar map will appear on the edit profile form so users can easily change their address if needed.

add users on map with WordPress

Add Users on Map in WordPress

Listing all the users on the map can be achieved using with the User Listing module in Profile Builder Pro.

      • Profile Builder -> User Listing -> All UserListing Template -> Extra Functions use the {{{users_one_map}}} tag to create a map with all the points. This particular tag only works with the All User Listing Template.
      • Profile Builder -> User Listing -> Single UserListing Template -> User Fields Tag. Will have a unique name based on the metaname you created in the Form Fields.

With the settings we mentioned in the Form Fields for our Map field, using the {{{users_one_map}}} will now load all the POI’s users added.

For a small number of POI’s (300) they will load instantly, for the rest, they will load asynchronously so we don’t run into performance issues when there are a lot more users.

Filtering users on map in WordPress

Moving a step forward, we can also filter the user POI’s based on the faceted filters defined for this particular user listing.

You can filter users based on any information defined in other form fields like:

      • name
      • age
      • sex
      • company
      • favorite color
      • etc.

Applying any of the filters, will list all the users that meet that criteria.

Check out this short video (~2 min and no sound) on how this feature works. Make sure to make it full screen in order to see the settings and setup better.

Conclusions

If you have a project where you need to add users on map in WordPress, this is now possible with Profile Builder Pro. Not only you can list all the users on the map, you can also filter them, search for individual users, making this functionality even more useful.

If you have suggestions or feedback regarding the add users on map feature, feel free to let us know in the comments bellow!

Keep on building WordPress sites!

The post Add Users on Map in WordPress – Tutorial appeared first on Cozmoslabs.

How to Create Your WordPress User Custom Profile Page

$
0
0

Although WordPress is the most popular content management system out there, it lacks some basic features – specifically, front-end user management. In other words, WordPress doesn’t let users view or modify their user profile information from the front-end.

While there are plenty of features for users in the WordPress back-end, extending the same to the front-end isn’t easy. For example, adding custom WordPress user profile fields to the front-end using a custom page template or through code isn’t exactly a cakewalk.

With this in mind, in this step-by-step tutorial, we’ll show you how to create your WordPress user custom profile page using the Profile Builder Pro WordPress plugin. This lets you give users a more flexible and intuitive way to view and modify their user profile information.

Creating your custom WordPress user profile page (in 3 easy steps)

Traditionally, you would need to create custom fields if you wanted to ask for more user profile information. The Profile Builder Pro plugin is a user profile plugin that comes with default fields as well as advanced custom fields. This lets you create a fully customizable profile page, registration page, and login page without having to mess around with custom fields in WordPress.

For this tutorial, you’ll need to have the Profile Builder Pro plugin installed and activated to your WordPress site. Once that’s done, here’s what you need to do to create a custom WordPress user profile page, user registration page, and user log-in page.

User profile page

The simplest way to create a custom WordPress user profile page is by using the Profile Builder Pro plugin. This way, you don’t have to use user_meta or profile_fields functions to retrieve user profile information.

The first thing you need to do is create a new page (by going to Pages > Add New) that users will access to view and modify their profile information. For example, you might call it something like Edit User Profile or Edit Profile.

Edit profile shortcode in text editor

Once that’s done, add the [[wppb-edit-profile]] shortcode to the text editor. By default, your page should look something like this on the front-end:

Preview of the edit profile shortcode

You can choose to add (or remove) any of the fields by heading over to Form Fields from the Profile Builder menu item in WordPress admin panel. For example, you could remove the Nickname field from the front-end form.

Remove Profile Builder Pro field

Or, you might want to add a Phone field under the Contact Info heading.

Add phone number field to user profile

The modified front-end custom edit profile page will look something like this:

Updated preview of the profile page

This allows you to create a front-end form that gives your site’s users an easy way to modify their user profiles. They can use this form to update their contact information, modify their user role, or change their password without accessing the WordPress back-end. Your WordPress site’s users can see their full profile page from the front-end.

Additionally, the WordPress website’s administrator can access (and edit) all user profiles from the same screen. The page will be populated by user data from your database. Admins can view user data, modify user roles, and much more. This is all possible with the easy to use Profile Builder Pro plugin.

User registration page

There are many scenarios where you might want to let users register directly from the front-end. For this, you’ll need to create a user registration page to display the registration form. The easiest way to do this is by using the Profile Builder Pro plugin. (Hint: you won’t have to create any custom fields!)

Start by creating a new page (Pages > Add New) in WordPress to accept online registrations. You might call it something like User Registration.

User registration page shortcode in the text editor

Next, add the [[wppb-register]] shortcode to the text editor. This shortcode will add the registration form to your page. By default, your page should look something like this on the front-end:

Preview of the user registration page on the front-end

With Profile Builder Pro, you can choose to add (or remove) any of the fields from the registration form by heading over to Form Fields from the Profile Builder menu item in the WordPress admin panel. For example, you might want to add an Avatar field to the front-end registration form.

Add new avatar field to the front-end registration form

The modified front-end user registration form will look something like this with the avatar field:

Updated preview of the front-end registration page

This way, you can create a front-end registration form that makes it easy for your WordPress site’s users to register online. New users can also set their user roles. The best part is that you don’t have to worry about manually creating a new user every time a registration form is submitted or sending login credentials to new registrants (via MailChimp) – all of this happens automatically. Optionally, you can add the registration form to a widget.

The MailChimp for Profile Builder add-on lets you associate MailChimp list fields with Profile Builder Pro’s fields and configure advanced settings.

User log-in page

Creating a custom login page for users is incredibly easy with the Profile Builder Pro plugin. All you have to do is create a new page that will work as your front-end login page. You can do this by going to Add New from the Pages screen. Call it something intuitive like User Login.

User login page shortcode in text editor

Next, add the [[wppb-login]] shortcode to the WordPress text editor. Your login page should look something like this:

Preview of the user login page

To take it to the next level, you can use Custom Login Page Templates to give your login page a new look and feel.

User login page with template

You can choose from one of the available templates and upload your branding elements to it. For example, you might consider adding a logo and background image. You can also choose to add the shortcode to a widget.

Be sure to check out our tutorial on How to Create a Custom WordPress Login Page for more ideas!

Create your custom user profile page today!

The good news is that you can add just about any kind of custom field to your WordPress user profile page. Instead of messing around with custom code, user profile fields, and validations, we recommend using the intuitive user profile plugin.

Let’s quickly recap some of the different ways you can use the Profile Builder Pro plugin:

  • Create a custom user profile page that’s accessible from the front-end.
  • Let visitors register online directly from the front-end without creating custom fields manually.
  • Allow users to log in to their accounts directly from the front-end using a shortcode.

Whether you’re a developer or trying to DIY a better user experience for your site’s visitors, having a WordPress plugin that lets you create custom front-end user profile pages is a must-have. We showed you how you can get started and, hopefully, you’re in a good position now to take the next steps.

Get the Profile Builder Pro plugin!

Do you have any questions about how to create your custom WordPress user profile page without manually creating custom fields? Let us know in the comments section below.

The post How to Create Your WordPress User Custom Profile Page appeared first on Cozmoslabs.

How to Create a Custom WordPress Login Page

$
0
0

Depending on the type of site you’re running, there are several reasons why you might want to create a custom WordPress login page.

Done right, it can help you minimize hacking risks and related security issues and improve privacy. And if you’re a design agency, you might need to white-label the login page for your clients.

In this article, we’ll show you how to create a custom WordPress login page using the Profile Builder Pro plugin. We’ll also walk you through a step-by-step process on how you can set up redirects and hide the admin bar.

Let’s put everything into context before we begin.

Why you should create a custom login page

As a WordPress site owner, you’re probably familiar with the default login page. In terms of design, it’s pretty generic.

WordPress' default login page


Users can log in by visiting the /wp-admin or /wp-login.php login page URL and entering their username and password. It’s also worth mentioning that, out of the box, it isn’t particularly secure.

Here are a few main reasons why you should create a custom login page for your WordPress.org website:

  • Improved user experience and security. If your customers, clients, or subscribers are logging into the WordPress Dashboard, then you can dramatically improve the user experience by offering a custom WordPress login page. It’s also more secure, as if you change the login page URL, “drive by” attacks won’t be able to find the login page.
  • Lots of people manage your website. If your WordPress website is managed by multiple people (such as editors, bloggers, and authors), you might consider making the login experience more user-friendly. For example, you could set up custom redirects based on where users are most likely to go after logging in. Or you could add social media OAuth login options.
  • You get a lot of website traffic. WordPress websites that get a lot of traffic regularly are more likely to get spam traffic, as well. This opens the door for hackers, spammers, and bots. Customizing the login page can help you improve security by protecting it from malicious scripts. One way to do this is by adding Google reCAPTCHA.
  • You want to white-label the login page. If you’re a freelancer, solopreneur, or design agency, you might want to white-label the login page for clients. For example, you could add branding elements (like logos) to the login screen or a personalized message. This makes it more personalized to your clients than the default WordPress logo and branding.

Of course, there are many reasons why you might want to customize the WordPress login page. In the following sections, we’ll explain how you can do everything from setting up redirects to hiding the admin bar and customizing the login screen.

Setting up a redirect from default WordPress login to front-end login

If you’re running a WordPress website that allows users (members, students, or subscribers) to log in from the front-end, you’ll need an easy way to redirect them to a specific page.

For example, you might want to redirect students to your main course page or homepage after a successful login. Or you might want to redirect members to the Edit Profile page if it’s their first time logging in after registration.

Redirecting users to a specific page after login also lets you keep them out of the WordPress back-end. This minimizes any chance of confusion and helps you deliver a more friendly user experience.

Profile Builder Pro’s Custom Redirects module makes it easy for you to control where users are redirected to based on their actions. Out of the box, the module offers the following redirect types based on user actions, including After Login, After Logout, After Registration, After Edit Profile, Dashboard, After Password Reset, and After Email Confirmation.

With the Custom Redirects module, you can also target specific users using various redirect filters. This is useful for when you need to redirect specific users or specific types of users. You can redirect users based on user roles, their username, or a user ID. The module also lets you set up global WordPress redirects.

How to set up a redirect from default WordPress login to front-end login

Using Profile Builder Pro’s Custom Redirects module, you can easily set up a redirect for the default WordPress login page. So, whenever a user tries to access to default WordPress login URL by going to your site’s /wp-admin or /wp-login.php pages, they’ll be redirected to a front-end login page instead.

Log in to the WordPress admin panel and head over to Custom Redirects from the Profile Builder menu item. Scroll down till you reach the Redirect Default WordPress Forms and Pages section. You’ll be prompted to select a Redirect Type and enter a Redirect URL.

Custom redirects settings screen

  • Redirect Type. Use the dropdown menu to select when you want users to be redirected. Since we want users who’re trying to access the login page to be redirected, we’ll select the Login (wp-login.php) option.
  • Redirect URL. Here, you need to enter the redirect URL i.e. the URL of the page you want to redirect users to. If your front-end login page’s URL is com/login, you would enter that here. This field can also contain dynamic tags including homeurl, siteurl, user id, user nicename, and HTTP referer.

It’s worth mentioning that this is also possible for other WordPress pages. For example, you can redirect users to the Register page or your Lost Password page based on their actions. Be sure to check out our tutorial on How to Redirect Users after Login & Registration in WordPress for more information.

How to hide the admin bar after login for certain user roles

With Profile Builder Pro, you can easily hide the admin bar after user’s login. This is useful for all sorts of membership sites, online course websites, training programs, as well as SaaS applications. It also lets you hide the admin bar for specific user roles such as subscribers, customers, and shop managers.

From the WordPress dashboard, head over to Settings from the Profile Builder menu item. Next, navigate to the Admin Bar tab. Here, you’ll see options for setting the visibility of the admin bar for the different user roles currently active on your WordPress website. All you have to do is choose which user roles can view the admin bar from the front-end of the website after logging in.

Hide admin bar settings screen

For example, if you want to hide the admin bar after login for subscribers, customers, and shop managers, you would simply set their visibility to Hide. Click the Save Changes button to continue.

How to customize the login screen completely

The WordPress login page is just like any other page on your website. This means you can customize its styling and colors using CSS. You can also add features to it and play around with the layout using HTML and PHP.

While you can certainly customize the WordPress login screen and login form manually, we recommend using a WordPress plugin considering it’s much faster and easier. Plus, you won’t have to mess around with any PHP files. It’s especially great for users who aren’t particularly tech-savvy or want to avoid the coding route.

Customizing the login screen URL

With Profile Builder Pro, you can easily customize the WordPress login URL by creating a new page in WordPress and adding the [wppb-login] shortcode to it.

WordPress text editor with shortcode

For example, if you’re running a membership website and want to create a custom WordPress login page for members, you might call it something like Member Login Page and change it’s URL to www.example.com/member-login. Once that’s done, simply add the [wppb-login] shortcode to the text editor and publish the page. You can also add this login shortcode to a sidebar widget. It will have a Remember me checkbox under the username and password field by default. Your site’s members can simply bookmark the login page for quick access.

Allowing users to recover their password

Profile Builder Pro lets you add a recover password section to your login page. This is a great way to improve your site’s user experience. All you have to do is add the

Please enter your username or email address.
You will receive a link to create a new password via email.

shortcode to the login page.

Recover password shortcode in WordPress text editor

It will look something like this on the front-end depending on which WordPress theme you’re using:

Preview of the front-end recover password screen

Your site’s users can simply enter their username or email to receive a link to create a new password.

Adding reCAPTCHA

You can add Google reCAPTCHA to improve your login page’s security. For this, you will need to generate keys (site key and secret key) from the Google reCAPTCHA website. Once you have the keys, go to Form Fields from the Profile Builder menu item. Use the Field dropdown to select reCAPTCHA.

reCAPTCHA settings screen

In the Form Field Properties section:

  • Enter field details (title and description).
  • Select a reCAPTCHA type (either reCAPTCHA V2 or Invisible reCAPTCHA).
  • Enter your site key and secret key.
  • Make sure the PB Login box is ticked next to the Display on PB forms

Click the Add Field button to proceed. The reCAPTCHA will automatically be added to your login form. Your login page will look something like this:

Preview of reCAPTCHA field

Letting users sign in with social profiles

You can use Profile Builder Pro’s Social Connect add-on to enable social login on your WordPress website. This lets users log in with Facebook, Twitter, Google+, and LinkedIn. Once you have the add-on activated, you can go into its settings by clicking Social Connect under the Profile Builder menu item.

Settings screen for Social Connect add-on

From the General settings section, make sure that the Profile Builder Login checkbox is ticked next to the Display on the Following Forms option. Once that’s done, simply fill out the Application Settings section for the social platforms you want to allow logins through. The add-on also lets you customize Appearance Settings from the same screen.

Social Connect front-end preview

Using custom login page templates

Profile Builder Pro comes with the free Custom Login Page Templates add-on that lets you completely change the look and feel of your login page.

Custom login page template preview

You can choose one of the available templates and customize it to fit your brand. It lets you:

  • Upload your logo.
  • Add a background image.
  • Enable the Picture of The Day
  • Tweak the design using custom CSS.

Enabling passwordless login

Profile Builder Pro lets you use the Passwordless Login add-on to let users log in to your WordPress website without entering a password.

It only asks users for their email or username on the login page. The plugin automatically creates a temporary authorization token which is valid for 10 minutes. It sends the user a link containing the token via email. The user can then click on the link to log in to their account on your website.

WordPress passwordless login shortcode

Once you’ve activated the add-on, simply add the [passwordless-login] shortcode to your login page. It will look something like this on the front-end:

Preview of WordPress passwordless login

Additional benefits of a custom WordPress login page

There are two additional benefits from creating a custom WordPress login page: security and branding.

If you’re running a community-powered website that requires users to login, having a secure login page that hides the admin bar after login is essential. This way, users won’t be able to access the WordPress admin area. This is great for membership sites, forums and discussion boards, and niche social network sites.

And if you’re a design agency, you can improve your service offering by white-labeling client login pages. This allows your clients to deliver a more consistent user experience to their site’s users and makes the overall experience more worthwhile.

Additionally, customizing your WordPress login page gives you many opportunities to improve user experience. For example, you can offer social logins or passwordless login options.

Now create your custom WordPress login page!

By customizing the WordPress login page, you can create a more welcoming (and secure) environment for users, members, students, and clients.

Let’s quickly recap some of the different ways you can customize the WordPress login page using the Profile Builder Pro:

  • Set up redirects from the default WordPress login page to a front-end login page.
  • Hide the admin bar after successful user login for specific user roles such as customers and subscribers.
  • Customize the login screen URL by creating front-end login on a separate page with a Remember me checkbox.
  • Allow users to recover their password from the login page by entering their username or email.
  • Add Google reCAPTCHA to your login page to protect against spammers and bots.
  • Let users login with their social profiles such as Facebook, Twitter, Google+, and LinkedIn.
  • Use custom login page templates that come with the Profile Builder Pro plugin out of the box.
  • Enable passwordless login options for a more secure login experience.

Profile Builder Pro

Create beautiful front-end registration and profile forms with custom fields. Setup member directories, custom redirects, cutomize user emails & more using the all in one user management plugin.

Get the plugin

How will you be customizing your WordPress login page? We’d love to hear from you so let us know in the comments section below.

The post How to Create a Custom WordPress Login Page appeared first on Cozmoslabs.

How to Create a Custom WordPress Registration Form

$
0
0

There are tons of scenarios where you might need to create a custom WordPress registration form for your website. For example, you might need to allow members to register for your membership program, create profiles, sign up for an online course, or create an account to join discussion boards or forums.

Creating a custom WordPress registration form gives you better control over the information you collect from users. In addition to this, you can tweak the form however you’d like to deliver a better user experience or enhance its functionality (for example, by connecting it to your email marketing service of choice). And, finally, you can add as many additional form fields as you’d like.

In this tutorial we’ll go through how to build and customize front-end registration forms in WordPress using the Profile Builder Pro plugin.

Introducing Profile Builder Pro

Profile Builder Pro is an all-in-one user registration and management plugin for WordPress sites. It lets you add beautiful front-end user registration, profile, and login forms to your site using shortcodes. The plugin is fully GDPR compliant right out of the box.

With Profile Builder Pro, you can add all sorts of custom fields to your WordPress user registration forms including agree to terms checkboxes, timezone select, date picker, reCAPTCHA, and color picker as well as avatar upload and a full WYSIWYG editor. The plugin also lets you configure conditional logic for form fields and set up content restrictions based on the user role.

Using the plugin you can also enable admin approval for new user registrations, which is especially useful for private membership sites. In addition to this, it offers neat features like email confirmation for user registration which requires registrants to confirm their email. This is a great way to prevent bot accounts.
You can also enforce minimum password length (and strength) to improve your site’s security and hide the admin bar to deliver an intuitive, distraction-free registration experience.

All these features will be key to building a powerful front-end user registration for your website.

How to create a custom WordPress registration form in WordPress

Let’s dive into how you can use Profile Builder Pro to create custom user registration forms for your WordPress site.

Control over Admin Bar on the Front-end

The Profile Builder Pro plugin lets you decide which user roles can view the admin bar on the front-end of your WordPress website. To configure the admin bar settings, head over to Profile Builder > Settings from the admin panel and click on the Admin Bar tab.

Admin bar settings in Profile Builder Pro

From the Admin Bar Settings screen, you can set the visibility of each user role you have added to your WordPress website to either show or hide.

The key benefit of hiding the admin bar from the front-end for logged-in users is that it lets you deliver a clean and user-friendly interface.

Adding Extra Profile Fields to Registration Forms

The Profile Builder Pro plugin lets you manage default and extra profile fields for user registration directly from the back-end. The default field types include name, contact information, about yourself, username, first and last name, email, website, and others.

Extra profile fields for Custom WordPress Registration Form

However, when creating custom WordPress registration forms, you might need to add extra field types to your forms. You can select from a total of 29 extra form field types including:

  • Heading
  • Input
  • Number
  • Textarea
  • WYSIWYG
  • HTML
  • reCAPTCHA
  • Avatar upload
  • Date picker and time picker

You can manage all forms fields by heading over to Profile Builder > Form Fields from the WordPress admin panel.

Manage custom WordPress Registration form fields

The Manage Form Fields screen provides an intuitive user interface for adding, editing, deleting, as well as reordering user registration fields (drag and drop).

Adding extra form fields in Profile Builder Pro

Once you select a form field type, you can easily configure the field properties. This includes the form field’s title, type, meta-name, description, default value, and whether or not it’s required.

Creating Multiple Registration Forms

The Multiple Registration Forms module from Profile Builder allows you to add multiple front-end user registration forms with different form fields for certain user roles. In other words, you can assign registrants a specific user role automatically after they fill out the form.

For example, let’s say you have two registration forms – Member Registration and Event Registration. People who fill out the Member Registration form will be assigned the Members user role. And people who fill out the Event Registration form will be assigned the Attendee user role.

You’ll also probably want to collect different information from each type upon registration.

Multiple registration forms module

The first thing you need to do is enable the Multiple Registration Forms module by heading over to Profile Builder > Modules. Once that’s done, you can configure the After Registration… meta box for each form.

Set user role setting

Profile Builder Pro lets you configure the following settings for each form you create:

  • Set Role – the user role that will be assigned to people after they fill out this form.
  • Automatically Log In – whether or not to automatically log in to the registrant or not.
  • Redirect – whether to redirect the registrant to a different page or not.

After you publish the form, you’ll see a form shortcode that can be used to add the form to any page you’d like.

Setup Multiple Edit Profile Forms

If you use the Multiple Registration Forms module to add multiple custom WordPress registration forms to your site’s front-end, you might also consider giving each user type the option to access and edit their profile information.

For this, you will need to set up multiple edit profile forms. The easiest way to do this is by using the Multiple Edit Profile module.

Enable multiple edit profile

Once you’ve enabled the Multiple Edit Profile module from the Profile Builder > Modules screen, head over to Profile Builder > Edit-profile Form to add a new form and choose which fields users can view and / or modify from the front-end.

Edit profile form fields

After publishing, you’ll see a form shortcode that can be used to add the edit profile form to any page you’d like. You can use to show only certain fields / information under the user profile, as well as control which fields they can modify and which remain unchanged.

Drag and drop to reorder User Profile Fields

One of the neat features on offer with Profile Builder Pro is that you can simply drag and drop form fields into place to reorder them. This lets you change the default order of how form fields appear on the front-end.

Rearranging custom WordPress registration form fields Custom WordPress Registration form with fields

For example, let’s say the registration form asks users to enter their username before their first name and last name.

Rearranging fields Preview of form

You can simply drag and drop the username form field so that it appears after the first name and last name fields.

Add Email Confirmation for User Registration

The Profile Builder Pro plugin also lets you set up email confirmation for new user registrations. This is great for making sure people sign up with their real email addresses. It also helps you protect against bots and spam accounts.

To enable the email confirmation feature, head over to Profile Builder > Settings from the admin panel. Next, click on the General Settings tab. From here, change the “Email Confirmation” Activated option to Yes using the dropdown.

Email confirmation settings in Profile Builder Pro

Once that’s done, choose a page to redirect registrants to once they’ve confirmed their email account.

Click the Save Changes button to proceed.

Enable Conditional Logic for Custom WordPress Registration Form Fields

Using the Profile Builder Pro plugin to create custom WordPress registration forms, you also have the option to configure conditional logic for certain fields. In other words, you can choose to show or hide fields based on the user’s input. You can apply conditional logic to user fields when you’re adding in new fields or editing existing ones.

Let’s say you want to apply conditional logic to the Phone Number field. First, tick the checkbox next to the Conditional Logic option to enable conditional logic. Once that’s done, you will be able to configure conditional logic rules.

For example, if we want to ask users for their phone number only if they live in the United States, we would set the conditional rules as follows:

Conditional rules

The phone number field only appears when the user selects the United States using the Country field.

Conditional logic example Conditional logic example

Using conditional logic you can implement dynamic front-end custom WordPress registration forms for your users.

Adding Repeater Fields to Custom WordPress Registration Form

Profile Builder Pro’s Repeater Fields module allows you to add front-end repeater fields (or groups of fields) to your forms.

This is really handy when you need your users to insert similar information, multiple times.

Enable Repeater fields module

To get started, head over to Profile Builder > Modules to enable Repeater Fields. Next, go to Profile Builder > Form Fields to add a Repeater field and configure its field properties.

Add repeater field to custom WordPress registration form

From here, you can choose to limit the number of fields that registrants generate by using the Limit option. You can also use the Repeated field group option to manage the form field that will be repeated. Alternatively, you can choose to repeat a group of fields.

Edit repeater field group

It will look something like this on the front-end:

Repeater field group for custom WordPress registration form

Start creating Custom WordPress Registration Forms for your site

The Profile Builder Pro plugin makes it incredibly easy for website owners to setup custom WordPress registration forms with custom fields.

Profile Builder Pro

Create beautiful front-end registration and profile forms with custom fields. Setup member directories, custom redirects, cutomize user emails & more using the all in one user management plugin.

Get the plugin

It also comes with a variety of advanced features like conditional logic, repeater fields, and email confirmation allowing you to deliver an enhanced user experience and boost conversions.

The multiple registration forms and edit profile forms offer incredible flexibility for setting up different registration forms with different fields, allowing you to collect different information from different user roles.

Ready to create custom WordPress registration forms for your website? Get the Profile Builder Pro plugin today!

The post How to Create a Custom WordPress Registration Form appeared first on Cozmoslabs.

Viewing all 116 articles
Browse latest View live