Quantcast
Channel: Profile Builder Archives - Cozmoslabs
Viewing all 114 articles
Browse latest View live

Profile Builder Free version 2.0 released

$
0
0

After the newly launched version 2 of Profile Builder PRO, we focused on releasing an update to the Profile Builder Free version from wordpress.org.

Profile Builder Free v2 comes with:

  • a completely redesigned interface, more focused on flexibility
  • manage default user profile fields (add/edit/delete)
  • drag & drop to reorder profile fields
  • set a minimum password length
  • enforce minimum password strength (using the built in WordPress strength meter)
  • email confirmation for new users
  • allow users to login with email or username

Profile Builder Free Basic Information

New to Profile Builder?

If you’re looking to have a basic front-end registration for your website, you’ll find Profile Builder Free very easy to set up. It’s shortcode based, allowing you to set up register, login and edit profile forms in minutes.

More functionality (like Extra User Fields (Avatar Upload), Front-end User Listings, Custom Redirects or Multiple Registration Forms) is available in the premium versions.

The post Profile Builder Free version 2.0 released appeared first on Cozmoslabs.


Maximum Character Length Add-On for Profile Builder

$
0
0

How can I limit the maximum number of characters a user can type in a field?

You may find yourself in the situation where you want your users to provide a postal code that is at most 4 characters long, or a description of themselves in less than 140 characters. In these cases the Maximum Character Length Add-On for Profile Builder comes in handy.

So to answer the above question, let me walk you through the 3 easy steps of getting this feature up and running.

Download and activate

icon-150x150First of all, click on the button below to download the add-on. Unzip the downloaded file and copy the contents in the wp-content/plugins directory.

Download The Maximum Character Length Add-On

Please note: The Maximum Character Length Add-On requires Profile Builder version 2.0.5 or higher.

Once the files are moved, head over to the Plugins section of the Dashboard and activate the add-on.

maximum-character-length-1

Set the maximum character length

Once the add-on has been activated head over to the Manage Fields page in Profile Builder. If you select an input field, a textarea field or the default biographical info field you will see that a new property named Maximum Character Length appeared below the other properties. All you need to do is set the desired value, in my case it was 10. You can also modify this value when editing one of these fields.

maximum-character-length-2

See it in action

Too see your work in action head over to the page where you display the register or edit form and type something in the field that has a maximum value set. Did it stop you from typing?

The post Maximum Character Length Add-On for Profile Builder appeared first on Cozmoslabs.

Manage WooCommerce Customer Fields with Profile Builder

$
0
0

Profile Builder WooCommerce Sync Add-on
Looking for a simple way to manage WooCommerce Customer Billing and Shipping Address fields with Profile Builder?
How about adding custom user fields to the WooCommerce checkout page?

Now you can, using the Profile Builder – WooCommerce Sync Add-on.

Get Profile Builder – WooCommerce Sync Add-On

Manage WooCommerce Customer Fields

By default, WooCommerce adds address fields, Customer Billing and Shipping Address to the user profile. But what if you want to capture more user information, as well as let users manage all their profile fields in one place?

When a user/customer registers or updates his profile via Profile Builder front-end forms, using this add-on he will now not only be able to fill in/edit the user fields created with Profile Builder, but also display and update the shipping and billing fields from WooCommerce.

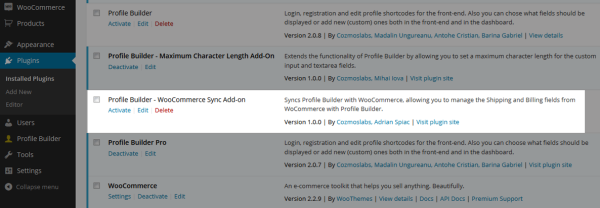
Installing Profile Builder – WooCommerce Sync Add-on

After downloading, you can add the add-on using the standard WordPress plugin uploader and clicking “Activate”.

Woo-Sync-Addon-Install
Note: For the Profile Builder WooCommerce Sync add-on to work as expected, you’ll need to have already installed both Profile Builder and WooCommerce plugins.

Note: The Profile Builder – WooCommerce Sync Add-on requires at least Profile Builder 2.0.8, free or premium.

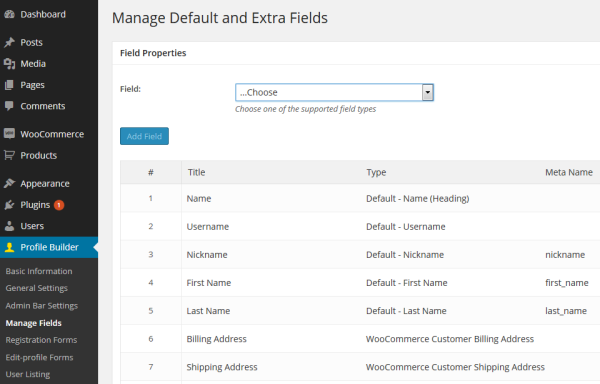
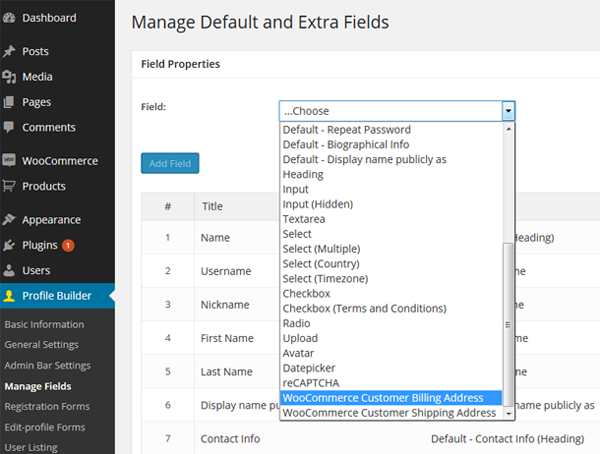
Adding WooCommerce Customer Billing and Shipping Address to User Profile

Once activated the Profile Builder – WooCommerce Sync Add-on will automatically add WooCommerce Customer Billing and Shipping Address fields to the Manage Fields list from Profile Builder. They will output all the individual fields required for WooCommerce Shipping and Billing Address in the front-end.

manage-fields-woo

You will be able to (re)arrange them, edit their heading (title) and in case you remove them, you can always add them later in the Fields drop-down.

manage-fields-woo-shipping-billing-small
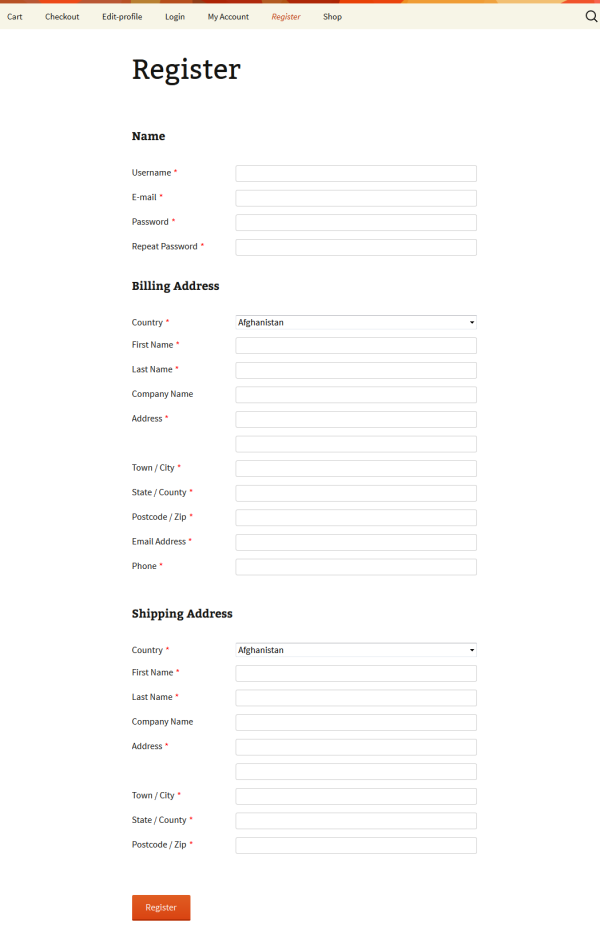
The WooCommerce fields will now appear on both registration as well as edit profile pages managed with Profile Builder.

front-end-register-woo-fields1

Users registering through Profile Builder will be able to fill in the required WooCommerce Customer fields
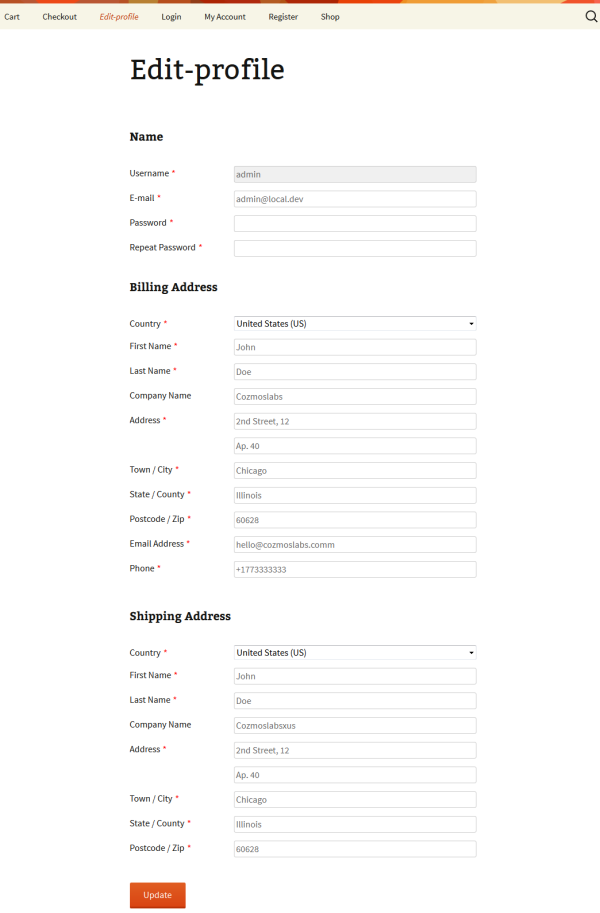
The Edit Profile page will now allow your users to update WooCommerce Shipping and Billing information

The Edit Profile page will now allow your users to update WooCommerce Shipping and Billing information

So from now on, when a new user registers, you can give him access to add or modify the WooCommerce customer fields as well, all in one place.

Adding Custom Fields to WooCommerce Checkout page

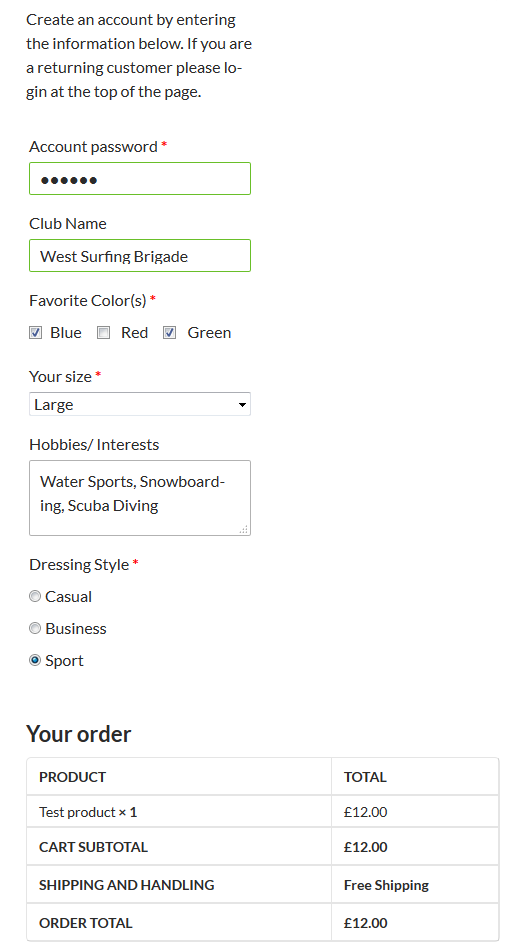
Profile Builder – WooSync add-on allows you to also add custom user fields to the “Create an account” section from the WooCommerce Checkout page.

Custom Fields added with Profile Builder to the WooCommerce Checkout page

Custom Fields added with Profile Builder to the WooCommerce Checkout page

The way you can collect more custom user information as well as register new users directly when they checkout.
The supported field types which can be added to the WooCommerce Checkout page using Profile Builder are: ‘Input’, ‘Textarea’, ‘Checkbox’, ‘Select’ , ‘Radio’, ‘Heading’.

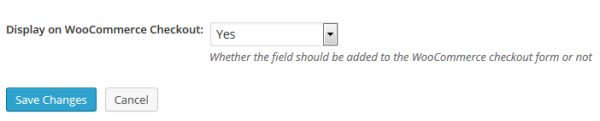
To add a custom field to the WooCommerce checkout page, in Manage Fields, when adding a new field or editing an existing one, you’ll simply need to select “Yes” for “Display on WooCommerce Checkout” option.

Choose which fields to display on the Checkout page

Choose which fields to display on the Checkout page

Integrate WooCommerce My Account page with Edit Profile form created with Profile Builder

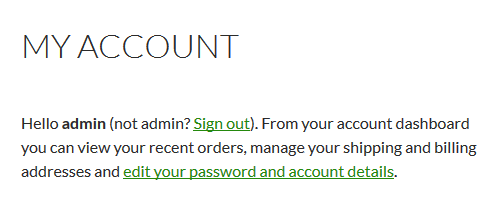
Another aspect we looked into for a complete integration was to allow people to access the Edit Profile form created with Profile Builder, directly from the WooCommerce My Account page.

After activating the WooSync add-on, once you go to My Account page created by WooCommerce and click on “edit your account details” link you will be taken to the Edit Profile form created with Profile Builder.

Clicking the link to edit your account details you will take you to the Edit Profile form created with Profile Builder.

Clicking the link to edit your account details you will take you to the Edit Profile form created with Profile Builder.

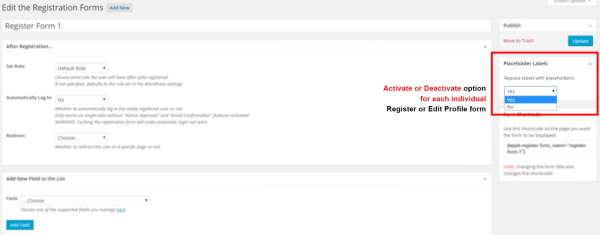
If you’re using the Multiple Edit-Profile forms module from Profile Builder PRO, and have setup more than one Edit Profile form, you can choose which one to display under the My Account page.

When creating an Edit Profile form, you’ll notice a box asking you if you want to add that form on MyAccount page from WooCommerce.

add-edit-profile-form-myaccount-woocommerce
This sums up all the WooSync add-on features which will help you fully integrate Profile Builder with WooCommerce.

Get the Profile Builder – WooCommerce Sync Add-On

The post Manage WooCommerce Customer Fields with Profile Builder appeared first on Cozmoslabs.

Numbers and Phone Validation Addon for Profile Builder

$
0
0

I want to restrict an input field to be numerical How can I do that?

Zip codes, phone numbers, custom ID’s require the custom input field in a registration form to be made up of numbers only. That’s where this addon for Profile Builder comes in handy.

Download and activate

icon-150x150First of all, click on the button below to download the add-on. Unzip the downloaded file and copy the contents in the wp-content/plugins directory.

Download The Numbers Only Field Add-On

Please note: The Numbers and Phone Validation Add-On requires Profile Builder version 2.0.5 or higher.

Once the files are moved, head over to the Plugins section of the Dashboard and activate the add-on.

Enable Numbers or Phone Validation for a Custom Input

Once the add-on has been activated head over to the Manage Fields page in Profile Builder. If you select an input field you will see that a new property named Numbers Only appeared below the other properties.

numbers_phone_format

See it in action

Too see your work in action head over to the page where you display the register or edit form and type some letters into your new field and submit the form. You will get an error asking you to enter numbers only!

screenshot2

The post Numbers and Phone Validation Addon for Profile Builder appeared first on Cozmoslabs.

User Field Visibility for Profile Builder

$
0
0

I would like to have some fields which are not visible, some fields visible but not editable for logged users.

icon-field-visibility-150x150

Did you ever wanted to have some admin only fields attached to your user profiles? Or fields that are editable by administrators and visible by your user?

Now it’s possible with a new addon for Profile Builder: Field Visibility

Profile Builder – Field Visibility Add-On

By default, extra fields created with Profile Builder can be visible and editable by all user roles both in the front-end forms or in the backend.

Now you can add extra fields that are only visible and editable by an administrator like:

  • admin notes about the user
  • custom ID to connect the user with another system
  • a custom category that only admins can add the users in

field_visibility

User Role based field visibility

Wouldn’t it be nice to have different profiles for different user roles?

Now this is possible with the User Role Visibility for fields.

If in the past you had to use the multiple edit profile forms to achieve this, the User Field Visibility Addon gives you the possibility to have a single edit profile form that displays different fields depending on what user role the current user has.

This applies to the backend Edit Profile page as well.

Note: User Field Visibility requires Profile Builder Pro or Hobbyist version 2.0.8 or higher.

Get Field Visibility for Profile Builder

The post User Field Visibility for Profile Builder appeared first on Cozmoslabs.

WYSIWYG User Field, now available in Profile Builder

$
0
0

The list of custom field types you can add to the user profile with Profile Builder has now expanded to include the WYSIWYG User Field.

Your users will now be able to add, edit and format their profile information making use of all the functionality of a Rich Text Editor. The same editor you’ve been used to when editing Posts and Pages in WordPress.

The WYSIWYG User Field is powered by WordPress default TinyMCE editor.

wysiwyg-field

The WYSIWYG field type allows you to add a Rich Text Editor field to the user profile (both front-end and back-end).


Creating a new WYSIWYG User Field

To add a WYSIWYG custom field to the user profile, simply go to Manage Fields tab in Profile Builder. Then, in the Fields drop-down, select the WYSIWYG field type.

wysiwyg-manage-fields-dropdown

Adding a WYSIWYG to the user profile fields.

After inserting a Field Title, decide if this field is required or not, and click “Add Field” to add this field to the user profile.

The WYSIWYG user field will now appear on both front-end Register and Edit-profile forms.

Front-end Edit Profile form containing a WYSIWYG user field.

Please note: The “Add Media” button will appear only to logged in users, with the default role of Author or above.
For custom user roles the “Add Media” button will display only if those roles have the following capabilities (Upload files, Edit published pages, Edit other pages). This is the way the core WordPress TinyMCE works.

Displaying the WYSIWYG User Field

You can easily display the WYSIWYG content (as well as the rest of the user fields) in the front-end using the User Listing module.

You’ll have access to a specific tag in the available variables list which can be used in the Single Userlisting template.

wysiwyg-single-userlisting

This will output all the HTML generated by the WYSIWYG field.

Single Userlisting page displaying the user profile information.

Single Userlisting page displaying the user profile information.

Note: The WYSIWYG field type is available in Profile Builder Hobbyist and Pro, starting from version 2.1.0.

The post WYSIWYG User Field, now available in Profile Builder appeared first on Cozmoslabs.

MailChimp for Profile Builder

$
0
0

icon-mailchimp-150x150

Say hello to our newest addition to the Profile Builder Add-Ons lineup. It is the MailChimp Integration Add-On and it will make it extremely easy for your new users to subscribe to your lists.

You’ll have it set up in no time, so let’s see what it’s all about.

MailChimp API key

First things first, when you activate the add-on a new page will be created for it. Here you will need to enter a MailChimp API key in order to connect the add-on with the data from your account.

If you don’t have an API key you will need to create one. To do this, navigate to your MailChimp account and in the Account section search for Extras > API keys. Here you will have an option to create a key. Copy the generated key and paste it in the MailChimp API Key field, then hit save.

mailchimp-walkthrough-1

Lists and fields

If the API key is valid your lists will be loaded and you will be able to edit each one.

mailchimp-walkthrough-2

In the edit panel of a list you will be able to associate each of the lists fields with Profile Builder fields.

By default the Email Address field from MailChimp is associated with the Default E-mail field from Profile Builder and this cannot be edited. If your MailChimp list contains the First Name and Last Name fields, they will also be associated by default with their corespondents from Profile Builder.

mailchimp-walkthrough-3

MailChimp Subscribe field

Once the add-on is active the MailChimp Subscribe field will be added to the fields drop-down in Manage Fields. Here you will select the list you wish your new users to be added to. By default the field shows both on Register forms and on Edit Profile forms, but you can hide it from the later if you wish.

mailchimp-walkthrough-4

What users see

In the front-end part of your website the field will be displayed as a checkbox. If the users check this option, when the registration is complete the data of the fields that have been associated with the MailChimp fields will be sent to MailChimp and the new user will be subscribed to the list you have selected.

mailchimp-walkthrough-5

MailChimp Widget

The add-on comes with a built-in widget that you can place in any widget area. By default the widget has only the Email Address, First Name and Last Name fields from each list, and you can select which of these to display.

mailchimp-walkthrough-6

If all three fields are selected, in the front-end part of your website, the widget will look something like the one bellow.

mailchimp-walkthrough-7

If a field is required, on submission, the user will be prompted with an error. If everything worked fine, the user will receive a thank you message and will be subscribed to the list you have selected.

mailchimp-walkthrough-8

That’s it

With this you are all done with a basic set-up of this new add-on. Get it now by following the link below.

Get Profile Builder MailChimp Add-On

The post MailChimp for Profile Builder appeared first on Cozmoslabs.

Campaign Monitor and Profile Builder

$
0
0

icon-campaign-monitor-150x150The Campaign Monitor Add-On for Profile Builder is here and it will help you close the gap between you and your potential subscribers. As with the MailChimp Add-On we’ve tried to make the set-up as easy as possible, in order to save you the time and the trouble. So let’s see what needs doing.


API Key

In order to connect Profile Builder with Campaign Monitor you will need to add the API key of your Campaign Monitor account into the newly created page from Profile Builder. You will find the API key in your Campaign Monitor account, in the Account Settings page.

profile-builder-campaign-monitor-1

Clients

If the API key is valid a drop-down with all the clients from Campaign Monitor will appear. Select the client you wish to connect with Profile Builder and the lists associated with that client will load into the page.

profile-builder-campaign-monitor-2

Client lists and fields

You can edit each client list. Click on the name of the list to open the Edit Panel. Here you will find the Field Associations option where you can associate the fields from Campaign Monitor with the fields from Profile Builder. By default the E-mail Address from Campaign Monitor is associated with the Default E-mail field from Profile Builder and it cannot be edited as it is a mandatory field in Campaign Monitor.

Don’t forget to hit Save after you’ve made new changes.

profile-builder-campaign-monitor-3

Campaign Monitor Subscribe field

Once the add-on is active the Campaign Monitor Subscribe field will be added to the fields drop-down in Manage Fields. Here you will select the list you wish your new users to be added to. By default the field shows both on Register forms and on Edit Profile forms, but you can hide it from the later if you wish.

profile-builder-campaign-monitor-4

On your website

In the front-end part of your website the field will be displayed as a checkbox. If the users check this option, when the registration is complete the data of the fields that have been associated with the Campaign Monitor fields will be sent to Campaign Monitor and the new user will be subscribed to the list you have selected.

profile-builder-campaign-monitor-5

Campaign Monitor Widget

Use the built-in Campaign Monitor Widget to attract more subscribers. Here you can select the list your new subscribers will be added to and also which fields to display in the front-end form. By default you will be able to display the E-mail address and Name fields.

profile-builder-campaign-monitor-6

If both fields are selected the form will display as in the image below. The e-mail address field is mandatory.

profile-builder-campaign-monitor-7

If everything goes well the user will be prompted with a success message, if not an error message will be displayed with indication to what went wrong.

profile-builder-campaign-monitor-8

And finally…

You are done! Campaign Monitor is up and running and ready to be used. Get it now for a limited discounted price by following the link below.

Get Profile Builder Campaign Monitor Add-On

The post Campaign Monitor and Profile Builder appeared first on Cozmoslabs.


User Listing Table made Responsive with CSS

$
0
0

One of the awesome features of Profile Builder is the user listing. As the name suggests, you can create a listing of your users by selecting different criteria, like which user roles to display, the number of users to display on a page, a default sorting, be it by username, first name or other default and extra fields, and so on, that you can display in your pages via a shortcode.

The default template, used to display the listing, is a table and as you can see in the image below it looks quite good out of the box, when it is displayed on a large screen. But, as you may already know, tables don’t really look all that great on small screens, especially when they have lots of columns.

profile-builder-user-listing-table-1

In some cases they look terrible even with a few columns. Five columns were more than enough to ruin the overall tidy aspect of the above table. So, the goal is to make them look pretty even on small screens.

profile-builder-user-listing-table-2

Using the pure CSS solution the guys at Living Social found for their problem, we’ve transformed the crammed table into something easy to read and understand with just a few lines of CSS.

profile-builder-user-listing-table-3


Let’s see the code

These improvements will be present in a future update of Profile Builder, but for the impatient and for any others looking for a pure CSS solution to responsive tables I’m going show what needed to be done in order to achieve this good looking table.

The solution uses the power of CSS pseudo-elements, the ::before pseudo-element to be more exact and its ability to get content from an attribute of the targeted element.

Let’s take the default user listing template. We want the column titles to become the labels that are displayed to the left of our new rows. In order to do this we will add a new attribute to the table cell.

1
2
3
4
<!-- Table cells without the new attribute -->{{{avatar_or_gravatar}}}{{meta_user_name}}{{meta_first_name}} {{meta_last_name}}{{{meta_number_of_posts}}}{{{more_info}}}
 
 
<!-- Table cells with the new attribute -->{{{avatar_or_gravatar}}}{{meta_user_name}}{{meta_first_name}} {{meta_last_name}}{{{meta_number_of_posts}}}{{{more_info}}}

Now let’s sprinkle some CSS magic dust

1
2
3
4
5
6
7
8
9
10
11
12
13
14
15
16
17
18
19
20
21
22
23
24
25
26
27
28
29
30
31
32
33
34
35
36
37
38
39
40
41
42
43
44
@media screen and ( max-width: 720px ) {
 
    /* 
     * This little bit of code will add the pseudo-element and populate it with 
     * content from the table cell's data-label attribute 
     */
    .wppb-table td:before {
        content: attr(data-label);
        float: left;
    }
 
 
    /* 
     * Let's add a little more styling to make the table look clean
     */
     .wppb-table {
         border: 0;
     }
 
    .wppb-table thead {
        display: none
    }
 
    .wppb-table tr {
        display: block;
        margin-bottom: 30px;
    }
 
    .wppb-table td {
        display: block;
        text-align: right;
        border-bottom: 0;
    }
 
    .wppb-table td:last-of-type {
        border-bottom: 1px solid #e1e1e1;
    }
 
    .wppb-table .wppb-posts,
    .wppb-table .wppb-moreinfo{
        text-align: right;
    }
 
}


A bit more

If you want to go a step further and create a minimalist user listing you can use the style below.

profile-builder-user-listing-table-4

1
2
3
4
5
6
7
8
9
10
11
12
13
14
15
16
17
18
19
20
21
22
23
24
25
26
27
28
29
30
31
32
33
34
35
36
37
38
39
40
41
42
43
    .wppb-table {
        border: 0;
    }
 
    .wppb-table thead {
        display: none
    }
 
    .wppb-table tr {
        display: block;
        margin-bottom: 30px;
    }
 
    .wppb-table td {
        display: block;
        text-align: right;
        border: 0;
        border-bottom: 1px dotted #e1e1e1;
        padding: 15px;
    }
 
    .wppb-table td:last-of-type {
        border-bottom: 0;
    }
 
    .wppb-table .wppb-posts,
    .wppb-table .wppb-moreinfo{
        text-align: right;
    }
 
    .wppb-table td:before {
        content: attr(data-label);
        float: left;
        font-weight: bold;
    }
 
    .wppb-avatar:before {
        display: none;
    }
 
    .wppb-table .wppb-avatar {
        text-align: center;
    }

The post User Listing Table made Responsive with CSS appeared first on Cozmoslabs.

Labels Edit for Profile Builder

$
0
0

icon-150x150

The Labels Edit Add-On will help you edit all Profile Builder labels. With the Labels Edit Add-On we’ve tried to make Profile Builder labels edit as easy as possible.


Edit Labels

To edit a label first you need to select desired string in the Label to Edit select. With the label selected enter the new string in the New Label textarea and hit Add Entry.

2

After you edit a label this plugin will automatically replace the old label with the new one in all places (both front and back-end).

7

You can edit all the edited labels by clicking the Edit button from the edited labels table.

5

Rescan Labels

If we’ll add more labels after an update of Profile Builder, you can scan again very fast with a click on the Rescan button and your select will be updated with all the new labels.

4

Variables explained

Variables with numbers like 1, 2, 3, etc. help us to output variables content in any order in a string.

  • %1$s
  • %2$s
  • %3$s
  • %4$s
  • %s

You must be careful and place them like in the default string, see e.g.

Example:

Old Label: in %1$d sec, click %2$s.%3$s

New Label: click %2$s.%3$s in %1$d sec

Variables can output links, users username, email, etc.

You must escape characters in new label like in the old label, see e.g.

  • \”

Example:

Old Label: Password Reset from \”%1$s\”

New Label: From \”%1$s\”, a password reset

Get Profile Builder Labels Edit Add-On

The post Labels Edit for Profile Builder appeared first on Cozmoslabs.

Adding reCAPTCHA to WordPress Register, Login and Lost Password Forms with Profile Builder

$
0
0

The improved reCAPTCHA field from Profile Builder now offers an UI for enabling reCAPTCHA verification on all Profile Builder front-end forms, as well as default WordPress register, login and lost password forms.

Having a reCAPTCHA powered registration on your website can help you dramatically reduce user registration spam.

reCAPTCHA-Manage_fields

Once you add the reCAPTCHA field to the Manage Fields list in Profile Builder, under the field options, you will be able to select the forms which will have reCAPTCHA verification enabled.

reCAPTCHA-field-options

Adding reCAPTCHA to Profile Builder front-end forms

reCAPTCHA_display_PB_forms
The first set of options allows you to choose which Profile Builder forms should display the reCAPTCHA verification.

By default, only the Register form has reCAPTCHA verification enabled, but you can also add reCAPTCHA to Login and Lost Password front-end forms by checking the corresponding options.

Displaying reCAPTCHA  on the front-end Recover Password form

Displaying reCAPTCHA on the front-end Recover Password form

Having a reCAPTCHA verification in place on the Login and Lost Password forms is a good way to improve your website security and protect yourself against brute force attacks.

Adding reCAPTCHA to WordPress Register, Login and Lost Password forms

reCAPTCHA_display_default_WP_forms
Profile Builder allows you to also add reCAPTCHA to the default WordPress Register, Login and Lost Password forms as well.

By default, the WordPress Register form will have reCAPTCHA enabled, but you can choose to also add it to the (back-end) WP Login and Recover Password forms.

reCAPTCHA enabled on default WordPress Login form

reCAPTCHA enabled on default WordPress Login form

With the improved reCAPTCHA field from Profile Builder, you now have full control over which forms (both back-end WP default forms as well as front-end Profile Builder forms) should display the No CAPTCHA reCAPTCHA verification.

reCAPTCHA error on the back-end WordPress Login form

reCAPTCHA error on the back-end WordPress Login form

Note: The improved reCAPTCHA field is available in Profile Builder premium versions (both Hobbyist and PRO), starting with version 2.1.6.

The post Adding reCAPTCHA to WordPress Register, Login and Lost Password Forms with Profile Builder appeared first on Cozmoslabs.

Replace form labels with placeholders using Placeholder Labels Add-On for Profile Builder

$
0
0

icon-150x150

Placeholder Labels Add-On hides all Profile Builder form labels and adds for each form field a placeholder with the title of the field.

This can help you reduce clutter on the page, or shorten the length of your forms.

Note: Requires at least Profile Builder 2.1.9, free or premium.

Version 1.2 released:
Fixed compatibility with PB add-ons and problems with some form fields.

Version 2.0 released:
Added a Meta Box on back-end of each form from Multiple Registration and Edit-Profile Forms to select on which form to be active.

pbpl

Replace form labels with placeholders

Add placeholders only to input and textarea fields, but hide the labels of all fields.

4

Support for RTL (right-to-left) languages

This add-on will work on all RTL languages.

5

About

This add-on will hide all labels, it will not remove them.

Works only with PHP and CSS, no unnecessary JavaScript.

Get Profile Builder Placeholder Labels Add-On

The post Replace form labels with placeholders using Placeholder Labels Add-On for Profile Builder appeared first on Cozmoslabs.

WordPress Admin Approval based on User Role with Profile Builder

$
0
0

Admin Approval for new users is one of those must have features for every website that allows user registration. Sometimes, deciding who gets to be a user on your website is a good way to keep your user base clean and fight user registration spam.

Taking it further, there are times when you need to approve only certain types of users (user roles) and allow the rest to register without any approval. It’s when admin approval based on user role comes into play.

When to use Admin Approval based on User Role?

A common scenario is when you need to allow registration of two distinct types of users, let’s say Consumers and Service Providers. Each user group should have a unique role, profile type and a separate registration page with different fields.

Setting up multiple registration forms with different user fields and also making sure users who register through different forms will get different roles assigned is something we already discussed in this tutorial.
The Multiple Registration Forms module for Profile Builder was designed with this scenario in mind.

The next step would be to figure out how to set up Admin Approval based on User Role, so that only Service Providers need to be approved by an administrator. Consumers should skip approval upon registration.

Setting up Admin Approval based on User Role with Profile Builder

Profile Builder allows you to enable admin approval per user role.

After installing the plugin, simply navigate to the “General Settings” tab and activate Admin Approval. Once active, you’ll be able to select the user roles which will require admin approval upon registration. In our case, Service Providers.

admin_approval_based_on_user_role

Click “Save Changes” and you’re done.

Service Providers will now need to have their account approved by an administrator. All users requiring admin approval will be listed under the “Admin Approval” page (Users > All Users > Admin Approval) from where they can easily be approved/unnaproved by an admin.

admin_approval_based_on_user_role_1

Note: For creating custom user roles tied to a subscription plan and even accepting paid accounts, have a look at Paid Member Subscriptions, it’s free and fully compatible with Profile Builder.

Admin Approval feature is part of Profile Builder Hobbyist or Pro.

The post WordPress Admin Approval based on User Role with Profile Builder appeared first on Cozmoslabs.

How to Redirect Users after Login & Registration in WordPress

$
0
0

If you own a WordPress site that allows front-end user registration you’re probably looking for an easy way to redirect users after certain actions, like successful login, registration or edit profile, to custom pages and also keep them out of the WordPress dashboard.

pb-custom-user-redirects
Using the new and improved Custom Redirects module from Profile Builder, you can control to a high extend where to redirect users based on their actions.

In this tutorial we’ll go through the different types of custom redirects you can setup.

Types of WordPress User Redirects

The Custom Redirects module supports a couple of redirect types based on certain user actions, as listed below:

  • After Login – redirect users after successful front-end login
  • After Logout – redirect users when logging out
  • After Registration – redirect users after successful front-end registration
  • After Edit Profile – redirect users to a custom page after they edited their front-end user profile
  • Dashboard – redirect users when trying to access the WordPress dashboard
  • After Password Reset – to redirect users after they successfully changed their password
  • After Email Confirmation – to redirect users after confirming their email address

pb-custom-redirects-types
Now that we listed the type of user actions where we can apply our custom redirects, we’ll look into how to target only certain users, based on redirect filters like user role, username or user ID.

Redirect User based on Username or User ID

One of the most focused types of user redirects is when you need to target only specific usernames, or user IDs.

cr2

Under Custom Redirects -> Individual User Redirects you’ll be able to select which users are redirected to which link after a certain action. You can target a specific user by entering his username or user iD.

Redirect Users based on User Role

Let’s say you have a registration form where users ca select their user role (using the User Role Select field) and you want different roles to be taken to different pages after registration.

cr3
Or in case you allow users to sign up for paid accounts using Paid Member Subscriptions with Profile Builder, they will automatically get the user role of the selected subscription plan at registration. Which means users selecting different plans will have different user roles.

pms_pb_register_page
By setting up custom redirects based on user role, you can choose where to redirect users based on which membership plan they applied for at registration.

As you can imagine, the use cases for redirecting users based on user role are countless.

Global WordPress Redirects

These redirects rules are applied globally, when there are no more specific rules defined, like redirects based on username or user role.

cr4

Redirect Users on default WordPress pages

Besides the front-end user redirects listed above, you’ll probably want to keep your users from seeing or accessing the (backend) default WordPress pages like:

  • Login (wp-login.php) – redirect users to the front-end login form created with Profile Builder
  • Register (wp-login.php?action=register) – redirect users to the front-end register form
  • Lost Password (wp-login.php?action=lostpassword) – redirect users to the front-end lost password form
  • Author Archive (http://sitename.com/author/admin) – this has been a common request from Profile Builder users, to be able to redirect people trying to access an author archive to that author profile page, basically the single userlisting template.

cr5

The new Custom Redirects module from Profile Builder has also a list of available tags which can be used for creating dynamic URLs:

  • {{homeurl}} – generates a url of the current website homepage.
  • {{siteurl}} – in WordPress the site url can be different then the home url
  • {{user_id}} – the ID of the user
  • {{user_nicename}} – the URL sanitized version of the username, the user nicename can be safely used in URLs since it can’t contain special characters or spaces.
  • {{http_referer}} – the URL of the previously visited page

Custom Redirects Priority

Which redirect happens depends on the following priority:

  1. Individual User Redirects
  2. User Role based Redirects
  3. Global Redirects
  4. Individual redirects defined in shortcodes or in the Multiple Registration and Edit Profile form settings. (redirect_priority=”top” parameter can be added in any shortcode, then that shortcode redirect will have priority over all other redirects)

Note: If you’re an existing Profile Builder user, by upgrading your old custom redirects settings will be ported over.

This sums up all the user redirect types which can be set using the Custom Redirects module from Profile Builder Pro.

Which type of redirects do you use more often? Let us know in the comments section below.

The post How to Redirect Users after Login & Registration in WordPress appeared first on Cozmoslabs.

Placeholder Labels Add-On for Profile Builder Updated – now with support for Login Forms and Widget

$
0
0

icon-150x150

Placeholder Labels Add-On hides all Profile Builder form labels and adds for each form field a placeholder with the title of the field.

This can help you reduce clutter on the page, or shorten the length of your forms.

Note: Requires at least Profile Builder 2.1.9, free or premium.

Version 2.1 released:
Added support for Login Forms and Widget.

Placeholder Labels Add-On now works on all Profile Builder forms (even on Login Widget).

pbpl-login

Find out more about Placeholder Labels Add-On

Get Profile Builder Placeholder Labels Add-On

The post Placeholder Labels Add-On for Profile Builder Updated – now with support for Login Forms and Widget appeared first on Cozmoslabs.


WordPress Social Login – A Case for Better User Engagement

$
0
0

Enabling WordPress Social Login can easily increase the user engagement with your website. And it all has to do with users forgetting their password. Apparently there's a thing called "password fatigue" and your website might be suffering from it. It's one of the main cases for activating WordPress social login. Any site that requires users […]

The post WordPress Social Login – A Case for Better User Engagement appeared first on Cozmoslabs.

Tribulant Newsletter – Profile Builder Addon

$
0
0

An integration with the WordPress Newsletter plugin developed by tribulant.com has been made into the Profile Builder plugin to capture subscribers through registration forms. A new field "Newsletters" is now available in Profile Builder -> Manage Fields, allowing your users to also subscribe to various newsletters offered on your site. It is offered as a […]

The post Tribulant Newsletter – Profile Builder Addon appeared first on Cozmoslabs.

How to Load a Login, Edit Profile or Registration Form in a Popup

5 Ways User Profiles Add Authority to Your WordPress Site

$
0
0

WordPress continues to offer an astounding array of choices and customization options for website owners. One option in particular can help add authority to your site and create an improved user experience for your site visitors: enabling user profiles. Allowing your repeat visitors to create their own user profiles can help make your site “the […]

The post 5 Ways User Profiles Add Authority to Your WordPress Site appeared first on Cozmoslabs.

Moving Forward with Profile Builder 2.3.8

$
0
0

When using a WordPress plugin there are times when a small extra feature is all you need to finish your project.

If you’re in a hurry or simply are not a technical person, the last thing you want to do is spend time implementing a custom plugin that extends Profile Builder.

This year we’ve spent a lot of time improving the base version by fixing a lot of edge cases, adding compatibility with other plugins and making it more developer friendly. We’ve also pushed new features in the form of addons in order to keep the base plugin as clutter free as possible.

However, the last 3 Profile Builder releases have been focused almost entirely on adding new features to the base plugin:

  • 7 new extra field types
  • User listings are now filterable
  • Optimized User Listing for speed, making it 10x times faster on normal listings
  • Improved the User Listing search allowing you to exclude fields from the search
  • 7 New Extra Field Types

    Building complex registration forms just became a little bit better. Almost 7 times better.

    You now have access to :

    • Map Field
    • Currency Select
    • Custom Validation Field
    • Color Picker
    • Time Picker
    • Phone
    • Static HTML

    Almost all except the Map field, were variations of the existing fields. However if you need any one of them, you don’t have to worry about custom code any longer.

    Better User Listing

    Besides integrating the new extra fields with the User Listing module, behind the scenes everything changed.

    Faceted Filters based on custom fields

    Filtering users based on the custom fields filled during registration was always a pain point when using Profile Builder and the User Listing module. This is no longer the case with access to 4 filter types:

    • Checkboxes – with the possibility to narrow or expand the results
    • Select
    • Range
    • Search in a custom field

    user_listing_faceted_filters

    Faster Rendering for User Listing

    When abstracting a template system there will always be speed penalties from the overhead.

    We’ve reworked the entire base queries, making use of the default WP_User_Query class while still being able to expand our feature set. For sites with a lot of users (10k+) the new User Listing can be 10x faster.

    More options when searching

    Sometimes, searching in all the user fields makes it’s results irrelevant. There is also a MySQL limit on how many JOIN causes you can call, braking the search for sites with 50+ extra fields. Previously removing extra fields from search results was possible with a filter, now you can do the same thing directly from the UI

    userlistin_search_filter

    Moving forward

    By bringing these features to Profile Builder, we’re making room for even more improvements in the near future.

    In the mean time, test out the new fields and user listing on our demo site

    The post Moving Forward with Profile Builder 2.3.8 appeared first on Cozmoslabs.

Viewing all 114 articles
Browse latest View live